Download
1 / 15
150 likes | 194 Vues
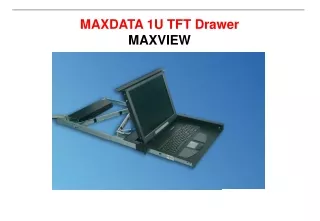
Integrated TFT drawer with touchpad, mechanical switch for automatic display turn off, rack-mountable design with full extension slides and IP20 protection.

E N D
MAXDATA 1U TFT Drawer MAXVIEW
TFT Drawer Resolution 17”: 1280 x 1024 SXGA OSD (On Screen Display) for configuration of display TFT with analog HD-Sub 15 pol. interface Integrated, country specific, keyboard with touchpad touchpad with left and right mouse button mechanical end switch turn off the display automatically
600 - 1000 mm rack size as standard Little mounting depth 17”: 410 mm Slided in TFT display is protected Form fitted full extension telescopic slides handle with Logo on the front
Scope of delivery : 1x 17” TFT drawer 1x VGA cable with SUB HD 15 connector 1x Mains cable 1x Cable for VGA/PS2/PS2 1x 19" mounting set 1x Two-point hinged cable router 2x Mounting bracket 1x Manual & Installation guide
Dimension Width 485 mm Depth 440 mm Height 44 mm Weight 10,5 kg Degree of protection IP 20 Material Sheet steel Colour: Powder-coated textured RAL 9011 485 - 850 440 580 465
Connectors on the rear side • Features • Monitor SUBD15 (female) Power IEC 320 Keyboard/Mouse double PS/2-PS/2 (MiniDin6) single USB1.1 (Typ B) • cable length • power cable 2 metres • VGA/PS-2/PS-2 3 meters
Touchpad touchpad with integrated right click and scroll bar function and separate left and right mouse button
Keyboard • ! physical characteristics ! • wear-resistant lettering (Laser-burning-technology) • different country codes available • Ergonomicaly industry keyboard • PS/2 or USB • Optionally features (NumBlock- NB Versions): • With seperate Numblock • SUN Keyboard with Numbblock and SUN - Function keys
Mechanical Features • ergonomically handle on the frontpanel • full fitted telecopic railes • special safty hinghes • easy open 30NM • save close 40NM
Mechanical end switch turn off the display automatically • 240V AC is only the display switched off • 48 V DC is the complete drawer incl. the power supply
Slave KVM Slave KVM Connect the keyboard, monitor, and mouse to the master unit KVM connector, using the appropriate KVM cable. Connect CPU port #1 on the master unit to the KVM connector on Slave unit #1 using a VGA PS/2 to VGA PS/2 expansion cable. Connect the next sequential CPU port on the master unit to the KVM connector on the next sequential Slave unit. Connect the remaining Slave units to the master unit. CPU cable CPU cable Master KVM CPU cable KVM cable KVM-1 Station
Cascade and operate the Maxview together with a VISTA KVM Switch • Installation • Installation of the Vista switch consists of the following steps: • It is recommended that the CPUs be powered off. • 1. Connect the KVM station to the Vista Switch(Connect the power adapter). • 2. Connect the CPUs to the Vista switch. • 3. Sequentially apply power, boot the CPUs. • 4. Verify keyboard, mouse and CPU operation.
Computer select • To select a computer from your keyboard, press and release the left <Ctrl> key and then type in the computer number (1-8). • Check if there is <NUM Lock> activated on the Keyboard!!!! • The MAXVIEW TFT Drawer has an numeric keypad. You can`t switch with the NUM Block. • You must press and release the left control key before you press the key that specifies the port number. You must also use the numeric • keys above the alphabetic keys, not those on the numeric keypad.
Computer Select on KVM “MASTER” <Ctrl> x (x = 1, 2, 3, 4, 5, 6, 7, 8) Connects your keyboard,video monitor, and mouse to he selected computer Computer Select on KVM “SLAVE” 1, select the cascaded Port <Ctrl> x (x = 1, 2, 3, 4, 5, 6, 7, 8 –) 2, select the Port on the Slave KVM <Ctrl> <X> x (x = 1, 2, 3, 4, 5, 6, 7, 8) Connects your keyboard,video monitor, and mouse to the selected computer.