Getting Started with ISIS Data Warehouse at College of Engineering
This guide provides an overview of how to access and utilize the ISIS Data Warehouse at the College of Engineering. It covers essential steps like connecting to the databases, configuring ODBC with departmental contacts, and navigating the setup process. You'll learn how to create a new Access Database for student information, link tables from the warehouse, and generate queries for specific data. Additionally, contact information for support and training resources is included to ensure a smooth experience.


Getting Started with ISIS Data Warehouse at College of Engineering
E N D
Presentation Transcript
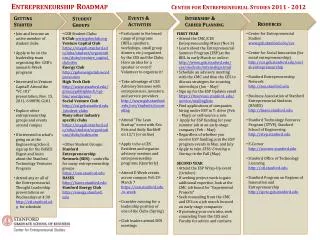
Getting Started College of Engineering ISIS Data Warehouse User Group Ida O’Donald Minority Engineering Program 865-7138 imodo@engr.psu.edu
Are you connected? • Contact Walt Beatty for security to connect to the warehouse databases • 863-0411 or wjbdo@engr.psu.edu • Contact ECS or your Department’s Technical Contact for ODBC configuration • Jerry Ciolkosz • Joe Lanager • Holly Benscoter • For ODBC instructions, visit http://www.ecs.psu.edu/training/ISIS/Documentation/ODBCSetup.htm
Create Your Database • Get Access training(http://www.ecs.psu.edu/training) • Open Access Database to link the tables and create queries • Create a new Access Database just for student information • Create a new database using “Blank Access database”
Link to Databases • Click on “File” • Under “Get External Data” • Choose “Link tables”
Find ODBC connection • Under “Files of type” • Choose “ODBC databases” • which is at the bottom
Select Data Source • Click on “Machine Data Source” tab • Choose “ENGR_WAREHOUSE” • Click “OK”
SQL Server Login • Click on “Use Trusted Connection” box • Click “OK”
Choose your tables • Click table you want to use from the list • Click “OK” or “Cancel” for each table you are linking.
Which table? • dbo.AIDAA_SP_SU_FA_* • Tables of prospective ENGR studentswho have applied to Penn State • dbo.CLASS_LIST_* • Tables of students who enrolled in ENGRwith a course field • dbo.CODES_* • Tables of some codes and what they represent(i.e., “AA” = “Altoona” in “CAMPUS_LOCATIONS”) • dbo.*SLCT • Tables of ENGR students who are enrolledfor that semester • dbo.FOLLOWUP_LETTERS • Tables of prospective ENGR students whohave been offered admission to Penn State • dbo.OFFICIAL_ENROLLMENT_* • Tables of ENGR students who are officiallyenrolled at Penn State • dbo.userids • Tables of students and their CAC address • dbo.transcript_view • includes students, their courses taken and their grades. • dbo.enrollment_view • includes the current semester's Select table information. It is used so that queries/reports using this table as the source will not have to be updated each semester with a new current semester name. The table name will stay the same, and the data will be updated each semester. A field has been added to let you know what semester is being reported.
Select Unique Record Identifier • Click “OK” or “Cancel” for each table you are linking
You are Linked • The “globe icon” illustrates that you are linked to a table • Double click on table to view data • Click “Queries” to create requests for specific data