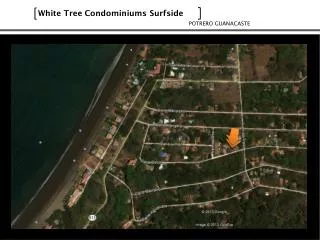
LAS SALINAS CONDOMINIUMS
LAS SALINAS CONDOMINIUMS. Key West Florida. Featuring. A Sprayed Polyurethane Roof System Applied To Concrete. Installed By. WeatherTight Roofing. An aerial view of the project. The preliminary gathering of our equipment at the site. We have covered the cars in the

LAS SALINAS CONDOMINIUMS
E N D
Presentation Transcript
LAS SALINASCONDOMINIUMS Key West Florida
Featuring A Sprayed Polyurethane Roof System Applied To Concrete
Installed By WeatherTight Roofing
The preliminary gathering of our equipment at the site
We have covered the cars in the parking lot to protect them from over spray
This is what the old roof looks like before we install the new SPF roof! The inside of the mansard is rotted and has to be replaced All new vents will be made in our metal shop
The inside of the mansard has been ripped apart and will be rebuilt
We are cutting the roof into square sections for easy pick up and removal
Our Bobcat starts digging up the concrete roof
The crew is loading the lightweight concrete to bring over to the debris boxes
Look at this mess!
Here the guys are loading the slabs of lightweight concrete into our specially built debris boxes
The debris is piled into our boxes to be lifted to the dumpsters on the ground
Our crane is lifting our custom built box to the dumpster below
There is so much debris we have 2 cranes taking it off the roof! We use safety lines around the perimeter of the building
Another load to the dumpster
These are the hurricane approved equipment stands waiting to be installed We are rebuilding the dormers
The concrete is being scarified to prepare it for the primer coat
The primer has been sprayed and the mansard has been rebuilt
The equipment stands are in place and are primed and the concrete is primed and ready to accept the sprayed polyurethane foam
This area is called a “cricket” and is used to direct all water to the drain
We foam in all the protrusions first A “cricket” These are the vents we custom make in our metal shop
The white strips indicate how we will build up the foam for water drainage One of several drains Everything that sticks out of the roof is pre-foamed which will prevent future leaks
We like to foam the corners first The screen they are holding prevents over spray
We are always trying to prevent over spray
The equipment stands are wrapped, primed and ready to be foamed in
A perfect example of how the equipment stands and vents look after being foamed in
We are spraying the parapet wall. The men are holding screens to prevent over spray
The base coat is being applied on the parapet walls as well as on the roof
A great contrast between the silicone and the top coat with granules
This shows the preparation of our 3”-2”-1” water management system This broad tan area will have 3” of foam. The gray area will have 2” of foam and then there will be 1” of foam in the small box around the drain. This will insure positive water drainage!
A beautiful roof! The roof has been done except a small part in the upper right corner. The only thing left to do are the dormers and install the A/C units
As shown in the next few slides the dormers will be rebuilt with steel covered tiles
The finishing touches are now being completed and the dormers are ready for the tile installation
The roof and all tile work is now complete
WAIT! There’s More!!!
BUT! IT IS TRUE!
BAYERAGThe Global Fortune 500 Company And Its North American Subsidiary BAY SYSTEMS NORTH AMERICA
Along WithWeatherTight Roofing “FOR TWO YEARS IN A ROW THE TOP APPLICATOR IN THE US”