Making a Book Cover
Making a Book Cover. Using only PowerPoint A P i A Presentation By Paul G Day. Making a Book Cover. Using only PowerPoint A P i A Presentation By Paul G Day. For normal novel size set your page to portrait.


Making a Book Cover
E N D
Presentation Transcript
Making a Book Cover Using only PowerPoint APiA Presentation By Paul G Day
Making a Book Cover Using only PowerPoint APiA Presentation By Paul G Day
Insert a box and with rulers enabled, set your frame size to 9 by 6 inches. Note: You can remove this frame later. It’s used as a guide only.
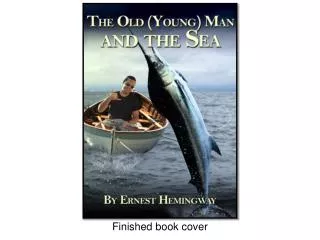
Insert your background image. In this example I am using my book “The Last Boy Fairy”.
Double click the image and select “crop” from the menu. Then crop your image and enlarge to fill the frame.
Add a new slide, minus the frame. This is where you will add some of the other images to be used as layers for your cover.
In this new blank slide, insert the first image you want to use. In this case it is the black crow.
Now copy and paste the crow from your blank slide into your original slide. Notice that the background is not transparent. You can fix this easily in PowerPoint.
Double click on the crow image. On the far left of the menu, select remove background. You’ll notice the background will turn pink. The pink areas are the ones which will become transparent once you remove the background, leaving only the image.
Now return to the blank working slide where you placed the crow and insert the third image. In this case it is a fairy boy riding a warrior grasshopper.
Again double click on this image and click “remove background”. This will require some mucking around to get it right and requires some practice. My suggestion is to use images with a white background at first. Unfortunately I cannot screen grab remove background in action, so you will simply have to try it to see for yourself
When you click the click the “remove background” icon, three new icons will appear. These allow you to pick which elements to keep and which to ditch.
This will take some practice, but eventually you can remove all the unwanted elements from the image and then it is ready to paste into your cover.
Now return to your main cover slide and introduce this new element by copying and pasting it into the slide.
Now this is where it gets a little tricky and requires some practice and patience. Position the new image layer roughly where you want it to appear. Notice how it does not quite yet look how you want it to.
Move the new image away from the second image to make it easier to work with that image. Then double click on the crow and crop it so that only the head and part of the left wing are in the frame.
Now, before you go any further, copy this image and then undo the cropping so that the crow returns how it was.
Now paste the cropped image over the original. Note that it still appears the same, but there should be a smaller working frame around it. Now reposition the boy fairy and note that he is now behind the head and wing of the crow.
Resize the boy fairy image so that he sits snugly behind the head of the crow. Now double click on the head and shoulder wing of the crow.
Using “remove background”, remove the parts of the crow that interfere with the left leg, saddle and chains of the boy fairy so that they now appear in front of that part of the crow. Note that the rest of the boy’s body is now snuggly behind the head and wing, as they should be.
Now you are ready to add the title and author and we are almost done.
Last Boy Fairy Add your text for the title, minus the word “The”.
Last Boy Fairy Enlarge the font until you are happy with the size.
Last Boy Fairy Now choose a font type you want. In this case I used Bernard MT Condensed
Last Boy Fairy Change the font to the desired color and then place an outline around the text by clicking on “text outline” on the menu.
Last Boy Fairy Now you need to add a shadow to the text to make it stand out more.
On the menu, click on “text effects” and choose “Shadow Options” right down the bottom.
Set the shadow exactly how I have done in the “Format Text Effects” call up menu. Then click close.
Last Boy Fairy You should now have a shadow on your text, which helps make it stand out against the background, but with just enough transparency so as to not dominate the cover.
Last Boy Fairy Now select all but the first letter of each word and reduce the size to about half.
Last Boy Fairy Last Boy Fairy Copy and paste the title so as to retain all the adjustments you have made to the font.
Last Boy Fairy Last Boy Fairy Copy and paste the title (twice) so as to retain all the adjustments you have made to the font. Last Boy Fairy
Last Boy Fairy The Now change one title to “The” and the bottom one to your author name. Paul GDay
The Last Boy Fairy Reposition and then resize the “The” and place it where you want in the title. Paul GDay
The Last Boy Fairy If you are not happy with the size or position, select both titles and adjust accordingly. Paul GDay
The Last Boy Fairy You can now add a short blurb on the cover, but it isn’t necessary. Congratulations, you now have the skills you need to make a book cover using only PowerPoint. Born the last of his kind Bound by an unlikely friendship Destined for greatness Paul GDay
The Last Boy Fairy Born the last of his kind Bound by an unlikely friendship Destined for greatness Paul GDay
To get the actual PowerPoint presentation, along with all the elements used, visit PiA (Published Indie Authors) or go to the Author Blog of Paul G Day. www.authorpgday.wordpress.com www.publishedindieauthors.wordpress.com