Download
1 / 34
400 likes | 772 Vues
Laser Capsure Microdissection (LCM) Principle and Application.

E N D
Laser Capsure Microdissection (LCM) Principle and Application
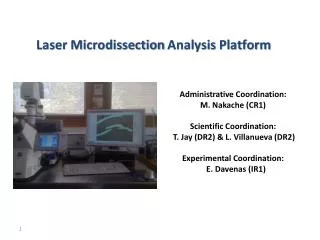
The PixCell® II performs Laser Capture Microdissection (LCM) from heterogeneous tissue samples simply, quickly and precisely. In minutes, you can locate a single cell or large groups of cells and, using a simple aim-and-shoot method, extract them for subsequent molecular analysis. LCM preserves the exact morphologies of both the captured cells as well as the surrounding tissue. The PixCell II transfers cells from paraffin-embedded and frozen tissue samples, stained and immunolabelled slides. Monitor and document the entire process, and store images in the archiving workstation. Microdissect fluorescently-stained cells with the optional fluorescence package.
The goal of LCM Use a rapid and accurate method to obtain homogenous cell populations of individual cells or cell clusters from tissue specimens For DNA, RNA and protein extraction and then use for microarray, RT-PCR, Western blot analyses.
Type of laser used A near infrared , solid state laser dipole.(812 nm wavelength) The laser produces short , controlled burst of light that soften the thermoplastic film in localized areas. The temperature of the thermoplastic film reaches 60-80°C at the site of the laser pulse. No water or molecular dissociation absorption peaks associated with this wavelength. The laser may not damage samples by destroying tissue or nucleic acids.
The time of laser last >1010 shots 5000 pulses/cap, 5000cap/year, 400 years. 5000x5000x400=1x 10¹⁰ Laser beam diameter 7.5 mm, 15 mm, 30 mm Objectives microscope 4X, 10X, 20X
How does LCM work? 1. Cells can be microdissected through capture on thermoplastic film(ethylene vinyl acetate polymer, EVA). 2. A focused laser pulse activates the adhesiveness of the film localized to an area down to a resolution of 7.5 mm. 3 . Cells are captured and transferred to the film in the spot that the film was activated, then the cells are lifted off the section and placed directly into DNA, RNA or enzyme buffer for processing. 4. Cells are not directly impacted by the laser, only the transfer film is.
Method: • Placing a thin transparent film (ethylene vinyl acetate polymer, EVA) over a tissue section, visualizing the tissue microscopically. • 2. Selectively adhering the cells of interest to the film with a fixed-position, short-duration, focused pulse from an infrared laser. • 3. The film with the procured tissue is then removed from the section and placed directly into DNA, RNA or enzyme buffer for processing.
1. Prepare • Follow routine protocols for preparing a tissue or smear on a standard microscope slide. Apply a Prep Strip™ to flatten the tissue and remove loose debris prior to LCM
2. Place • Place a CapSure™ HS onto the tissue in the area of interest. The CapSure™ HS is custom designed to keep the transfer film out of contact with the tissue
3. Capture e • Pulse the low power infrared laser. The laser activates the transfer film which then expands down into contact with the tissue. The desired cell(s) adhere to the CapSure™ HS transfer film. Puls
4. Microdissection • Lift the CapSure™ HS film carrier, with the desired cell(s) attached to the film surface. The surrounding tissue remains intact
5.Extract • Pipette the extraction buffer directly into the microcentrifuge tube and place the Capsure on the top of the tube.
6. Analyze • Invert the microcentrifuge tube. After centrifuging, the lysate will be at the bottom of the tube. The cell contents, DNA, RNA or protein, are ready for subsequent molecular analysis.
Paraffin Embeded Tissue · Fixed in 4% paraformaldehyde in 0.1M PBS solution or 10% formalin or 70% EtOH overnight · Dehydrated with EtOH in gradually increased concentrations 1. 70% EtOH 1 hr 2. 80% EtOH 1 hr 3. 90% EtOH 1 hr/ 2 times 4. 100% EtOH 1 hr/ 3 times 5. Xylene 1 hr/ 2 times 6. Paraffin-infiltrated 1.5 hr/ 2 twice (paraplast, Oxford , USA) 7. Embeded into paraffin block (paraffin Wax, Nippon, Japan)
Preparation of sample for LCM different from standard histology preparation • Frozen tissue • Tissue MUST be frozen quickly after biopsy to prevent RNA , Protein degradation. After sectioning, mount the section on a new slide, but • DO NOT allow the tissue to thaw. • Paraffin embeded tissue: • Paraffin sections MUST NOT be baked on the slides. • Alcohol-based fixation and/or rapid perfusion fixation is preferred. • 3. Use fresh reagents and solvents. • Pipet a few drops of stain directly on the tissues. • Slides are NOT cover slipped. • Sample must be dehydrated fully with graded ethanols and xylenes. • Proper storage conditions must be observed. Slides may be stored in a desiccator with desiccant.
De-Paraffinization of Tissue Section for LCM Section paraffin blocks at 5-10 microns. 5 microns is optimal for LCM, but the thickness should be dependant on the cell (nuclei) diameter that is being worked on. Place ribbons into a water bath at 42° to smooth out and eliminate folds and wrinkles. Mount sections on new, plain, uncharged, untreated glass slides. Air dry overnight at room temperature. Dip the slide containing the tissue section in the following solutions for the specified times. 1. Xylene 15 minutes 2. Xylene 15 minutes 3. 100% Ethanol 5 minutes 4. 100% Ethanol5 minutes 5. 90% Ethanol5 minutes 6. 80% Ethanol5 minutes 7. 70% Ethanol5 minutes 8. 50% Ethanol5 minutes 9. Water 1 minute
Hematoxylin and Eosin Staining for LCM Procedure 1. 70% ETOH 30 seconds 2. dH20 30 seconds 3. Hematoxylin 10 seconds 4. dH20 30 seconds 5. Eosin 5 seconds 6. 70% ETOH 30 seconds 7. 95% ETOH 30 seconds 8. 100% ETOH 30 seconds 9. 100% ETOH 30 seconds 10. Xylene 5 minutes 11. Xylene 5 minutes 12. Air Dry 20 minutes in a hood or vacuum desiccator * molecular sieve treated 100% Ethanol. The tissue sections are now ready for LCM. Store the samples in a desiccator when not in use.
DNA Extraction The following extraction method has been used for measuring loss of heterozygosity (LOH), dideoxy fingerprinting (DDF), clonality analysis (chromosome X inactivation) direct sequencing of PCR* products for single base mutational analysis. Extractions are typically performed on 500-1000 captured cells. Materials Proteinase K Digestion Buffer 1mg/ml Proteinase K 1% Tween 20 * in TE Buffer pH.8.0 *Detergent may interfere with amplification reactions with a small number of commercial DNA polymerases.
Procedure 1. Pipet 50 ul of proteinase K digestion buffer into a microfuge tube. 2. Place the tube up-right in a humidified incubator at 37-42°C for 5 minutes to preheat. 3. Place the CapSure Transfer Film cap onto the microfuge tube with the insertion tool. 4. Invert the microfuge tube and flick down the digestion buffer until all the fluid is in contact with the surface of the cap containing the sample. 5. Incubate overnight in the humidified incubator at 37-42°C. 6. Centrifuge for 5 minutes at a maximum of 6400 rpm (2000xg) to collect the fluid and DNA. 7. Remove the transfer film cap and visually inspect under the microscope to verify that all cells have been digested (no cellular material remains on the transfer film areas of capture). 8. Inactivate the proteinase K by heating the microfuge tube at 95°C for 10 minutes. 9. Sample is now ready to go directly into amplifications or into other applications.
DNA Yield: 3000 transfer shots 1300ng 2500 transfer shots 800ng 1500 transfer shots 580ng 750 transfer shots 300ng
RNA Extraction (NIH Protocol) Materials GITC digestion buffer (final concentrations listed) · 5.25M GITC (guanidinium isothiocyanate) · 50mM Tris-HCl pH 6.4 · 20mM EDTA · 1% Triton X-100 · 0.1M -Mercaptoethanol (added fresh with each extraction) 2M Sodium Acetate (NaOAc, pH 4.5) Phenol - water saturated Chloroform-isoamyl alcohol Glycogen Isopropanol Ethanol DEPC water
RNA Extraction (NIH Protocol) Procedure 1. Place the cap in a reagent tube containing 200 ul RNA denaturing buffer(GITC) and 1.6 ul -mercaptoethanol. Invert several times over the course of 2 minutes to digest the tissue off of cap. 2. Remove the solution from the reagent tube and replace it in a 1.5 ml tube. 3. Add 20 ul (0.1X volume) 2M sodium acetate (pH 4.0). 4. Add 220 ul (1X volume) water saturated phenol (bottom layer). 5. Add 60 ul (0.3X volume) chloroform-isoamyl alcohol. 6. Vortex vigorously. 7. Put on wet ice for 15 minutes. 8. Centrifuge for 30 minutes at 4°C to separate the aqueous and organic phases. 9. Transfer upper aqueous layer to a new tube. 10. Add 1-2 ul glycogen (10 mg/ml). Glycogen is a carrier that is used if RNA quantities are less than 1 ug. It also facilitates visualization of the pellet. 11. Add 200 ul cold isopropanol. 12. Put in -80°C freezer for at least 30 minutes. It may be left overnight.
13. Centrifuge for 30 minutes at 4°C with cap hinges pointing outward so that the location of the pellet can be better predicted. 14. Remove the majority of the supernatant with a 1000 ul tip and then switch to smaller pipet to remove the rest of the supernatant. This minimizes disruption of the RNA pellet. 15. Wash with 400 ul cold 70% Ethanol. Add the alcohol and spin for 15 minutes. 16. Remove the supernatant as explained above. All of the supernatant should be removed at this point. 17. Let the pellet air dry on ice to remove any residual ethanol. Over drying prevents the pellet from resuspending easily. 18. Pellet can be stored at -80°C until use. 19. (optional) Resuspend pellet with DEPC water.
DNase Treatment (optional) 1. To RNA pellet, add 15 ul DEPC water, 0.5 ul of 40 units/ul rRNasin RNase inhibitor, 2 ul 5X DNase buffer ( 400 mM Tris-HCl pH 8.0 , 20 mM DDT, 100 mM MgCl2) and 2 ul 10 units/ul DNase. 2. Incubate at 37°C for 2 hours.
Re-extraction of RNA 1. 2 ul 2M NaOAc 2. 22 ul Phenol 3. 6 ul Chloroform-isoamyl alcohol 4. Place on ice for 15 minutes. 5. Centrifuge 10 minutes at 4°C. 6. Transfer upper layer to a new tube. 7. Continue with RNA extraction from step 10.
LCM has advantages over other cell microdissection • Simple, no moving parts, no manual microdissection , one step transfer. • Retains its morphology, allowing microscopic verification of specificity of the capture material. • Able to microdissect cells from an area that was previously microdissected. • DNA, RNA and protein are all recoverable through LCM.
Applications utilizing LCM A valuable aid in cancer biology, neurobiology, genomics, experimental pathology, new drug discovery, and diagnostics. Research Applications Genomics Differential Gene Profiling Loss of Heterozygosity Microsatellite Instability Gene Quantification Proteomics Two-Dimensional Protein Gels Western Blotting Immuno-quantification of Proteins
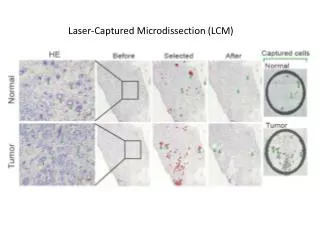
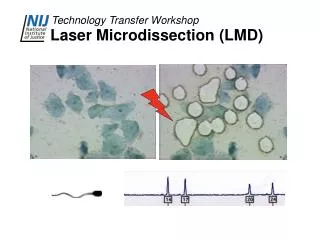
Loss of annexin 1 correlates with early onset of tumorigenesis in esophageal and prostate carcinoma. Paweletz et al. Cancer Res 60:6293, 2000
Before LCM After LCM Dissected cells on the cap
Further Referenceshttp://www.arctur.com Science 274: 998-1001 (1996) Science 278: 1481-1483 (1997) Trends in Genetics 14:272-276(1998) Nature Reviews (genetics) 1: 48 -56, (2000)
![[ Lab11] Character LCM](https://cdn1.slideserve.com/2614107/slide1-dt.jpg)