FlexiForce Pressure Sensor
FlexiForce Pressure Sensor. Ben Nadeau Chris Hashem Megan Joiner. Objectives. To educate and help our peers to complete their project To convert the output of an analog sensor to a digital input that can be read on a computer Light an LED with either an Analog or Digital Output Channel


FlexiForce Pressure Sensor
E N D
Presentation Transcript
FlexiForce Pressure Sensor Ben Nadeau Chris Hashem Megan Joiner
Objectives • To educate and help our peers to complete their project • To convert the output of an analog sensor to a digital input that can be read on a computer • Light an LED with either an Analog or Digital Output Channel • To calibrate our sensor in order to obtain a visual output using a Light Emitting Diode(LED)
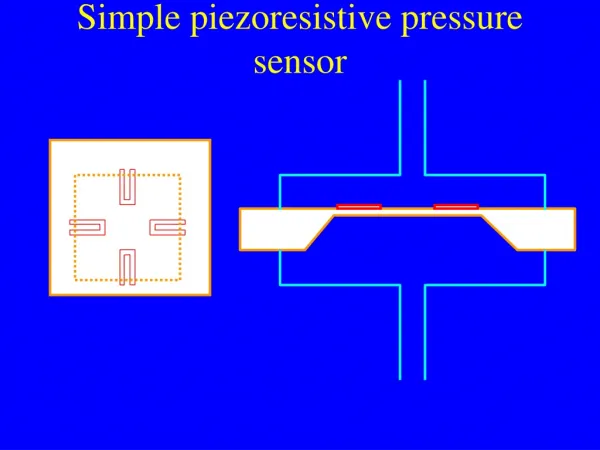
Our Sensor • FlexiForce Pressure sensor • The sensor acts as a variable resistance • The pressure applied to the sensor is inversely proportional to the resistance output by the sensor
Our A/D Converter • Arduino Mega microcontroller to do A/D conversion • Connects to the computer via USB • Has analog input pins • Outputs a digital signal to the computer that can be read in real-time
Original Program #define SENSOR 0 // select the input pin for the // sensor resistor intval = 0; // variable to store the value coming // from the sensor void setup() { Serial.begin(300); // open the serial port to send // data back to the computer at // 300 bits per second } void loop() { val = analogRead(SENSOR); // read the value from // the sensor Serial.println(val); // print the value to // the serial port delay(100); // wait 100ms between // each send }
LCD Screen • Hooks up directly to the Arduino using schematic below • 2x16 LCD Screen • 16 Pin Interface • Register Select (RS) pin • Read / Write (R/W) pin • Enable Pin • 8 Data Pins • Display Contrast Pin • Power Supply Pins • LED Backlight Pins
Calibration • Readout in Bits • To convert to Volts: • To calibrate, use equation: • Equation obtained from TekScan website • Ten LEDs divided over 1024 Bits determine light-up sequence
Program #define SENSOR 0 // select the input pin for the // sensor resistor #include <LiquidCrystal.h> //includes LCD library code // initialize the library with the numbers of the interface pins LiquidCrystallcd(32, 31, 25, 24, 23, 22); float val = 0;// variable to store the value coming // from the sensor float Bit=1023; //set value for amount of bits float volt=0; //set value to store calculated voltage float lbs=0; //set value to store calculated weight in pounds constintledCount = 10; //number of leds used intledPins[] ={ 2,3,4, 5, 6,7, 8, 9,10, 11}; //an array of pin numbers to which LEDs are attached. void setup() { lcd.begin(16,2); //sets up the LCD's number of collumns and rows reectively. lcd.print("weight in lbs:"); //rints message to LCD. for(intthisLed = 0; thisLed < ledCount; thisLed++) { pinMode(ledPins[thisLed], OUTPUT); } Serial.begin(9600); // open the serial port to send // data back to the computer at // 9600 bits per second } void loop() { val = analogRead(SENSOR); // read the value from // the sensor volt= val*5/Bit; //equation to convert incoming value to voltage lbs=24.2424*volt; //equation to convert voltage to pounds intledLevel = map(lbs, 0, 100, 0, ledCount); //map the result to a range from 0 to the number of LEDS // loop over the LED array: for (intthisLed = 0; thisLed < ledCount; thisLed++) { // if the array element's index is less than ledLevel, // turn the pin for this element on: if (thisLed < ledLevel) { digitalWrite(ledPins[thisLed], HIGH); } // turn off all pins higher than the ledLevel: else { digitalWrite(ledPins[thisLed], LOW); } } Serial.println(lbs, DEC); // print the pound value to // the serial port lcd.setCursor(0,1); //sets cursor to column 0 lin 1(second row since counting begins with 0) lcd.print(lbs); delay(100); // wait 100ms between // each send }
Resources / References • http://www.arduino.cc/ • http://www.tekscan.com/flexiforce/flexiforce.html • http://www.arduino.cc/en/Tutorial/LiquidCrystal • http://www.sparkfun.com/ • myweb.wit.edu/johnsont • Zach Baron