Download
1 / 11
110 likes | 132 Vues
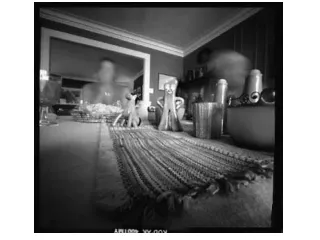
Criteria for Pinhole Photos: The photograph shows dramatic spatial separation between extreme foreground and background elements: it conveys a strong sense of depth. At least some elements in the photo are reasonably sharp, indicating that the camera did not move.

E N D
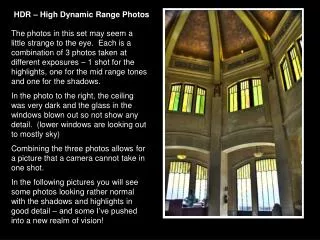
Criteria for Pinhole Photos: • The photograph shows dramatic spatial separation between extreme foreground and background elements: it conveys a strong sense of depth. • At least some elements in the photo are reasonably sharp, indicating that the camera did not move. • The exposure is good, meaning that you have a reasonable amount of shadow, highlight, and midtone detail, or that the photo at least has detail in the most important areas. • There is some “ghost” (that is, translucent) element in the photograph, created by including something in your composition that is not there during the entire exposure time. Related alternative: Aim your pinhole camera at two different subjects, each for half the recommended exposure time • There are some major compositional elements in your image which will lend themselves to effects of mirror symmetry.
Checklist: -put photo paper in the back of the camera, with the shiny side (the emulsion side) facing the pinhole (front of the camera) -tape camera to front of masonite board (for steadiness), after deciding whether to photograph with horizontal or vertical emphasis -find location with good lighting: scene has areas of detail with contrasting light and dark tones (note: exposure isn’t affected by whether the camera is in shadow or not; it’s affected by whether the scene/subject matter your camera is pointed at is in shadow or not) -determine appropriate exposure time, and time exposure with clock or watch
Troubleshooting: -negative comes out entirely black, or mostly black Possible causes: camera has a light leak, or you’ve miscalculated or mis-timed your exposure or used the wrong pinhole size, or the photo paper may have been fogged before you used it (unlikely!) To check for light leaks, place a piece of photo paper in the camera and bring the camera to a bright, sunny area. Leave it there for a few minutes. Return to the darkroom and process the piece of photo paper. It should come out completely white. If there is any black or light instead, stray light is coming into the camera. Check with the teacher for possible repairs. -image is blurry overall Almost certain cause: camera moved during exposure time. Make sure to tape your camera to a board. On very windy days, you might need to weight the board down. Never try to steady the camera by placing your hand on it during the exposure: this is not effective! -image is very faint Certain cause: underexposure. Double check lighting and exposure. Remember that, even though it may be a sunny day and you may be photographing outside, the intensity of light varies from place to place. Might you be photographing something in shade? If so, you’ll need to use a longer exposure time than the standard one suggested for bright sunshine: consult with the teacher, who’ll help by taking a meter reading that will give you the basis for calculating a more appropriate exposure time. -image is very dark, but there doesn’t seem to be any stray light fogging the paper Certain cause: overexposure. You may have mis-timed your exposure, or you may have used the wrong size pinhole (e.g., the larger instead of the smaller) by accident. It’s also possible that you’re photographing some very bright and highly reflective subject matter (e.g., white concrete) and will need to adjust your exposure time accordingly (shortening it somewhat). -image doesn’t include what you wanted it to include -Causes: miscalculation of what your camera’s angle of view would include; insufficient care taken to preview the scene from your camera’s vantage point. Your next step should be to evaluate this negative carefully, to learn more from it about your camera’s angle of view. Re-take the photograph, taking extra care to position it appropriately.