CPR
CPR. Course Goal The American Heart Association designed the Heartsaver AED Course to prepare a wide variety of people who, as first responders May need to perform cardiopulmonary resuscitation (CPR) in the workplace or similar settings

CPR
E N D
Presentation Transcript
Course Goal • The American Heart Association designed the Heartsaver AED Course to prepare a wide variety of people who, as first responders • May need to perform cardiopulmonary resuscitation (CPR) in the workplace or similar settings • May need to use an automated external defibrillator (AED) • May need to help someone who is choking • Want or need a course completion card
The Importance of CPR • Heart attack, drowning, electric shock, and other problems may cause a victim's heart to stop pumping blood. This is called cardiac arrest • Studies show that effective CPR right away improves survival from cardiac arrest. Most cardiac arrests happen outside the hospital, where bystander CPR is really important • You can make a difference, and the first step is learning CPR. You never know when you might need to use the CPR skills you learn for someone you know or even one of your loved ones
Who Should Take This Course • We created this course for anyone who needs to learn CPR, including corporate and retail employees, security, law enforcement, health and fitness staff, and anyone who needs a course completion card in CPR and AED
How This CourseIs Organized • You will learn CPR basics through this student workbook and the video for the course. You will have a chance to practice many times while the video guides you. When you are not practicing with the video, you may watch the video, watch the other students practice, or follow along in your student workbook. • During the course you will practice some skills. After you correctly demonstrate the skills taught in the course, you will receive a Heartsaver AED course completion card
Adult CPR • What You Will Learn • By the end of this section you should be able to give CPR to an adult. • Ages for Adult CPR • Adult CPR is for victims 8 years of age and older.
OVERVIEW • If you know when to phone your emergency response number (or 911) and how to give compressions and breaths, your actions may save a life. • There are basic steps in giving CPR: • Doing compressions • Giving breaths that make the chest rise
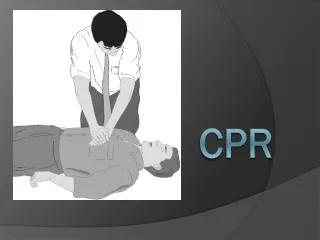
Compressions • One of the most important parts of adult CPR is compressions. • When you give compressions, you pump blood to the brain and heart.
Follow these steps to give compressions to adults • 1 Kneel at the victim's side. • 2 Make sure the victim is lying on his back on a firm, flat surface. If the victim is lying facedown, carefully roll him onto his back. • 3 Quickly move or remove clothes from the front of the chest that will get in the way of doing compressions and using an AED. • 4 Put the heel of one hand on the center of the victim's chest between the nipples (Figure 1A). Put the heel of your other hand on top of the first hand (Figure 1B).
Figure 1. Chest compressions. A. Put the heel of one hand on the center of the chest between the nipples. B. Put the other hand on top of the first hand
5 Push straight down on the chest 11/2 to 2 inches with each compression. Push hard and fast. • 6 Push at a rate of 100 compressions a minute. • 7 After each compression, release pressure on the chest to let it come back to its normal position. • Important • Push hard and push fast. • Push at a rate of 100 times a minute. • After each compression, release pressure on the chest to let it comeback to its normal position.
Open the Airway • When giving CPR you must give the victim breaths that make the chest rise. • Before giving breaths, you must open the airway with the head tilt-chin lift • Performing the Head Tilt-Chin Lift • Tilt the head by pushing back on the forehead. • Lift the chin by putting your fingers on the bony part of the chin. Do not press the soft tissues of the neck or under the chin (Figure 2). • Lift the chin to move the jaw forward.
Figure 2. Open the airway with a head tilt-chin lift
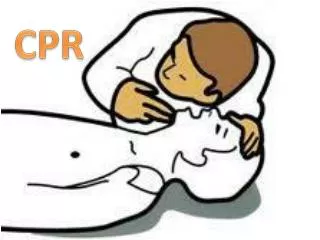
Giving Breaths • Your breaths give oxygen to someone who cannot breathe on his own. • Actions for Giving Breaths • Follow these steps to give breaths: • Hold the airway open with a head tilt-chin lift (Figure 2). • Pinch the nose closed. • Take a normal breath and cover the victim's mouth with your mouth, creating an airtight seal. • Give 2 breaths (blow for 1 second each). Watch for chest rise as you give each breath (Figure 3).
Compressions and Breaths • When you give CPR, you do sets of 30 compressions and 2 breaths. Try not to interrupt chest compressions for more than a few seconds. For example, • don't take too long to give breaths or use the AED
Putting It All Together • Make Sure the Scene Is Safe • Before you give CPR, make sure the scene is safe for you and the victim (Figure 4). • For example, make sure there is no traffic in the area that could injure you. You do not want to become a victim yourself.
Check for Response • Check to see if the victim responds before giving CPR. Kneel at the victim's side. Tap the victim and shout, "Are you OK?" (Figure 5).
Get Help • If the victim does not respond, yell for help. If someone comes, send that person to phone your emergency response number (or 911) and get the AED if available.
If no one comes, leave the victim to phone your emergency response number (or 911) and get the AED if available (Figure 6). Return to the victim and start the steps of CPR Figure 6. Phone your emergency response number (or 911) and get the AED if available
Once you have checked the victim for a response, you must check to see if the victim is breathing normally Open the victim's airway with a head tilt-chin lift.Check to see if the victim is breathing normally (take at least 5 seconds but no more than 10 seconds) (Figure 7).
Put your ear next to the victim's mouth and nose. • Look to see if the chest rises. • Listen for breaths. • Feel for breaths on your cheek. Figure 7. Look, listen, and feel for normal breathing
Special Situations • Gasps Are Not Breaths • In the first few minutes after sudden cardiac arrest, a victim may only gasp. • Gasping is not breathing.
Important • If the victim gasps when you open the airway to check breathing, continue the steps of CPR. The victim is likely to need all the steps of CPR.
If the First Breath Does Not Go In • If you give a victim a breath and it does not go in, you will need to re-open the airway with a head tilt-chin lift before giving the second breath.
After you give 2 breaths, you will give 30 compressions. • You will repeat the sets of 30 compressions and 2 breaths until • the AED arrives, • the victim starts to move, • trained help takes over.
Trained help could be someone whose job is taking care of people who are ill or injured such as an EMS responder, nurse, or doctor.
Side Position • If the victim is breathing normally but is not responding, roll the victim to his side and wait for trained help to take over (Figure 8).
Child CPR • A child is considered 1 to 8 years old • Some steps for giving CPR to an adult and child are similar here are a few differences. • When to phone your emergency response number (911) • Amount of air for breaths • Depth of compressions • Number of hands for compressions
When to Phone • If you are alone, do 5 sets of 30 compressions and 2 breaths before leaving the victim to phone your emergency response number (911). • This is different from adult CPR, where you phone first
Amount of Air for Breaths • For small children, you will not need to use the same amount of air as for larger children or adults. • However each breath should still make the chest rise.
Compressions • When you push on a child’s chest, press straight down 1/3 to ½ the depth of the chest. • You may need to use one hand for compressions for very small children