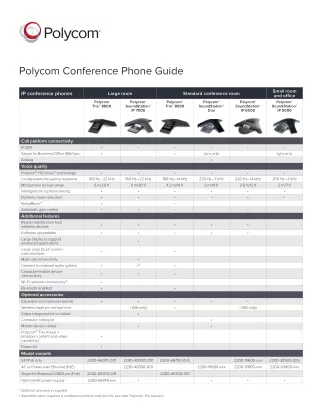
Polycom Guide
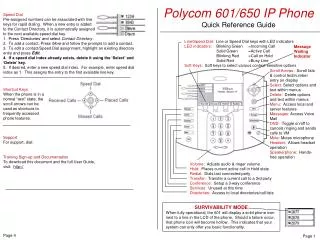
Polycom Guide. Polycom 601/650 IP Phone Quick Reference Guide. Speed Dial Pre-assigned numbers can be associated with line keys for rapid dialing. When a new entry is added to the Contact Directory, it is automatically assigned to the next available speed dial key.

Polycom Guide
E N D
Presentation Transcript
Polycom Guide Polycom 601/650 IP Phone Quick Reference Guide Speed Dial Pre-assigned numbers can be associated with line keys for rapid dialing. When a new entry is added to the Contact Directory, it is automatically assigned to the next available speed dial key. 1. Press ‘Directories’ and select Contact Directory. 2. To add a contact, Press More and follow the prompts to add a contact. 3. To edit a contact/Speed Dial assignment, highlight an existing directory entry and pressEdit. 4. If a speed dial index already exists, delete it using the ‘Select’ and ‘Delete’ key. 5. If desired, enter a new speed dial index. For example, enter speed dial index as 1. This assigns the entry to the first available line key. Line/Speed Dial: Line or Speed Dial keys with LED indicators LED indicators: Blinking Green =Incoming Call Solid Green =Active Call Blinking Red =Call on Hold Solid Red =Busy Line Soft Keys: Soft keys to select various context-sensitive options Message Waiting Indicator Scroll Arrows: Scroll lists & control text/number entry on display Select: Select options and text within menus Delete: Delete options and text within menus Menu: Access local and server features Messages: Access Voice Mail DND: Toggle on/off tocancels ringing and sends calls to VM Mute: Mutes microphone Headset: Allows headset operation Speakerphone: Hands-free operation Shortcut Keys When the phone is in a normal “rest” state, the scroll arrows can be used as shortcuts to frequently accessed phone features. Support For support, dial: Training Sign-up and Documentation To download this document and the full User Guide, visit:http:// Volume: Adjusts audio & ringer volume Hold: Places current active call in Hold state Redial: Dials last connected party Transfer: Transfer a current call to a 3rd party Conference: Setup a 3-way conference Services: Unused at this time Directories: Access to local directories/call lists SURVIVABILITY MODE When fully operational, the 601 will display a solid phone icon next to a line in the LCD of the phone. Should a failure occur, that phone icon will become hollow. This indicates that your system can only offer you basic functionality. Page 4 Page 1
Place a Call (3 ways) 1. Pick up the handset. 2. Press to use the headset 3. Press to use the speakerphone. Dial the desired number and press ‘Send’ to complete the call Answering a Call Pick up the handset, or press to use the headset, or to use the speakerphone Voice Mail New messages will be indicated by a flashing Message Waiting Indicator light. If you have multiple lines, individual line indicators reflect Voice Mails left on that line. Press the ‘Messages’ button to connect to the Voice Mail system. Dial _____________________to access Voice Mail when outside the system. If you are a new user to the Voice Mail system, see http:// for more instruction. Conference You may create a conference with two other parties. 1. Place a call to the first party. 2. Press ‘Conference’ to create a new call (the active call with automatically be placed on hold). 3. Dial the second party using the keypad, speed dial keys, missed/placed/received call list, etc.. 4. When the second party answers, announce that you are establishing a conference and press ‘Conference’ again to join all parties. OR You can create a conference any time you have an active and held call by pressing the ‘Join’ soft key. Note: Ending the call on the originator’s phone will end the conference. Putting the call on hold from the originator’s phone will hold all parties in the conference. Splitting a Conference When a conference has been established, press the ‘Split’ soft key to split the conference into two separate calls. The two calls will automatically be placed on hold. Soft Keys: Soft Key labels are listed on the screen & change depending on the situation. Main Display: Will display the date/time, missed calls, show incoming calls, the status of active/held calls, and more. Speed Dial Buttons: Contacts in your Directory will be assigned rapid dialing buttons. Line Appearances: Multiple appearance of your line allow you to see the status of several calls at once. Multiple Call Appearances Your phone is configured to show multiple call appearances. More than one appearance is useful if there is an active call and an incoming call arrives on the same line. In the example shown, an active outbound call is highlighted when an incoming call from 9307 appears. Transferring a Call You may transfer an active call to another party. 1. During a call, press the ‘Transfer’ button. 2. Dial the number to transfer the call to using the keypad, speed dial keys, missed/placed/received call list, etc.. 3. Press the ‘Transfer’ key again to complete the transfer. You may choose to wait until the 3rd party answers to announce the caller before completing the transfer. To answer the incoming call, put the original call on Hold or press to access the new call. Soft Keys on the Display will give options to Answer, Reject, or Forward the incoming call. Page 2 Page 3