Download
1 / 19
190 likes | 302 Vues
Writing With Symbols Contact information: brooslinj@sps.springfield.ma.us. Writing With Symbols is a talking word processor that has picture symbols for each word that is typed. Example. The Purpose:. Writing With Symbols provides: the teacher the ability to make visuals.

E N D
Writing With SymbolsContact information: brooslinj@sps.springfield.ma.us
Writing With Symbols is a talking word processor that has picture symbols for each word that is typed. Example
The Purpose: Writing With Symbols provides: • the teacher the ability to make visuals. • it allows students who can not read text to write using pictures. • it allows students to use a talking word processor
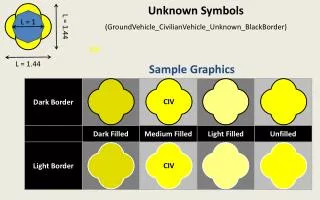
Features of WWS • Symbol processor – each word is accompanied by a picture. • Talking word processor- a word processor that reads the word after you type it. • Making grids – a printed grid can be created using symbols and text.
Teacher Created Materials: Writing with Symbols enables teachers to create the following materials: • Picture stories • Comprehension questions • Picture strips • Picture directions • Picture schedules • Social Stories
Symbol Processor • Open the program WWS 2000. • From the front screen, select symbol processor. • You can type a sentence.
Symbol Processor • You won’t get a picture symbol until you press the space bar after each word. • You can have more than one picture for each word. • You can choose the picture that you want to assign to a specific word. F12 changes the picture symbol.
Helpful Strategies • Depending on the student, you don’t need a picture symbol for each word. • You don’t want to overwhelm the student with too many pictures. • The program remembers your F12 preferences. If you displayed the word “the” without a picture symbol, “the” will automatically be displayed without a picture.
Renaming a symbol • Sometimes you can not find a picture for a particular word. You may be able to find another picture tat is being used with another word. • Type the word cat. • Put your cursor in the word “cat” • Press F11. The word cat disappears and now you can type a different word. • Then hit the right arrow key and continue typing the rest of your sentence.
Saving New Words • You can save the changes by going to “images” on the top of the screen and selecting “save word list changes.” • Select the word you want to save and click add.
Renaming a Phrase • You can use F11 to use one picture for a series of words. • Type dog and put the cursor in the middle of the word. • Press F11. • Now type Here is my dog Lucky. • The hit the right arrow key to finish writing. • The program can only save phrases that are 3 words long.
Setting the Toolbars • Go to “view” • Click on normal and additional view. • You can change text by changing the font, size, color, and style. • You can change the symbol size and color.
Settings • You can change the space between symbols by • going to OPTIONS and clicking “space between • images” • You can make the space small, medium, or large.
Using the Word Processor • The second button on the main screen is for the word processor. It is designed for: • Students who write in text but need visual support • Students who want to use pictures to go along with their writing • Students who need extra help in writing
Word Processor • You can change between symbol and text modes by pressing the F10 button. • Using Spell checker • Using speech – Click on the speech icon on the toolbar
Creating a Grid • On main screen, click on Grids for printing • You have 3 choices: • Select new grid • Create grid sizes • Type one word in each cell
Grids • Highlight the center block of cells. • Press CTRL + G to group them. • Group the top row of cells. • Now you can write a title or directions
Resources • www.widgit.com • www.speakingofspeech.com • www.mayer-johnson.com