Creating a new Database
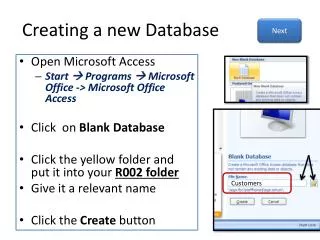
Creating a new Database. Next. Open Microsoft Access Start Programs Microsoft Office -> Microsoft Office Access Click on Blank Database Click the yellow folder and put it into your R002 folder Give it a relevant name Click the Create button. Customers. Importing Data. Back.

Creating a new Database
E N D
Presentation Transcript
Creating a new Database Next • Open Microsoft Access • Start Programs Microsoft Office -> Microsoft Office Access • Click on Blank Database • Click the yellow folder and put it into your R002 folder • Give it a relevant name • Click the Create button Customers
Importing Data Back Next • You will need to import data into your database. • Click on ‘External Data’ and import from a ‘Text File’ • Find the Customer data (In the shared area) • Student on EGA/ICT/Subject Resources/Year 10/R002/Assignment/MStreamIT files/customers • click Next • Select the ‘Delimited’ option and click next • Select Comma, and tick ‘First Row Contains Field Names’ • Click Finish!
Adding/Editing/Deleting Data Back Next • To add data, scroll to the bottom of the table. You will find a blank row starting with (New). Leave the (New) column and you can start to enter your data • To edit data, just find what you need to change in the table. You can simply change anything you need to. • If you can’t find it you could filter your data to help. • To delete data, right click on the square and click Delete Record. Be careful as you can not undo!
Adding, editing and Deleting Back Next • Task A: The details that need to be updated in the database are: • KudwickBoskohas moved abroad and has asked to cancel his monthly membership. • Rebecca Jackson has moved to: 29 Chester Road, Fleetwood, Blackpool, FY7 9PP. • Miss Phoebe Jacques, has just registered for the monthly subscription option. She lives at 9 Blackberry Close, Yate, South Gloucestershire, BS37 8YA. The certificate age block she has selected is ‘PG’. • Task B (complete only if you have finished this task): • Miss Jacques needs to be sent her new membership details. Create an address label so that the registration documents and membership details can be sent to her.
Filters Back Next • To find one record in your database you will need to apply a filter. • Click on the column that you wish to filter, then click the filter button • You can now select data that you require
Address Labels Back Next • Click Create and choose Labels • Choose the label size, then font style
Address Labels Back Next • Now you will need to set the layout of your label. Think about how labels are laid out on letters. • (Note: Don’t forget to add spaces) • Click Finish when you’re done • Examples of address labelsare below
Task 4: Finding Information Back Next • Adam would like to send some publicity information to all ‘Stream-as-you-go’ members who registered before April 2012. • Provide a list of contact details of customers who should receive this information, • Sort this information in alphabetical order of last name. • Provide evidence of how you produced your outcome.
Finding information (Queries) Back Next • To find information in a database you need to perform a database query • Make sure you have the table closed. • Go to Create and select Query Design
Finding information (Queries) Back Next • Choose the table you need. • Then you need to choose the fields that you need. • You should only get the fields/data that you need
Sorting and Criteria Back Next • At the bottom you can set the criteria for any field. You need to add criteria to the criteria row. You can also choose a field to sort by. • Examples of criteria:
Finding information (Queries) Back Next • Then add the criteria you want to match • Once finished click on the Run button to see the results