Essential Guide to Creating and Managing Databases in Excel
This presentation by Jolanta Soltis covers the fundamentals of using Excel for database creation and management. Learn when to utilize Excel over relational databases, including handling up to 15,000 rows of mainly numeric data for calculations and statistical analyses. Discover how to create database fields, add records, and utilize built-in data forms for easy data entry. The guide also details advanced functionalities such as data searching, sorting, importing, and exporting, providing practical tips to streamline your database tasks in Excel.


Essential Guide to Creating and Managing Databases in Excel
E N D
Presentation Transcript
CREATING DATABASE Presenter: Jolanta Soltis
When to use Excel • Use Excel when you: • Require a flat or non-relational view of your data (you do not need a relational database with multiple tables). This is especially true if that data is mostly numeric—for example, if you want to maintain a financial budget for a given year. • Want to run primarily calculations and statistical comparisons on your data — for example, if you want to show a cost/benefit analysis in your company's budget. • Know your dataset is manageable in size (no more than 15,000 rows).
What characterizes an Excel List? • row = record • column = field • header row = 1st row; formatted differently • no blank rows or columns in the data (though blank cells within records are OK) • formulas to calculate data items are OK
Excel list navigation tips • Move to list corners • CTRL+arrow keys • Select a single record • CTRL+SHIFT+right arrow • Select the entire list quickly • CTRL+* (e.g., CTRL+SHIFT+8)
Creating Database • Automatic Numbering • How To Create Database Field • How To Add Records Manually • How To Add New Record Using A Built-In Data Form
Automatically number rows • Microsoft Excel does not provide a button to automatically number data. • You can easily add sequential numbers to rows of data by filling a column with a series of numbers. Note: These numbers are not automatically updated when you add, move, or remove rows. You can manually update the sequential numbering by selecting two numbers that are in the right sequence, and then dragging the fill handle to the end of the numbered range.
Fill a column with a series of numbers • Select the first cell in the range that you want to fill. • Type the starting value for the series. • Type a value in the next cell to establish a pattern. For example, if you want the series 1, 2, 3, 4, 5..., type 1 and 2 in the first two cells. If you want the series 2, 4, 6, 8..., type 2 and 4. • Select the cells that contain the starting values. • Drag the fill handle (fill handle: The small black square in the lower-right corner of the selection. When you point to the fill handle, the pointer changes to a black cross.) across the range that you want to fill. • To fill in increasing order, drag down or to the right. To fill in decreasing order, drag up or to the left.
How To Create Database Field? • Bold • Larger font • Different color
How To Add Records Manually? • The same way as you work with any data in Excel
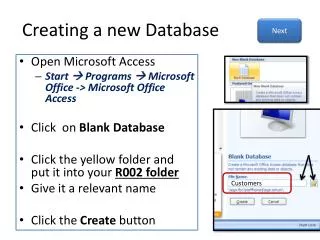
How To Add New Record Using A Built-In Data Form? • A data form is a dialog box that gives you a convenient way to enter or display one complete row of information, or record, in a range or list at one time. • Click a cell in the range or list you want to add the record to. • On the Data menu, click Form. • Click New. • Type the information for the new record. • When you finish typing data, press ENTER to add the record. • When you finish adding records, click Close to add the new record and close the data form. • (In 2007 add Form button in Quick Access Toolbar)
Managing Record in Database • How To Search For The Record Using Data Form • How To Edit / Delete The Record Using Data Form
Find the record you want to change • To move through records one at a time, use the scroll bar arrows in the dialog box. • To move through 10 records at a time, click the scroll bar between the arrows. • To move to the next record in the range or list, click Find Next. To move to the previous record in the range or list, click Find Prev. • To set search conditions, or comparison criteria click Criteria, then enter the criteria into the data form. • To find records that match the criteria, click Find Next or Find Prev. • To return to the data form without searching for records based on the criteria you specified, click Form.
Sorting Records • How To Perform Simple Sort • How To Perform Multiple Sort • How To Set Advanced Sort Options
Using AutoFilter • How To Enable / Disable AutoFilter • How To Apply / Remove The Criteria • How To Customize Criteria • How To Use Wildcard In Criteria
Using Advance Filter • How To Define The Criteria Range • How To Use The Advanced Filter Command
Using Simple Database Functions • How To Find The Sum Of Specific Records Using Paste Function • How To Find The Average Of Specific Records • How To Find The Maximum / Minimum Value Of Specific Records • How To Find The Number Of Records
IMPORTING AND EXPORTING DATAImporting / Exporting Data • How To Use Text Import WizardHow To Export Data To A DocumentHow To Copy Data From Other ApplicationsHow To Insert Objects • How To Export Data To Excel Workbook In Other Application • Retrieving Data From A Database • How To Get Specific Information Using Database QueryHow To Edit Database Query
Import or connect to data • On the Data menu, point to Import External Data, and then click Import Data. • Do one of the following: • Open an existing data source • In the Select Data Source dialog box, select a data source from My Data Sources, and then click Open. • Create a new data source connection • In the Select Data Source dialog box, click New Source. • In the Data Connection Wizard, choose a data source to connect to, and then click Next. • Provide the information requested by the Data Connection Wizard dialog boxes.