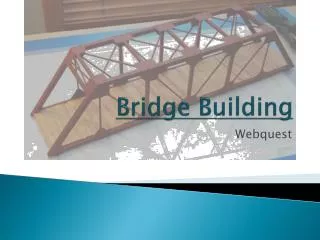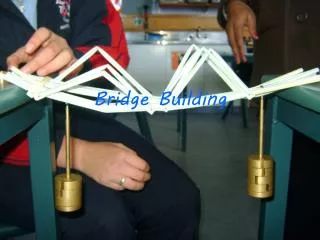
Bridge Building Notes
Bridge Building Notes. Physics. Bridge Building Tips. Keep your hands clean! Oils and grease from your skin can ruin your joints. Go easy with the glue bottle. As a general rule of thumb, if you can see it then you are using to much. Keep your bridge from twisting by using lateral bracing.

Bridge Building Notes
E N D
Presentation Transcript
Bridge Building Notes Physics
Bridge Building Tips • Keep your hands clean! Oils and grease from your skin can ruin your joints. • Go easy with the glue bottle. As a general rule of thumb, if you can see it then you are using to much. • Keep your bridge from twisting by using lateral bracing. • It’s still true, measure twice and cut once. • Keep a log of every bridge you build. Record notes, you won’t remember later on.
Try to videotape testing your bridge. You may get a clue on what failed first. • Always keep safety in mind when using sharp tools. Most mistakes are made when you aren’t paying attention. • Always test your bridge before taking it to competition, but leave enough time to build another. • Draw out your bridge on graph paper to make sure that it is symmetrical. • Different trusses have different ways of spreading out the load.
Wood has about the same strength in tension, no matter how long it is. • Balsa wood sands very easily if needed. • You can mix glue with water to cut down on weight. Doing this also helps the glue to seep into the wood, creating a stronger joint. • Remember to close your glue bottle when you are done. • By cutting a piece in half, you more than double its strength compression.
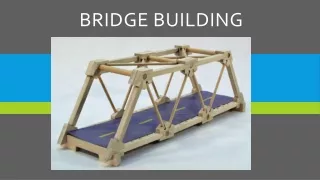
Bridge Joints • Lap Joint: The lap joint is one of the strongest, and you should use it whenever you can. It strengthens compression members because it adds stiffness. • The lap joint has one draw back. The joint as only as strong as the face of the wood. The face of the balsa wood is typically not strong, and tears easily. So make your lap joints have plenty of surface area for the glue.
End Joint: The end joint is not very strong. In tension, the two pieces of wood will just pull right away from each other. In compression, this this will allow the piece to bend in a perfect arc. The lap joint holds the piece stiff, which does help it to hold more.
Notched Joint: The notched joint gives more strength than end joint but less than the lap joint. It is more difficult to build, so it is not very common.
Gussets: If you have to use as end joint, it is a good idea to add a gusset to make it stronger. The gusset creates a lap joint, which is strong in both tension and compression. Try to make each part of the gusset the same length. If there is more glued to one piece, the one with less surface are for the glue will pull away first. Gusset (plate)
Forces that Act on Bridges • Compression: Compression is a pushing (compressing) force. You can take the middle of a straw and squeeze it between two fingers, the straw flattens. However, is you hold each end of a straw and push together it is harder to make the straw compress or flatten. The shorter the piece of wood is, the more compression it can hold. The longer the piece of wood is, the less compression it can hold.
Tension: Tension is pulling. It would be hard to break a straw if you held both ends and pulled apart. Wood also has the ability to resist tension. Tension may be applied parallel to the grain of the wood, but should avoid perpendicular to the grain.
Torsion: Torsion is twisting. When you wring out a cloth, you are applying torsion to the cloth. Different materials respond to tension differently. • Shear: Shear happens when two opposing forces are acting on the same point. If you hold a piece of wood with both hands next to each other, and push up with one hand and down with the other, you are applying shear. Shear usually occurs horizontally, and vertically.
Trusses • Why is a truss not a type of bridge? http://www.brantacan.co.uk/bxtruss.htm • Why use triangles in trusses? Most people know the answer; because a triangle is the only rigid shape that can be made with pinned joints - so there is only one set of angles that will go with a given set of sides. http://www.brantacan.co.uk/truss.htm
Common Truss Designs • WARREN TRUSS - A Warren truss, patented by James Warren and Willoughby Monzoni of Great Britain in 1848. • Can be identified by the presence of many equilateral or isosceles triangles formed by the web members which connect the top and bottom chords. These triangles may also be further subdivided. • Warren truss may also be found in covered bridge designs.
PRATT TRUSS - The Pratt truss is a very common type, but has many variations. Originally designed by Thomas and Caleb Pratt in 1844, the Pratt truss successfully made the transition from wood designs to metal. • The basic identifying features are the diagonal web members which form a V-shape. The center section commonly has crossing diagonal members. Additional counter braces may be used and can make identification more difficult, however the Pratt and its variations are the most common type of all trusses. • The vertical members are in compression while the diagonal members are in tension, exactly opposite the structure of a Howe truss.
HOWE TRUSS - A Howe truss at first appears similar to a Pratt truss, but the Howe diagonal web members are inclined toward the center of the span to form A-shapes. • The vertical members are in tension while the diagonal members are in compression, exactly opposite the structure of a Pratt truss. • Patented in 1840 by William Howe, this design was common on early railroads. The three drawings show various levels of detail. The thicker lines represent wood braces; the thinner lines are iron tension rods. The Howe truss was patented as an improvement to the Long truss which is discussed with covered bridge types.
Red represents tension, blue represents compression, and green is no load. The following figures are shown under a load. The numbers represent percentage, where the total load = 100. The numbers are rounded to the nearest 5.
On this Warren truss, each of the down arrows represents 50% of the load. Notice how the two middle pieces have no load. Notice the load is quite a bit less on the ends of the top and bottom chord than in the middle. When you build for efficiency, keep in mind that for a bridge loaded in the center, the ends can be smaller than the middle.
Now examine the same Warren truss, but with added vertical members: The added vertical members serve to break the top chord into smaller segments, making it stronger. However, the percentage of the load has increased both on top and bottom. Also notice where the green members are now.
Notice the difference between the Pratt and Howe trusses under a load. The Pratt has bigger numbers on both the top and bottom chord, but its middle compression members are shorter, and hold less than those on the Howe. But the load is still concentrated in the middle, and gets less further to the ends on both.
It is a trade off between the Pratt and Howe. For the Pratt, you’d have to use bigger top and bottom chords, while on the Howe you’d have to use bigger compression members.
How to Get Started #1 – Know The Rules #2 – Design the Bridge #3 – Get Supplies #4 – Build the Bridge #5 – Test the Bridge #6 – Build the Bridge Again #7 – Write Lab Report
Bridge Designer • West Point Bridge Contest http://bridgecontest.usma.edu/ • Model Bridge Designer http://www.garrettsbridges.com/design/bridgedesigner/
Bridge PALS Rules • http://www.bradley.edu/academics/eng/Civil/Html/Bridge-Pal.htm Click on Competition Rules on the right side of the screen.
Sources • http://pghbridges.com/basics.htm • http://www.garrettsbridges.com/design/trussdesign/ • http://www.brantacan.co.uk/starterpages.htm • http://www.bradley.edu/academics/eng/Civil/Html/BPal-Docs/BPal15-2006-PhotoGallery/FrameSet.htm