Download
1 / 38
380 likes | 499 Vues
This comprehensive guide offers step-by-step instructions for beginners looking to create a classroom website using NVU, a user-friendly web authoring system. Starting from folder organization on your desktop to saving and managing your web pages, the tutorial emphasizes best practices in site structure, including the use of images and custom backgrounds. Learn how to format text, incorporate images, and create an engaging website without the need for technical expertise. Perfect for educators wanting to enhance their online presence!

E N D
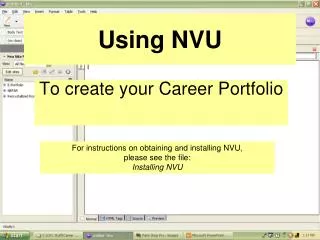
Designing a Classroom Web Site Using NVU Beginning Level
Getting Started • Create a new folder on the desktop. • Change the name of that folder the same as your folder on the web server (example: smitha). • Save your web page in this folder. • Open your folder. Create a subfolder called “index_files” or “images”. • In this subfolder, save any images or additional content (other than text) that you will be putting on your web page.
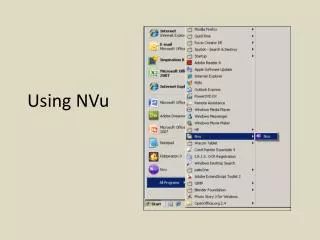
Getting Started • Open Nvu Nvu Finally! A complete Web Authoring System for Linux Desktop users as well as Microsoft Windows and Macintosh users to rival programs like FrontPage and Dreamweaver. Nvu (pronounced N-view, for a "new view") makes managing a web site a snap. Now anyone can create web pages and manage a website with no technical expertise or knowledge of HTML.
Getting Started • Before you do anything more, save your page. Click “File” and select “Save as” from the drop-down menu.
Getting Started • Before you can save your page, Nvu will prompt you to give it a Title. This is NOT the filename, but rather is what will appear in the Title Bar of a browser when your page is on the web.
Getting Started • After you have given your page a title, Nvu will prompt you to save. • Name your first page (which will be the home page for your site) “index.” • Make sure the “Save as type” box says “HTML Files.”
Getting Started • Be sure to choose the location where the file will be saved on your computer, (so you don’t lose it!) and press the Save button.
Getting Started NOTE: All file names should be one word (no spaces). This includes .html file names and file names for pictures. We also recommend you not use capital letters in file names and NEVER use punctuation marks. Always save your work frequently!!!! Nvu does not have an automatic rescue in the event your computer crashes, so save, save, save!
Page Colors and Backgrounds Before creating your background you must decide whether you plan to use a solid color background or a background image. Background images are located on your computer and on the Internet. It is best to locate the image first and save it in your folder before going to the next step.
Page Colors and Backgrounds • On the top menu line click “Format.” Select “Page Colors and Background.” • Select “Use Custom Colors.” This enables you to choose a solid background color and the appropriate text colors. • You will also need to select the color of your links (active and visited). Consider the color of your background when you do so. • To use a background image: Click the button that says “Choose File.”Select the location of the background you have found or downloaded from the Internet. • After these decisions have been made, click OK.
TEXT Type the text as you would in any word processing program. Text changes are made by first highlighting the passage you desire to change.
TEXT You can change font style by clicking the dropdown triangle beside the text “Variable Width.” NOTE: Make sure you use a standard font (Times New Roman or Arial) or the visitor may view your webpage in binary code.
TEXT To change the size click the “A” arrow that points up to increase or down to decrease the size.
TEXT Font color can be changed by clicking the button that looks like a black box.
TEXT Font can be made bold, italicized, and underlined by first highlighting the text and then clicking the appropriate buttons on the tool bar.
TEXT There are also four buttons on the tool bar to control text alignment once the text has been highlighted.
WORKING WITH IMAGES Before you insert images (pictures, icons or other graphics) you must first save them in your index_files folder on the desktop. Some images on the Internet are very large and should be edited by cropping or resizing using an image editing program.
WORKING WITH IMAGES To insert a graphic, on the top menu line click “Insert” and select “Image” or click the Image Icon on the toolbar. In the Image Properties screen, click Choose File.
WORKING WITH IMAGES In the “Image Properties” box, click the button that says “Choose File.” The “Select Image” window will open and allow you to find and select your image.
WORKING WITH IMAGES After you have chosen your image, type an explanation of what your image is (for the benefit of those who cannot view graphics) in the “Alternate text” box or click on the button that says “Don’t use alternate text.”
WORKING WITH IMAGES Resizing your images is easily managed in Nvu. Simply click and resize using resizing window points as in any Windows program. If you need to make a picture a specific size or a group of pictures all the same size (if you are putting them in a table, for example) that is also easily accomplished.
WORKING WITH IMAGES Resizing to make a picture a specific size is accomplished by clicking on the tab titled “Dimensions” and then clicking “Custom size.” You can highlight one number and change it and the other number will change automatically. (See following examples).
WORKING WITH IMAGES Images may be hyperlinked by clicking on the “Link” tab and typing (or pasting) the web address in the appropriate box.
HYPERLINKS Hyperlink to a new page: 1. First create and name the new page. Click the “New button” on the top toolbar. Complete the previous “Getting Started” steps, but give this new page a different name, such as myclass.htm or homework.htm. 2. To hyperlink to this new page highlight the text or object you wish to link and click the link button on the top toolbar. 3. Click Choose File and find the name of your new page and click OK.
HYPERLINKS Linking text Filename or address of new page.
HYPERLINKS URL Site Hyperlinks 1. To hyperlink to another website, highlight the text you wish to link, and click the link button on the top toolbar. 2. Beside link location type http: and the entire address (for example: type http://www.cnn.com to hyper link to CNN Online). An easy way to be sure you do not make a typo is to open a new window in Internet Explorer and go to the website you want to link to. Copy the address from the address bar and paste it in the link location box. 3. Click OK. The text will now be hyperlinked and will become the color selected earlier for active or visited hyperlinked text.
HYPERLINKS Copy THIS To HERE
HYPERLINKS Email Hyperlinks 1. To hyperlink to an email address, highlight the text you wish to link, and click the link button on the top toolbar. 2. Under hyperlink type type mailto: and the entire email address (for example: type mailto:smartsue@k12tn.net) and click OK. NOTE: Do not use any spaces in this text.)
TABLES 1. To insert a table quickly, click Table on the top toolbar. 2. Choose the number of rows and columns needed for the table using the “Insert Table” window.
TABLES 1. To insert a table with greater control of your options, click Table on the top toolbar. 2. Click the “Precisely” Tab on the “Insert Table” window. Choose the number of rows and columns needed for the table. You may also choose the table width on this tab. Table width should be in “% of window”. Do not select a height.
Tables • To position a table on a web page, select the table and right click. • Choose Table Cell Properties and sure the Table tab is selected. • Table alignment • Right • Left • Center
TABLES To format the cells in a table, click the “Cell” tab on the “Insert Table” window. Here you may control horizontal and vertical alignment, cell padding and cell spacing and even set your table for text wrapping.
TABLES NOTE: Using the number zero in the “border” width section (under the “Precisely” tab) will create a table without visible borders. This is the Easiest and BEST way to align text or images on a web page.
TABLES You can also add color to your table by clicking “Format” and selecting “Background Color” (under either tab) and clicking the rectangular button beside those words. Then click the desired color.
There’s More…But Not Today!!!! You have completed a basic web page! So PRACTICE what you have learned …and come again!!!!