Brief Formatting
Brief Formatting. February 21, 2008. What do I include?. Look at the score sheet. Include every element on the score sheet. Make sure you leave enough time to proof, proof again, and follow the simple formatting lessons learned here. Score Sheet elements. Cover Summary of the case


Brief Formatting
E N D
Presentation Transcript
Brief Formatting February 21, 2008
What do I include? • Look at the score sheet. • Include every element on the score sheet. • Make sure you leave enough time to proof, proof again, and follow the simple formatting lessons learned here.
Score Sheet elements • Cover • Summary of the case • Table of contents • Table of authorities • Jurisdictional statement • Statement of the issues • Statement of the case • Statement of the facts • Summary of the argument • Argument • Certificate of service
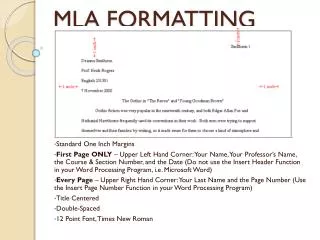
The Cover The court The date Color: Blue for appellant (They’re sad; they lost below.) Docket number The parties Color: Red for appellee (Like an apple.) On appeal to court and from court Your side Your teply numbers
Summary ofthe Case Title: All caps, bold Include reason for why court should grant oral argument Teply numbers, ATTORNEYS FOR [SIDE] and fake address Page number, use roman numerals for this introductory section i
Title: All caps, bold Table ofContents Include all sections and their page numbers. We’ll cover how to make one shortly. Include all point headings and their page numbers Page number, use roman numerals for this introductory section ii
Title: All caps, bold Remove pinpoint pages Table ofAuthorities Use passim if on >5 pages Separate cases by court designation. This will depend on your problem. Separate cases by court designation. This will depend on your problem. v
Table ofAuthorities,(cont.) Separate cases by court designation. This will depend on your problem. Separate cases by court designation. This will depend on your problem. Separate other authorities by type Do the Table of Authorities right before you do Table of Contents!The MOST important thing to remember when doing the Table of Authorities is to save a copy of your brief beforestarting and to save a separate copy of your brief after running Westlaw or Word. If any problems arise, you will have a clean copy to work from. vi
Title: All caps, bold JurisdictionalStatement Still using roman numerals vii
All caps, bold Statement ofthe Issues State each issues you are State each issue you are briefing You may list up to four of the MOST relevant cases for each issue and the most relevant statutory or constitutional provisions List, up to four, the MOST relevant cases for each issue and the most relevant statutory or constitutional provisions viii
All caps, bold Statementof the Case Note: citing to the record. (R. at page). Include Nature of the Case: Underlined Include Course of Proceedings: Underlined Page number, start numeric numbering here (Remember 25 page limit from here.) 1
All caps, bold Statementof the Facts Note: citing to the record. (R. at page). Note: citing to the record. (R. at page). Note: citing to the record. (R. at page). 3
All caps, bold Summary ofthe Argument Note: no citations within the summary 5
All caps, bold Argument (I, II) All caps (A, B, C) Bold, Capitalize First letter of appropriate words (A, B, C) Capitalize first letter of appropriate words (i, ii, iii) Regular sentence. (a, b, c) Regular sentence. 7
All caps, bold Conclusion Note: no citations within conclusion Include: ATTORNEYS FOR SIDE, Teply numbers, and address 19
All caps, bold Certificateof Service Date Note: mail 2 copies to opposing counsel and 10 copies to the clerk of court Note: mail 2 copies to opposing counsel and 10 copies to the clerk of court Include: Teply numbers, ATTORNEYS FOR SIDE, and address 20
Score Sheet Include teply numbers Include teply numbers DON’T FORGET TO INCLUDE YOUR INSTRUCTOR’S SCORE SHEET AT THE VERY END!!!
Inserting Page Numbers in Word • Separate all sections with page breaks NOT hard returns. • Insert page numbers right before you do your Table of Authorities and Table of Contents. • Save your brief and save a copy called FinalBriefClean. • Work from the original Final Brief.
2) Press the Show Paragraph Marks button from the Home tab 1) Go to the Summary of the Case page.
1) Go to the Page Layout Tab 2) Place your cursor here. 3) Click Breaks. Choose “Next Page Break.” 4) When you insert a section break you will likely create a blank page…you need to remove this page. 5) Put your cursor before the “S” if not still there. Hit backspace until it removes the extra page. Justify the title to center.
What the Title Page should look like with the Section Break (Next Page)
Go to your Statement of the Case page. Insert section break as done earlier. There will be a blank page. Delete this page as before. Center justify this heading again.
3) Click on Page Numbers 2) Click on Insert Tab 1) Go to Summary of the Case Page 4) Click on Format Page Numbers 5) Change number format to i,ii,iii 6) Change page numbering to start at i 7) Click OK
Repeat Previous Steps for Statement of the Case Page • Go to the Statement of the Case Page and place your cursor on that page • Click Page Numbers • Format Page Numbers from drop down • Number format will be 1,2,3 • Start at 1
1) Click on Page Numbers 2) Click on Bottom of Page option 3) Choose the plain option to center the page numbers
Removing the Page Number from the Title Page 1) Go to Title Page 2) Check the Different First Page box 3) Click Close Header and Footer
Make Table of Authorities in Word • Do this step right before you do your Table of Contents. • Save your Final Brief. • Save a copy as Brief With Page Numbers before starting the Table of Contents. • Work from your Final Brief.
Go to the beginning of the brief and work your way through marking citations 1) Press the References Tab 2) Highlight the full citation. Press Mark Citation 4) Choose the type 3) Remove pinpoint page 6) Click “Mark All” 5) Type short citation 7) Click Close and proceed to next citation
1) Go to the Table of Authorities page and place your cursor on that page. 2) Go to the Home tab and press the paragraph symbol to hide the field codes to ensure proper pagination
1) Click on the References Tab 2) Click on Insert Table of Authorities 3) Make sure “Use passim” and “Keep original formatting” are checked. 4) Click OK
Make Table of Contents in Word • Do this step LAST. • Save your Final brief. • Save another copy as Brief With Table of Authorities • Work from your Final Brief
2) Press the Paragraph Dialog box 1) Highlight the title of each section. 3) Choose the appropriate level for the Table of Contents. Click OK All Section Titles: Level 1 Within Argument section: Point Heading I, II, etc.: Level 2 Point Heading A, B, etc.: Level 3 Point Heading i, ii, etc.: Level 4 Point Heading a, b, etc.: Level 5 4) Repeat these steps for all components included in the Table of Contents
1) Go to the Table of Contents page and place your cursor on that page. 2) Click on References Tab 3) Click on Insert Table of Contents 6) Make sure “Show page numbers” and “Right align page numbers” are checked. 4) Uncheck “Use hyperlinks” 5) Change levels to the appropriate number based on your pointheadings. 7) Click OK
Slides will be available on Prof. Edwards TWEN page. Slides and detailed handout will also be available on the library web page under Class Presentations.
Congratulations,you’re almost done! • You need 3 copies- one to turn in, and two for your oral argument opponents during the first week. See the schedule posted. • Your brief must be bound. • Use a plastic comb binding. • Plan ahead—some copy shops require some time to do this. • Briefs due at 11 a.m. on Friday, March 3 in the Library Administrative Office.