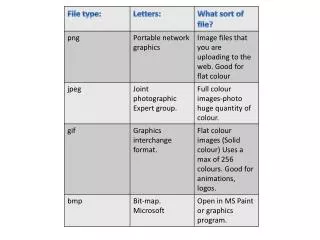
Mouse draw
Mouse draw. Using the mouse and a palette to make a picture. Lab completion is optional, but labs will help you understand the project. Lab 1: Mouse draw (put dot on mousedown event) Lab 2: Modification of Lab 1. Now mouse draws two color dots: on mouseup or mousedown, put a dot


Mouse draw
E N D
Presentation Transcript
Mouse draw Using the mouse and a palette to make a picture
Lab completion is optional, but labs will help you understand the project • Lab 1: Mouse draw (put dot on mousedown event) • Lab 2: Modification of Lab 1. Now mouse draws two color dots: on mouseup or mousedown, put a dot • Lab3: Revise lab two. only draw for mousemove event (preceded by mousedown) • Project: Mousedraw with a draw panel, color and size radiobuttons
In the code view: • Under the menu bar icons and the view tabs there are two pull-down selectors. • Select the component you want to add an event to in the left pull-down menu • Select the event you want in the right pull-down menu. • This will paste in a sub template • Previous two slides added MouseDown event to the form itself.
For a draw dot on mousedown lab • We select mousedown event on the form • We define a colored circle (with a size)
Field declarations These two lines go in code view, below class declaration, above and not inside a sub: Private Const blobsize As Integer = 8 Private graphicsobj As Graphics = CreateGraphics() Notice that we did several things: • Declared constants whose values may not be changed • Initialized values at declaration time • Blobsize will be how many pixels wide your dot is • Graphicsobj is a Graphics thingy defined for your form.
Code View- recall entire statements must go on 1 line Public Class Form1 Private Constblobsize As Integer = 8 Private graphicsobj As Graphics = CreateGraphics() Private Sub Form1_MouseDown(sender As Object, e As System.Windows.Forms.MouseEventArgs) Handles Me.MouseDown graphicsobj.FillEllipse(New SolidBrush(Color.BlueViolet), e.X, e.Y, blobsize, blobsize) End Sub End Class Notice that e.x and e.y (mouseeventargs.x and mouseeventargs.y) return the current mouse position.
Lab1 completed – It is hard to draw a picture with purple dots
Lab2: Add a MouseUp event handler • MouseUp event should put a green dot. • It is still pretty hard to draw a picture in this environment
MouseUp event handler- Note that I renamed my form MouseDraw Private Sub frmMouseDraw_MouseUp(ByVal sender As Object, ByVal e As System.Windows.Forms.MouseEventArgs) Handles MyBase.MouseUp graphicsobj.FillEllipse(New SolidBrush(Color.Green), e.X, e.Y, blobsize, blobsize) End Sub
Boolean data type • A boolean is a variable that is true or false. • It could be declared with Dim okay as Boolean • We will add a variable to our project so we can decide when to put dots. If mouse is up – no dot, when mouse is moved, put dot(s).
Lab3: Don’t draw for mouseup event only for mousemove: field variables Private Const blobsize As Integer = 8 Private graphicsobj As Graphics = CreateGraphics() Private ShouldPaint As Boolean = False
New MouseUp event handler: whenever mouse is up, stop painting Private Sub frmMouseDraw_MouseUp(ByVal sender As Object, ByVal e As System.Windows.Forms.MouseEventArgs) Handles MyBase.MouseUp shouldpaint=false End Sub
Lab3: Add mouse move event handler and adjust your other events Private Sub frmMouseDraw_MouseDown(ByVal sender As Object, ByVal e As System.Windows.Forms.MouseEventArgs) Handles MyBase.MouseDown ShouldPaint = True ‘paint when mouse down End Sub Private Sub frmMouseDraw_MouseUp(ByVal sender As Object, ByVal e As System.Windows.Forms.MouseEventArgs) Handles MyBase.MouseUp ShouldPaint = False ‘don’t paint for mouse up End Sub Private Sub frmMouseDraw_MouseMove(ByVal sender As Object, ByVal e As System.Windows.Forms.MouseEventArgs) Handles MyBase.MouseMove If ShouldPaint Then graphicsobj.FillEllipse(New SolidBrush(Color.BlueViolet), e.X, e.Y, blobsize, blobsize) End If End Sub
Components on your form • Put a Panel on the right – It is not a “visible” component but it occupies the entire right side of form. Resize the form to make the panel large. • Two Groups of radio buttons for size of brush and color. • Individual radio buttons as for VB project 2 • Not shown in previous image: You should have a clear button to clear the drawing panel.
About components • Be sure to drop your radio buttons on the form before button groups. • Be sure to rename all your radio buttons. • Put a group around the size buttons and a group around the color buttons. • Not shown in my screenshot – put a clear button on the form. Name it btnClear. • Panel on the right.
Some notes on mouse painter: Fields • If you built the previous lab(s), you will have to modify the Const blobsize variable. Const means “not allowed to change” but we want the size to be changed by the radiobutton selection. • Remove the word Const.
Drawing: Fields • In our labs we used: Private graphicsobj As Graphics = CreateGraphics() • This needs to be modified. Change it to: Private graphics As Graphics
Colors and sizes: Fields • Add a color field value. This will be set in the radio buttons that control color. Declare it above your subs with Dim theColor as Color
coloring • When you draw in mouseMoved event it will be something like: • graphics.FillEllipse(New SolidBrush(theColor), e.X, e.Y, blobsize, blobsize)
More Subs in this application • After properly naming your radio buttons, systematically go through double-clicking each radio-button to create a sub event handler for it.
Changing color and size • theColor will be changed in the color radiobuttons. Your color radio buttons will have code in theirs subs like: theColor=Color.red • In size radio-buttons, set blobsize to 3 or 4 pixels for small, 5 or 6 pixels for medium and 8+ pixels for large “blobs”…for example, for medium: blobSize=7
Form load • In your project, the panel, not the form, will have the graphics object. • Double-click the form itself. This opens up a form load sub. In the formload sub add the code to create the graphics for the panel (put your panel name where it says pnlName): graphics =pnlName.creategraphics()
More notes on mouse painter subs: mouse events go on the panel! • It uses a panel, and you’ll have to use get the correct graphics object instead of creategraphics() from Lab1. • Similarly, you’ll have to add the mouseUp, mouseDown and MouseMove events associated with the panel, not the form. See screenshot in next slide.
Clear the panel • Put a button on the form to clear the image. • Use pnlDraw.refresh() to clear the panel. • Here, I have named my panel pnlDraw