Microsoft Word 2010 Introduction to Word Processors
440 likes | 634 Vues
Microsoft Word 2010 Introduction to Word Processors. Lesson Objectives. After completing this lesson, you will be able to: Perform basic tasks in a word processor. Edit and format text. Work with tables and pictures. Work with language tools. Getting Started with Word Processors.

Microsoft Word 2010 Introduction to Word Processors
E N D
Presentation Transcript
Lesson Objectives After completing this lesson, you will be able to: • Perform basic tasks in a word processor. • Edit and format text. • Work with tables and pictures. • Work with language tools.
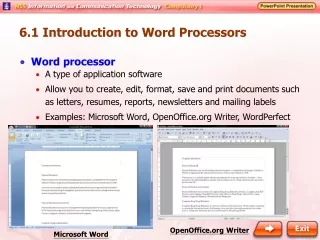
Getting Started with Word Processors • Word processors offer you the flexibility to format documents by making changes to the font, the page layout, the colors and the page style.
Getting Started with Word Processors You can open Microsoft Word by clicking on the desktop icon… … or by clicking the START button.
Getting Started with Word Processors When you see the cursor blinking, you are ready to type. Otherwise, use your mouse to click anywhere on the white part of the page.
Navigating within a Document • Use your mouse to click anywhere that you have typed text. • You can use the arrow keys on your keyboard to move the cursor vertically or horizontally. • The HOME key moves the cursor to the beginning of the line. • The END key will take it to the end of the line.
Saving a File To save the document, click the Save button on the Quick Access Toolbar or click on the File Tab to choose how to save the file. Quick Access Toolbar File Button
Opening an Existing File On the Standard toolbar, click the Open button. In the Open dialog box, double-click the name of the document you want to open. Click on the “Open” icon under File Tab in the ribbon
Printing Your File • To print out your document click on the File Tab, and then click Print. • This prints one copy of your file using the default settings. • When you need to, you can modify the settings of your print job in the Print dialog box.
Editing and Formatting Text • Advanced word processors include special tools that help you easily edit and format documents. • Word processors can: • cut, copy, and paste text • undo and redo actions • justify or re-align text • change font parameters • change paragraph spacing • various other editing and formatting functions.
Copy + Paste Select Hold down the left mouse button and drag the cursor ORHold down SHIFT and use the arrow keys on the keyboard. Copy You can find the Copy and Paste commands under the Home Tab. Paste You can also copy and paste by clicking with the right mouse button on a word you have selectedto pull up a shortcut menu.
Cut + Paste Using Cut + Paste is like moving text from one location to a new one. The cut command is located : • in the Home Tab • or in a shortcut menu when you right-click on a selected word
Formatting Text In the Font dialog box, you can make changes to the type, style, size, and color of font used in the document. Size Font You canchangethe “handwriting” of your text. Font style Put a word inboldor italics for emphasis. Effects Will let you add underlining, shadows, or details like strikethrough.
Formatting Text Size Color Font Many of these text options can also be found on your Home Ribbon in the Font Group.
Alignment You can specify the arrangement of objects, text, and graphics, in predetermined positions using the alignment settings. You can align the selected text to the left, right, or center by using the left, right, and center alignment buttons.
Bullets and Numbering You can use the bullet or numbering options to organize information into lists.
Indenting and Spacing Use indentation to offset text away from the margin or bring it closer again.
Undoing Mistakes Sometimes, you want to reverse the last action you performed. For this, you can use the Undo button: Similarly, you can use the Redo button to repeat the last action:
Using Language Tools Advanced word processors, such as Word, can automatically detect the language of the typed text and then use the spelling dictionary, grammar checker, and punctuation rules for that language. Language tools are a convenient way to perform certain tasks automatically as you type, such as checking spelling and grammar.
Spelling and Grammar Check • Wavy red lines=spelling errors • Wavy green lines=grammatical mistakes • You can check the spelling and grammar of the entire document by clicking the Spelling and Grammar Button on the Review Tab.
Spelling and Grammar Check • Spelling suggestions • Change All • AutoCorrect • Grammar suggestions • Custom dictionary • Ignoring instances
Language Tools: Thesaurus The Thesaurus Button lets you search for a word and presents a list of suggestions you can choose from. The Thesaurus feature in Word lets you find alternatives for a word or phrase.