Mastering Prezi: A Comprehensive Guide to Create Engaging Presentations
Discover how to enhance your presentation skills with Prezi through this detailed guide. Learn how to start from a template or a blank canvas, customize colors and fonts, and effectively use frames to organize your content. Understand how to use the Transformation Tool for seamless editing and panning across your canvas. Dive into tips for navigating your Prezi, setting paths for your presentation, and utilizing invisible frames for organization. With these tools at your fingertips, create interactive and visually captivating presentations that engage your audience.


Mastering Prezi: A Comprehensive Guide to Create Engaging Presentations
E N D
Presentation Transcript
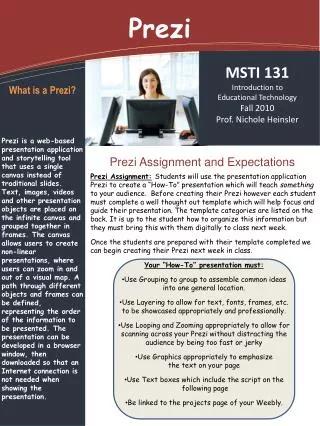
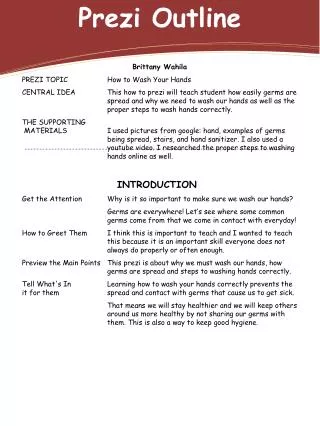
Presenting Prezi Michael Pelitera mpeliter@irsc.edu 772-462-7734 http://v125-irsc.weebly.com
Where are YOU? Is KEY !! • Zoom all the way out – Roll your ‘mouse’ • Use controls on the right side to “Size” • Look for the ‘Hand’ to grab • Click the ‘Pencil’ to Edit your Path • Un-click Pencil when you are done
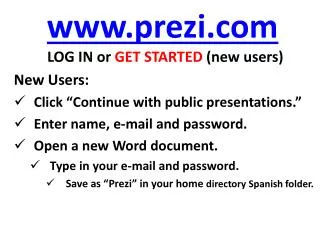
Start from a template • When you create a prezi, you can choose from a number of reusable templates or a blank canvas. • When you decide to use a template, you can edit everything you see on the canvas just as if you were creating your own prezi, including copying and pasting pre-made content from other prezis or applications
Customize colors and fonts: Theme Wizard • Use the Theme Wizard to customize the colors of your prezi and to set your font choices from Prezi's font library.
Anchor yourself on the canvas: The Home Button • To take a step back and get an overview of everything you've added so far (both in Edit and Present mode), you can use the Home button on the right hand side of your screen (you can find it just above the zoom + and - buttons). Clicking the Home button before you start making a prezi will also ensure that you're starting from the right place.
Frame your content • Frames are a signature part of Prezi and a great way to manage your content. • Frames work like slides and can be used to group your ideas. Use frames to create a placeholder in your prezi and then add content to them. • Frames come in a variety of shapes and sizes, and you an change the color of them as well as their size and position. • The other great thing about frames is that once you place one on your prezi canvas, you can move, size, and rotate it, and all the content within your frame will move, size, and rotate too.
Insert diagrams • Prezi has created layout drawings, diagrams, and charts that can help you better communicate your ideas to your audience.
Add URLS to your prezi • To put live links into your prezi, copy and paste the desired URL into a text box. Then click away from the text box and your link will become active (you will see it automatically underline).
Transformation Tool • In Prezi, the Transformation Tool is your best friend. Once you add anything to your canvas, click on it once to bring up the Transformation Tool. Now you can move, size, and rotate
Path: navigate and rearrange with the Path sidebar • When presenting your ideas, it can sometimes help to have a clear narrative that takes your audience through your prezi. • With the Left Sidebar, you can create a journey from one idea to the next. • Edit your path and its points in Edit mode and take your audience along that path in Present mode.
Setting the Path • To set your path, click the pencil icon on the left-hand side of screen. • Then click on the objects in your prezi canvas in the order you wish them to appear. • You can also use the sidebar to rearrange and delete path points or to zoom to a specific path point.
Panning: To move your prezi canvas left, right, up, or down, hold down the left button of your mouse and then move in the direction you want to go. Navigate the canvas Getting around your prezi canvas couldn’t be easier. Zooming around: This is a key feature of Prezi, so naturally we made it simple. You can zoom in and out by using your mouse’s scroll wheel or by clicking the + and - symbols on the right hand side of your screen.
5 simple steps • Reduce clutter with invisible frames • Layer text and objects: send backward, bring forward • Scale to convey meaning • Draw 4:3 frames • Make your transitions smoother
Reduce clutter with invisible frames • Invisible frames help you organize your content without the added visual of a conventional frame. They are ideal for highlighting details on a large image or block of text. Invisible frames are also really useful if you want to present your prezi without setting a predefined path. • To add an invisible frame to your prezi, select ‘Draw Invisible Frame’ from the ‘Frames & Arrows’ option on the top menu.
Then click on the canvas and drag your cursor around the content you want to put in your invisible frame. Invisible frames appear with a faded blue outline.
Transformational Tool • Hand Tool • Change size – Click + or – buttons • Hover over the corner of an object, until the Rotation tool appears, the click and drag it. • Use the Transformation tool to modify multiple objects at once.- Select Shift Key and select items to group • Click GroupTo ungroup – select any object in group. Select Ungroup.
“Borrow” from other prezi • On the Prezi Explore page you can find loads of great prezis from which you can “borrow” content, animations or even sound effects. • Reusing content in this way allows you to share your ideas more effectively and is a great way to get started with Prezi. • To use content from another prezi, first select a reusable prezi you like from the Explore page, then click ‘Save a copy’ to place a copy of the prezi in your own prezi library. • From here, you can open the prezi and start putting your own content into it. Alternatively, cut and paste the elements you like into one of your own prezis.
Import PowerPoint Intro: Starting the PPT Import Wizard Getting your slides onto the canvas Time to prezify: Step 1: Grouping content Pro Tip: Multi-select Step 2: Break out of the slide Step 3: Using arrows Step 4: Images & structure Simple slide deck vs. zooming prezi
PowerPoint See the results: In the beginning... Zoom for a closer look Using charts & diagrams Using charts & diagrams: Zooming in Using charts & diagrams: Rotating Back to the overview Follow the arrows • Back to the overview again • The End
Learn & SupportSupport Sites (with Videos) • https://prezi.zendesk.com/entries/23448918-Get-Started-with-Prezi • https://prezi.zendesk.com/entries/23449898-Five-simple-steps-to-a-great-prezi • https://prezi.com/support/ • https://prezi.zendesk.com/entries/22637573-editing-content-with-the-transformation-tool • http://prezi.com/explore/popular/