Download

1 / 41
420 likes | 644 Vues
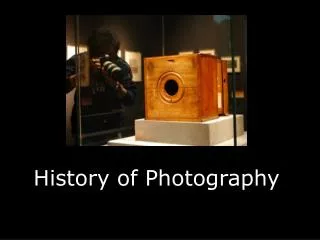
History of Photography. A Brief Overview…. Seven Elements of Photography. 1. Dark Box 2. Light 3. Light Sensitive Material - Film 4. Shutter 5. Photographer 6. Subject 7. Hole. How a pin hole camera works…. The Beginnings.

E N D
History of Photography A Brief Overview…..
Seven Elements of Photography • 1. Dark Box • 2. Light • 3. Light Sensitive Material - Film • 4. Shutter • 5. Photographer • 6. Subject • 7. Hole
The Beginnings • 5th Century BC In China Mo Ti recorded his observation of light rays and their ability to project a “duplicate” image • He noticed that when light reflected off an object and passed through a pinhole onto a dark surface, an inverted image of the object was evident on the darker surface
CAMERA OBSCURA A room…. • Centuries later light writing is further defined with camera obscura (dark room) • Used for: • View & record exterior scenes • Studies of heavens • Passage of the seasons • Architectural studies
Problems…. • Could not move room • Not portable • Always same image
A tent……. • 15 years later - 1560’s An Italian – DanieloBarbaro replaced the pinhole with lenses resulting in a further sharpening & brightening of the image • increased the camera obscura’s portability
Problems… • Not as dark – light got through • Unstable….wind shook • Photographers had to carry around a lot of equipment.
Problem… • Image still not permanent
Photography? Not Yet. Up to this time LIGHT was not creating a permanent record
Sun prints English chemist… • Thomas Wedgewood, son of British potter was the first man able to use light to describe an object • Decorating plates and pottery in his father’s company The images were weak but he invented the photogram A method of reproducing an image from contact copy, without a camera • SUNPRINTS were not permanent, silver salts were not permanent
Problem….. • Image still not permanent • Faded • Fuzzy
Take out…. • Sunprint objects • Newsprint pad • Coat • Supplies • Sun print paper • Trays – 10 • Plexi glass and boards • Sample sun prints
Method… • Place objects on paper • Develop outside 7 to 10 min depending on sun • Place in newsprint pad • Bring inside • Develop in water • Place under plexi glass
Joseph Nicephore Niepce • First Photograph
FLAWS • Low sensitivity of the Bituman of Judea emulsion, some take as long as three days. • Hazy due to the time of length exposed. • Uneven, blotchy, appearance.
Hand Held Cameras • 1888 George Eastman founded a Rochester NY company and specialized in manufacturing gelatin dry plates. The Eastman Dry Plate Company – Eastman Company
Kodak • Pre-loaded camera: Kodak #1 • 3 ¼ x 3 ¼ x 6 ½ inches • Used with “American Film” – actually paper
Photographic image made (without a camera) by placing objects directly onto the surface of a photo-sensitive material such as photographic paper and then exposing it to light. The result is a silhouetted image varying in darkness based on the transparency of the objects used, with areas of the paper that have not received any light appearing light and those that have appearing dark, according to the laws of photosensitivity. The image obtained is often quite similar to an X-Ray. This method of imaging is perhaps most prominently attributed to Man Ray (RAYOGRAPHS) PHOTOGRAM
Developing…. • 1. Developer – 1-2 minutes – 1:9 water • 2. Stop – 5-10 seconds – 1:9 water • 3. Fixative – 1 minute 1:9 water • 4. Wash - 5 minutes - water • 5. wash aid – 10 minutes – 1:99 water • 6. wash - 5 minutes - water • Squeegee and blow dry • (68 degrees) • Red lights
Pinhole Photography • Pinhole photography is lensless photography. A tiny hole replaces the lens. Light passes through the hole; an image is formed in the camera. • Pinhole images are softer – less sharp – than pictures made with a lens. • The images have nearly infinite depth of field. • Wide angle images remain absolutely rectilinear. • The first published Picture of a pinhole camera obscura is apparently a drawing in Gemma Frisius' De Radio Astronomica et Geometrica (1545). • Sir David Brewster, a Scottish scientist, was one of the first to make pinhole photographs, in the 1850s. He also coined the very word "pinhole", or "pin-hole" with a hyphen, which he used in his book The Stereoscope, published in 1856. reproduced in Renner. • Pinhole photography became popular in the 1890s. • In the 1940s pinhole cameras found their way into nuclear physics. It was discovered that pinhole cameras could be used to photograph high-energy X-rays and gamma rays. • In the 1970s pinhole photography gained increasing popularity. Multiple pinholes became rare.
Digital Photography Camera Basics………
How to hold a digital camera….. Practice holding yours now……
Step 1….Sorry lefties! • Use your right hand to grip the right hand end of the camera. Your forefinger should sit lightly above the shutter release, your other three fingers curling around the front of the camera. Your right thumb grips onto the back of the camera. Most cameras these days have some sort of grip and even impressions for where fingers should go so this should feel natural. Use a strong grip with your right hand but don’t grip it so tightly that you end up shaking the camera. - Squeeze the shutter don’t jab at it!!!!!!!!!!!!
Step 2 & 3 2. The positioning of your left hand will depend upon your camera but in in general it should support the weight of the camera and will either sit underneath the camera or under/around a lens if you have a SLR. 3. If you’re shooting using the view finder to line up your shot you’ll have the camera nice and close into your body which will add extra stability but if you’re using the LCD make sure you don’t hold your camera too far away from you. Tuck your elbows into your sides and lean the camera out a little from your face (around 30cm). Alternatively use the viewfinder if it’s not too small or difficult to see through (a problem on many point and shoots these days).
Step 4 4. Add extra stability by leaning against a solid object like a wall or a tree or by sitting or kneeling down. If you have to stand and don’t have anything to lean on for extra support put your feet shoulder width apart to give yourself a steady stance. The stiller you can keep your body the stiller the camera will be. • Gripping a camera in this way will allow you flexibility
Setting the ISO – • ISO – a numeric rating of the image sensors sensitivity to light. • Can be automatic or manual
ISO • 100/200 = sunny outdoors • 400/800 = Overcast skies/evening • 1600 = Night or dark indoors • 800/1600 = less of a camera shake • Higher ISO = more grainy the image • 100 = fine • 1600 = grainy = more noise
Grain 100 speed 400 speed
Image Noise • Digital artifacts • Random, grain like, textured colored specks. • Large Image sensors produce less noise that small sensors. • Most noise occurs when shooting with low light and a high ISO setting.
White Balance • You might have noticed when examining shots after taking them that at times images can come out with an orange, blue, yellow etc look to them – despite the fact that to the naked eye the scene looked quite normal. The reason for this is that images different sources of light have a different ‘color’ (or temperature) to them. Fluorescent lighting adds a bluish cast to photos whereas tungsten (incandescent/bulbs) lights add a yellowish tinge to photos. • The range in different temperatures ranges from the very cool light of blue sky through to the very warm light of a candle. • We don’t generally notice this difference in temperature because our eyes adjust automatically for it. So unless the temperature of the light is very extreme a white sheet of paper will generally look white to us. However a digital camera doesn’t have the smarts to make these adjustments automatically and sometimes will need us to tell it how to treat different light. Read more: http://digital-photography-school.com/introduction-to-white-balance#ixzz2NFAUJzcc
White Balance – Color Temperature • Light has a strong effect on the color of your picture. • Some light is – • Neutral • Warm – yellow/orange • Cool – blue • White balance allows you to match the image sensor to the light situation • Or miss match it for creative result.