Download
1 / 6
70 likes | 314 Vues
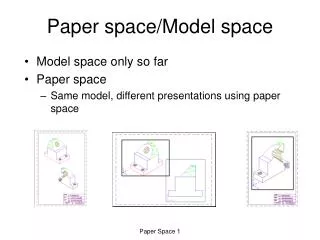
Paper space/Model space. Model space only so far Paper space Same model, different presentations using paper space. Preparing to Print. Draw in Model Space Prepare to print in Paper Space Start a new drawing using Paper Space as the template Insert Machine Support as a Block. Explode it.

E N D
Paper space/Model space • Model space only so far • Paper space • Same model, different presentations using paper space Paper Space 1
Preparing to Print • Draw in Model Space • Prepare to print in Paper Space • Start a new drawing using Paper Space as the template • Insert Machine Support as a Block. Explode it. • Click on the Blank A4 tab • Create a new current layer called VP • Make the left viewport first • View, Viewports, 1 • Move/Stretch the viewport (in Paper Space) • zoom/pan (in Model Space) • Make the other viewport Paper Space 2
Paper vs Model • What is Paper Space? • You are drawing on a piece of paper (can be set to any size) • WYSIWYG • You can have many (overlapping) viewports containing views of the object • Paper Space/Model Space • Toggle button on status line or type PS or MS Paper Space 3
Tidying up in Paper Space • Viewport border lines • Banish by freezing the layer called VP • Lose the UCS icon • View, Display, UCS Icon, Off in each viewport • Viewing with hidden line removal • View, Hide in each viewport • Plotting with hidden line removal • Type MVIEW then H then ON, then click on each viewport border Paper Space 4
Sections Layer: SECOND • Model Tab • Produce 2 copies of the support • Create 2 new layers (called SECOND, THIRD) • Put one copy on each layer • Draw, Solids, Slice • Pick three points on the slice plane (use the model on SECOND layer) • Layout 1 Tab • Make VP current layer • View, Viewports, 1 Viewport • To lose copies of support • Model Space • Format, Layer, Current VP freeze. • Current VP freeze layers 0 and THIRD. Layer: THIRD Paper Space 5
Section Practice • Layout 2 Paper Space 6