Download
1 / 20
200 likes | 296 Vues
Learn how to make engaging PowerPoint tutorials using images and captions. Tips included for layout consistency and effective design.

E N D
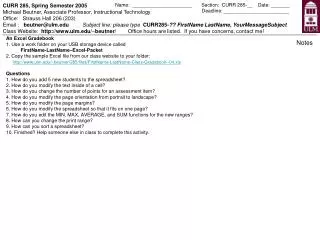
Michael Beutner, Associate Professor, Instructional Technology Office: Strauss Hall 206 (203) Email : beutner@ulm.edu When you send email, please type in Subject area: 285, Section [ 1, 4, 5, 6 ], [ FirstName LastName ] -- [ Your Topic ] Class Support Site: http://www.ulm.edu/~beutner/ Office Hours are listed on the site. Contact me regarding any concerns! CURR 285, Fall 2004 (Class Participation Credit Only) PowerPoint Assignment and Notes: Making a Tutorial with Images and Captions Recommendation: Work in Groups of 2. ___ 1. Download the file. ___ 2. Rename the file name. ___ 3. Edit the footer. ___ 4. As you edit, save the file as versions. ___ 5. Create a simple tutorial, using images and captions. ___ 6. Tip: Be consistent with your layout. ___ 8. Tip: Use few words per slide. ___ 9. Tip: Keep it simple. One font type is fine. ___ 10. Tip: Good contrast is important. ___ 11. Tip: For each image, use a caption. ___ 12. Tip: Use one font size for slide titles. ___ 13. Tip: Use one font size for regular text. ___ 14. Tip: Use one font size for captions. ___ 15. Save the finalized version of the tutorial as: CURR285-Sec_-FirstName-LastName-FirstName-LastName-Tutorial Copy the file to the “Teacher’s Station/Computer”. 1. How do you “capture” what you see on your computer monitor? 2. Where is a “captured screen” stored? Is it really an image? 3. How do you paste a “captured screen” into a PowerPoint slide? 4. How do you resize or move an image in Powerpoint? 5. Can you scan an image on a scanner? 6. Can you crop, resize and save a scanned image as a file? 6. Can you use a digital camera and save the image as a file? 7. Can you paste an image from a file, or from clipart, into a PowerPoint slide? 8. How do you make a presentation appear as “portrait” instead of “landscape”? 9. How do you add a background to a Powerpoint slide? 10. Which image file format or type works best for most applications? 11. How do you add a slide in PowerPoint? 12. How do you delete a slide in PowerPoint? 13. How do you rearrange slides in PowerPoint? 14. How do you copy slides in PowerPoint? 15. How do you print just one slide? 16. How do you print 2 slides on one sheet of paper as a handout? 17. How do you create “Word Art”? 18. How do you use a “hyperlink” to link from one slide to another? 19. How do you use a “hyperlink” to link to a Web page? 20. How do you insert an arrow, circle, square, or similar object into a slide? 21. How do you copy drawn objects? 22. Can you use the “drawing guide” to help you arrange and align? Vocabulary Navigation Transition Format Linear vs. Interactive Hyperlink Layout Custom Animation
[Slide Title (Arial 44)] 1. My Slide Format (Arial 36) 2. Tutorial: How to ….. 3. About Me/Us • Modify this slide, as needed, using the format that • you specify on the next slide. • Edit the footer. • Add a clipart image. • (Delete this later.) Curr 285, Section #, FirstName LastName, About Me, Fall 2004
Slide Format Arial 44 – Slide Titles Arial 36 – This is the size of regular text. Arial 24 – This is the size of text used for captions. 1. Edit this slide to show the font name and size you will use for your titles, regular text, and captions in your presentation. 2. Then, edit the title, as needed. (Delete this later.) Curr 285, Section #, FirstName LastName, About Me, Fall 2004
On this slide: • Paste an image of a portion of a captured screen. • Provide a brief explanation with a caption. • Use arrows or circles to highlight, if you like. • (Delete this later.) 1 Delete this later. This is Arial 36. You can use this area to provide a brief explanatory caption. Curr 285, Section #, FirstName LastName, A Visual Tutorial, Fall 2004
On this slide: • Paste an image of a portion of a captured screen. • Provide a brief explanation with a caption. • Use arrows or circles to highlight, if you like. • (Delete this later.) 2 Delete this later. This is Arial 36. You can use this area to provide a brief explanatory caption. Curr 285, Section #, FirstName LastName, A Visual Tutorial, Fall 2004
On this slide: • Paste an image of a portion of a captured screen. • Provide a brief explanation with a caption. • Use arrows or circles to highlight, if you like. • (Delete this later.) 3 Delete this later. This is Arial 36. You can use this area to provide a brief explanatory caption. Curr 285, Section #, FirstName LastName, A Visual Tutorial, Fall 2004
On this slide: • Paste an image of a portion of a captured screen. • Provide a brief explanation with a caption. • Use arrows or circles to highlight, if you like. • (Delete this later.) 4 Delete this later. This is Arial 36. You can use this area to provide a brief explanatory caption. Curr 285, Section #, FirstName LastName, A Visual Tutorial, Fall 2004
On this slide: • Paste an image of a portion of a captured screen. • Provide a brief explanation with a caption. • Use arrows or circles to highlight, if you like. • (Delete this later.) 5 Delete this later. This is Arial 36. You can use this area to provide a brief explanatory caption. Curr 285, Section #, FirstName LastName, A Visual Tutorial, Fall 2004
On this slide: • Paste an image of a portion of a captured screen. • Provide a brief explanation with a caption. • Use arrows or circles to highlight, if you like. • (Delete this later.) 6 Delete this later. This is Arial 36. You can use this area to provide a brief explanatory caption. Curr 285, Section #, FirstName LastName, A Visual Tutorial, Fall 2004
On this slide: • Paste an image of a portion of a captured screen. • Provide a brief explanation with a caption. • Use arrows or circles to highlight, if you like. • (Delete this later.) 7 Delete this later. This is Arial 36. You can use this area to provide a brief explanatory caption. Curr 285, Section #, FirstName LastName, A Visual Tutorial, Fall 2004
About Me/Us In this slide, simply insert your image/s with a very brief caption/s. (Delete this later.) Curr 285, Section #, FirstName LastName, About Me, Fall 2004
Image Work Area In this “work area”, paste your captured images. You can copy these slides later into your presentation. (Delete this entire section later.)
A Delete later.
B Delete later.
C Delete later.
D Delete later.
E Delete later.
F Delete later.
G Delete later.
H Delete later.