Download
1 / 3
30 likes | 135 Vues
Explore the fascinating process of self-assembly in nature and its application in materials science. Learn how viruses, cells, and more build themselves, and design your own self-assembling model using magnets or Velcro. Understand the principles of temperature and stickiness in creating precise structures. Enhance knowledge in computing, drug delivery, and tissue engineering. Ideal for educational activities and sparking interest in nanoscience. Visit the provided link for additional LEGO nanoscience resources.

E N D
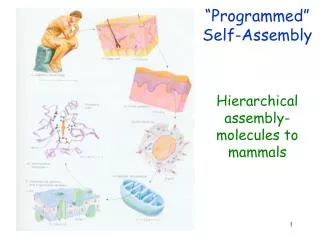
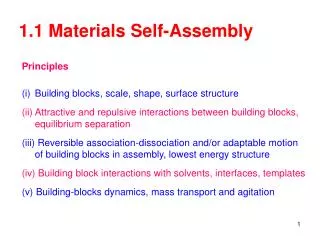
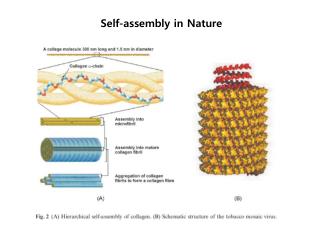
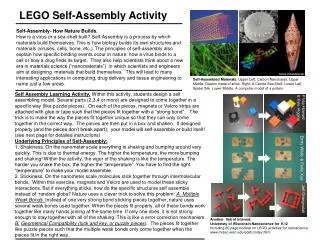
LEGO Self-Assembly Activity Self-Assembly- How Nature Builds. How is a virus or a sea-shell built? Self-Assembly is a process by which materials build themselves. This is how biology builds its own structures and materials (viruses, cells, bone, etc.). The principles of self-assembly also explain how specific binding events occur in nature: how a virus binds to a cell or how a drug finds its target. They also help scientists think about a new era in materials science (“nanomaterials”) in which scientists and engineers aim at designing materials that build themselves. This will lead to many interesting applications in computing, drug delivery and tissue engineering to name just a few areas. Self-Assembled Materials. Upper Left: Carbon Nanotubes. Upper Middle: Diatom made of silica. Right: A Calcite Sea Shell. Lower Left, Spider Silk. Lower Middle: A computer model of a protein. Self Assembly Learning Activity.Within this activity, students design a self assembling model. Several parts (2,3,4 or more) are designed to come together in a specific way (like puzzle pieces). On each of the pieces, magnets or Velcro strips are attached with glue or tape such that the pieces fit together with a “strong bond”. The trick is to make the way the pieces fit together unique so that they can only come together in the correct way. The pieces are then put in a box and shaken. If designed properly (and the pieces don’t break apart), your model will self-assemble or build itself! (see next page for detailed instructions) Underlying Principles of Self-Assembly: 1. Shakiness. On the nanometer scale everything is shaking and bumping around very quickly. This is due to thermal energy. The higher the temperature, the more bumping and shaking! Within the activity, the vigor of the shaking is like the temperature. The harder you shake the box, the higher the “temperature”. You have to find the right “temperature” to make your model assemble. 2. Stickiness. On the nanometer scale molecules stick together through intermolecular bonds. Within this exercise, magnets and Velcro are used to model these sticky interactions. But if everything sticks, how do the specific structures self assemble instead of random globs? Nature uses a clever trick to solve this problem: A. Multiple Weak Bonds. Instead of one very strong bond sticking pieces together, nature uses several weak bonds used together. When the pieces fit properly, all of these bonds work together like many hands joining at the same time. If only one does, it is not strong enough to stay together with all of the shaking. This is like a error correction mechanism. B.Geometrical Compatibility (lock and key, or puzzle pieces). The pieces fit together like puzzle pieces such that the multiple weak bonds only come together when the pieces fit in the right way. Philip Howard & Kyle Higgins Emily Wilde & Feifei Xue JeffGrangnolati Another link of interest: Univeristy of Wisconsin Nanoscience for K12 Including 60 page booklet on LEGO activities for nanoscience. www.mrsec.wisc.edu/edetc/index.html
Glue Lego Pieces together • Building a Self-Assembling Model: • Model Design: Before gluing or taping anything together, original model ideas should be designed on paper. Draw out plans for your model and work out the logic of your bonding schemes. You could even cut out pieces of paper with shape and bonds represented to see if the pieces fit and bond the way you intended (and to make sure that pieces you don’t want to bond strongly won’t). A lot of mistakes and false starts can be prevented at this stage. Try to use clever combinations of bonds (multiple weak bonds) and the lock and key strategy to allow several pieces to come together in a unique predetermined way. • Model Construction: The next step is to glue or tape your magnets onto your LEGO pieces. One of the most crucial design considerations of a successful model is that it doesn’t break under shaking. Superglue works pretty well but is not perfect. The best solution is good design. Try to prevent undesired bonds from occurring so you don’t have to shake so hard that things break. In many cases however, you will not be able to completely eliminate undesired (non-specific) binding. • Reaction Chamber: For the simplest self-assembling models you should use “2D” shaking in which the pieces simply slide around on the bottom surface of a box. The pieces are placed in the box (separated and randomly arranged), the box is placed on a desk or the floor and slid back and forth in random directions. Choose a box with flat walls the intersect at right angles with the bottom surface so that the pieces will bounce off the walls without flipping over. Adjust your “temperature” to break undesired bonding. That is, shake more or harder if pieces that aren’t supposed to come together stick. If you model is well designed, any such undesired bonds will be relatively weak. It may take several times for your model to work. That’s fine. If it works 1 out of 5 times, you’ve made a pretty good model (you may have to shake for 30s or 1min). If you are ambitious you can try 3D shaking (closing the box and shaking the pieces within the whole volume of the box. This will take longer and require that the pieces can take a beating without losing magnets or breaking. Have fun! • Hints and other ideas: • Use Velcro and magnets in clever combinations to create more unique bonds. • Use other materials besides LEGO: cardboard, tinker toys, Styrofoam balls etc. .. • Try to model protein folding. Use rubber tubing, a strip of cloth or duct tape (folded to embed magnets), design the interactions such that when the strip is shaken, it folds into a predetermined shape (challenging!!). • If pieces are bonding too strongly with the magnets, place pieces of tape on the magnets’ surface to adjust the force (by separating the magnets). Magnet Disk Magnet Primer: Every magnet has two sides : a north and a south. North attracts South, South attracts North, North repels North, South repels South. There is a true north and south end but you don’t need to worry about this. Simply choose one side of one magnet as your reference (call it North). You can then determine the “sign” of each magnet’s end by checking it against the reference. N S Model Example 1. Model Example 2. 1. Select Reaction Chamber 2. Place pieces in the chamber 3. Shake, shake, shake 4. Success!! You can keep the box open to watch the process if you wish.