
Basic & Advanced Reporting in TIMSNT ** Part One **
Basic & Advanced Reporting in TIMSNT ** Part One **. How it is - Reporting in TIMS.nt. Edulog wanted reporting in the new software to be more powerful and flexible. Rather than create their own software from scratch, they incorporated existing report software. They chose FoxPro Query Maker.

Basic & Advanced Reporting in TIMSNT ** Part One **
E N D
Presentation Transcript
How it is - Reporting in TIMS.nt • Edulog wanted reporting in the new software to be more powerful and flexible. • Rather than create their own software from scratch, they incorporated existing report software. • They chose FoxPro Query Maker.
FoxPro Query Maker • FoxPro is Microsoft database software • Grandma of ACCESS • Query Maker is FoxPro’s query builder and report writer that can be included royalty free in FoxPro applications. • That’s why we have it - it’s free.
Edulog vs. FoxPro Tables • The tables you edit in TIMS.nt are still in a format developed by Edulog. • However, QueryMaker can’t use the Edulog tables. • So, the TIMS.nt uses FoxPro format tables for reporting.
Edulog vs. FoxPro Tables • Because you are reporting from tables other than your Edulog data tables, changes made to your dataare not immediately available in reporting. • Changes made to the Edulog tables must be transferred to the FoxPro tables. • In a nutshell, it works like this…
How it Works. . . • Changes you make to your Edulog data tables are also written to a set of text files. • Internally, Edulognt checks these files every few minutes. It transfers what it finds in these files to your FoxPro tables. • After that, your reports will show the changes you made.
Remember • What you need to remember… • Generally, changes made to your data tables are not immediately available in reports. Give the software a few minutes to complete the transfer.
Edulog’s Dumpall Utility • Dumpall is a maintenance utility that is run through the Edulog Maintenance Utility (EMU). EMU is used for System Maintenance. • Dumpall deletes the existing FoxPro tables, builds new ones, and fills them with all your transportation and student data. • You will only need to run Dumpall under special circumstances.
Tradeoff: A little more complexity, a lot more control • Report’s Query maker gives you control over…. • Query Filters • Data item selection • Report appearance • Selection and sorting available on new items like bus stop assignment, time at stop, distance to stop, etc.
New Capabilities and Control • You have two options in Edulog.nt reporting: • Continue to use the reports you have always used and reports we’ve create for you. or • Learn to make use of the more flexible, FoxPro-based reporting and modify existing reports to your own liking.
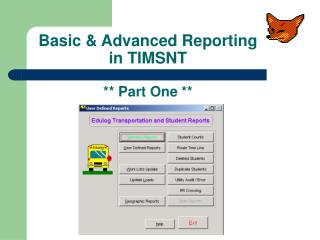
Getting Started Report Start > Programs > Edulog.nt Client Software > Report
Overview of Report features: Format Format Provides various options on how you want your reports to appear
Format You can set global options for all reports or set options for just standard reports. These are the default settings
Overview of Report features: Geographic Reports Geographic Reports • Opens the Geographic Reports launch pad which provides access to the various reports which list information on your geographic data. • Street Name Listing • Overlapping Segments • Traffic Listing • Boundary Listing
Overview of Report features: Student Counts Student Counts Produces reports listing the numbers of students at each of the schools in your system. You can produce student counts broken down by grade or by transportation eligibility code.
Student Counts Select Eligibility Code 0 • For output type, select landscape
Student Counts Sch/Grd Report Sch/Grd report shows enrollment • Sch/Elg Report shows assignments
Sch/Elg Report Setup Report fills fields for the report
Overview of Report features:Route Time Line Route Time Line Produces a time line report on routes in your system.
Route Timeline • This screen gives you choices to customize your timeline > selects a single route >>selects the whole list
Overview of Report features: Deleted Students Deleted Students Produces a list of all students that have been deleted (flagged for deletion, but not yet purged) in edulog.nt. Useful during an upstu?
Deleted Students Report • The first time you run it, you will need to name the query
Deleted Students • Next, select Student Last Name as the field > NextStep • Under the Pick an Operator tab, select Is Not Empty • You will also have to pick the fields you want in the report • When you run the query, the list will include all deleted students
Overview of Report features: Duplicated Students Duplicate Students Produces a listing of all students with duplicated information in the student database. You can use this report to find students that have the same first name, last name, and address (an indication that a student has been inadvertently entered into the system more than once) or to find students that have accidentally been given the same district ID number. You can have Query Maker check any field in student records for duplication.
Overview of Report features: Utility Audit/Error Utility Audit/Error Provides access to reports produced by the various edulog maintenance utilities. When you use Query Maker to examine these reports, you can change the information included in the report and the order in which it is arranged.
Utility Audit / Error Provides access to reports produced by the various edulog maintenance utilities. A bit complex. Not as useful as .aud & .err files from EMU.
Overview of Report features:RR Crossing RR Crossing Allows you to produce reports on railroad crossings in your system.
Overview of Report features: Standard Reports vs User Defined Reports Standard Reports vs User Defined Reports Standard: Structured menu system that lets you select parameters for reports User Defined: Pre-prepared reports, ready to run as they are or be customized.
Standard Reports • Standard • Easy to find report you want • Simpler to use • Partial control: Can change search and sort • Can’t change field selection, field order, or format • Adequate for many purposes
User Defined Reports • User Defined • Harder to find report you want • Harder to use • Full control over report: change search, sort, field selection, field order, report appearance • Use to create custom reports
Start here Standard Reports: PTSIII Reports Selecting the check box in any of the reports types will bring up sub menus for those reports
Standard Reporting:Example Run Report The resulting Run Report:
Reporting Vocabulary • Filter – a set of conditions that indicate which records and fields from a database are to be included in your query results. • A condition consists of: • a field name (such as “Grade”) • a relational operator (such as “Is equal to”) • a comparison value (such as “06”). • Example: students in the sixth grade
Click here Standard Reporting: Change Filter Search Further modifying your Search parameters….. Perhaps we desire the same run report but for just ONE school.
For this example, we’ll choose Add Change Filter Search (continued) Now you can edit, add to, or delete the modifiable filters. Non-Modifiable Modifiable
Save the filter and exit. Change Filter Search (continued) Now we’ll make the selections that locate all RunIDs that begin with306
Standard Reporting – end notes • The results will be a report that contains all Runs that begin with 306. • The Standard Reports option is great for generating reports that require typical or general information. • More complex data output will require the use of User Defined Reports
Basic & Advanced Reporting in TIMSNT** End of Part One ** To Continue. . . Go back to the web page and click Basic & Advanced Reporting in TIMSNT, Part Two