Download
1 / 18
180 likes | 352 Vues
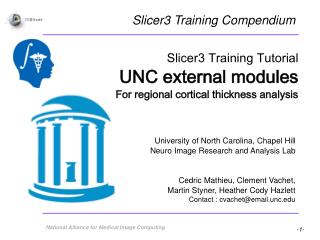
Slicer3 Tutorial / Registration Library: Case 29 - DTI converting and aligning diffusion MRI. Dominik Meier, Ron Kikinis Sept. 2010. Introduction / Scenario.

E N D
Slicer3 Tutorial /Registration Library: Case 29 - DTIconverting and aligning diffusion MRI Dominik Meier, Ron Kikinis Sept. 2010
Introduction / Scenario • We have a surgical planning dataset containing two structural reference scans: a T2 and T1-weighted MRI, and a diffusion-weighted (DWI) scan. • We want to convert the DWI into a DTI dataset to enable fiber-tracking • We then want to align the DTI with the structural reference T1 scan T1 reference T2 reference DTI baseline DTI tensor we seek the DTI tensor aligned and resample into the space of the T1 reference scan.
Modules Used • To accomplish this task we will use the following modules: • Volumes Module • Diffusion Tensor Estimation Module • BrainsFit Registration Module • Data Module • Resample DTI Module
Prerequisites • Slicer version 3.6.1 or later • Example Dataset: download and extract the dataset for this tutorial: RegLib_C29_DATA.zip, which should contain this tutorial, all original and some intermediate solution data files. • The extension set RegLib_C29_DATA_DWI.zip contains the original DWI image and the resampled DTI image (omitted from main set to maintain moderate dowload sizes). • Tutorials to complete first (optional): • Slicer3Minute Tutorial • Loading and Viewing Data • DTI tutorial
Convert to NRRD format We first convert the DICOM series of the DWI image into a single-volume NRRD file. This prevents problems when reading multi-dimensional datasets from DICOM directly. If reading the DICOM directly, the 4th dimension may not be recognized and merged with the 3rd dimension to yield an unusable image stack. The DICOM to NRRD converter taks care of this issue. Select the directory where the DICOM series is located and a filename for the result image file.
DWI -> DTI conversion The conversion from DWI to DTI will produce 3 new volumes: DTI_base: used as moving image to compute the registration with a T2 reference DTI:final registration transform will be applied to the tensor to resample it in the new reference space (T1). DWI DTI_mask: the mask will be used to guide the automated intensity-based registration of the DTI_baseline. Particularly the nonrigid aspects of the registration to correct for the DTI distortions benefit from the ROI provided by the mask.
Convert DWI -> DTI • We next convert the DWI volume into a DTI tensor image that can be used for fiber tracking and other forms of quantifying diffusion. • The DTI Estimation module in the Diffusion / Utilities section will perform this task in a single automated step: • Select the DWI image • Create new DTI output image • Create new output baseline volume • Create new Otsu mask volume • Leave Estimation Parameters at defaults • Click Apply • The DTI_baseline output will serve as moving image for the registration • The Otsu mask image may be useful as mask to focus registration
T1 T2 DTIbase T2reg T2reg DTI DTIreg DTImaskreg Registration Strategy Xf1 • Register the T2 scan to the T1 • Register the DTI_baseline to the registered T2 • Apply the second transform to the DTI volume. The reason for these 2 steps is that best registration quality and robustness is achieved when image contrast and/or resolution are similar. A registration of the DTI_baseline to the T1 is a large step in both image contrast and resolution / FOV and likely to fail We register to the T2 after it is aligned with the T1. Registering to the original T2 and then moving to the T1 would require concatenating transforms in a form not currently supported, or alternatively would require additional resampling which would reduce DTI image quality. Xf2 Xf2 Xf2
Register T2 -> T1 • Go to the “BrainsFit” module • Input:Fixed Image: T1 Moving Image: T2 • Output:“Slicer Linear Transform”: create new, rename to “Xf1_T2-T1_Affine”Output Volume: create new, rename to “T2_Xf1”Check boxes for: “rigid”, “affine”Registration Parameters all defaults except Number of Samples 200,000
Register DTI baseline to T2 • Go to the “BrainsFit” module • Input:Fixed Image: T2_Xf1 Moving Image: DTI_baseline • Output:“Slicer Bspline Tansform”: create new, rename to “Xf2_DTI-T1_unmasked”Check boxes for: “rigid”, “affine” + “Bspline” registrationRegistration Parameters as shown below: Changes to defaults highlighted
Registration: Masking • For this scenario a mask of the brain parenchyma is useful and improves registration quality. • The DTI estimation process produced a mask for the DTI_base image, but we still need another for the T1. • We can either perform a separate segmentation for the T1 or reuse the DTI_mask by first performing another registration.
Obtain Mask for T1 / T2reg BRAINSfit requires masks for both the fixed and moving image. To obtain a mask for the fixed image we first use the BRAINSfit registration we just did (without a mask) and use the result transform to resample the DTI_mask volume into the T1 space.
Obtain Mask for T1 / T2reg BRAINSfit requires masks for both the fixed and moving image. To obtain a mask for the fixed image we first perform the same (Affine + Bspline) registration without a mask and use the result transform to resample the DTI_mask volume into the T1 space. This requires : BRAINSfit registration (unmasked), output = Bspline Xform only Resample Scalar/Vector/DWI volume, applied to DTI_mask; output = T1_mask
Register DTI baseline to T2 (masked) We now have the masks to repeat the registration:We use the same settings except we add the two mask files:Go to the “BrainsFit” module Input:Fixed Image: T2_Xf1 Moving Image: DTI_baseline Mask Processing Tab:Check box: Mask Processing Mode: ROIFixed Mask: DTI_mask_Xf1Moving Mask: DTI_mask Output:“Slicer Bspline Tansform”: create new, rename to “Xf3_DTI-T1_masked”“Output Volume”: create new, rename to “DTI_base_Xf3”Check boxes for: “rigid”, “affine” + “Bspline” registrationRegistration Parameters as shown below: Changes to defaults highlighted
Resample DTI Last step is to resample the DTI with the new transform (Xf3). This is done with the Resample DTI Volume Module, found in the Diffusion / Utilities Set Input image = DTIOutput Volume = New DTI VolumeReference Volume = T1 Transform Parameters:Transform Node = Xf3_DTI-T1_masked Select/check the output-to-input box Apply
Results We have now the DTI in the same orientation and resolution as the T1 reference scan. For verification: for the resampled DTI_BSpl2 select “Color Orientation” from the Display tab in the Volumes module, then set fore- and background to the SPGR and DTI_BSpl2 respectively and drag the fade slider to a halfway position. animated gif, view in presentation mode
Acknowledgements National Alliance for Medical Image Computing NIH U54EB005149 Neuroimage Analysis Center NIH P41RR013218 -12S1 (ARRA Suppl)