Download
1 / 22
220 likes | 344 Vues
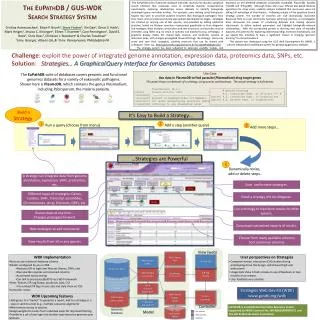
BioG-M Controller OPERATION GUIDE. CONTENTS. Screen & Keypad Main Screen Set Menu Calibration Menu 1) pH Calibration 2) DO Calibration 3) Temperature Calibration Data Logging Screen 1) Data Logging Menu 2) Saving all data stored in Flash Memory into PC. Diagnostic Screen

E N D
CONTENTS • Screen & Keypad • Main Screen • Set Menu • Calibration Menu • 1)pH Calibration • 2)DO Calibration • 3)Temperature Calibration • Data Logging Screen • 1) Data Logging Menu • 2)Saving all data stored in Flash Memory into PC. • Diagnostic Screen • Data communication with PC (using Data Logging program)
KEYPAD Run/Stop Main LCD Menu key No.Input key Screen & Keypad
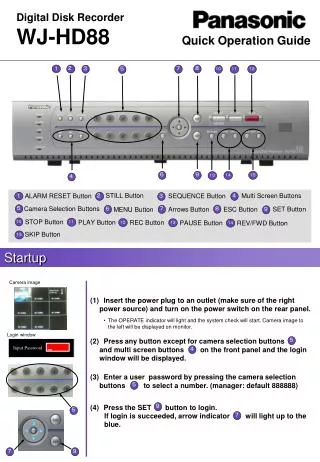
TITLE BAR CHANNEL NO. CONNECTION RUN1 RUN2 MEASURE SETTING PUMP INDICATOR DATA MENU BAR 1. Main Screen • Main menu • * Title Bar: Indicates current title of the screen. • * Channel No.: It is number of channel connected to fermenter. Therefore, we can divide Data from two fermenters according to their channel numbers. • * Com. Connection Indicator: Indicates connection to BioG-M. • - _Not Connect_ mean s it is not connected. • - _Connect_ means it is connected. • * Data (data name column): Shows the name of each data row. • * Measure (measured values): Shows us current value measured by sensors. • * Setting (setting value): Displays Setting Value set by User. • * Pump Operating Condition: The operating condition is indicated here. • - ACID1, BASE1, FEED1, FOAM1: Pumps of Fermenter No.1 • - ACID2, BASE2, FEED2, FOAM2: Pumps of Fermenter No.1 • - Pump condition: Stopped Operating • * Menu Bar: Sub menus are shown here. • - Set: Move to Set menu • - CAL: Move to pH Calibration menu • - Data Log: Move to Data Log menu • - Diag: Move to Diagnostic menu • 2. Operation • - When Com. Connection Condition is [Connect], press RUN/STOPor[F6] or[F7] in keypad to start operation of BioG-M. • * RUN : Shows the status that BioG-M is stopped. • * STOP: Shows the status that BioG-M is in operation.
CHANNEL NO. TITLE BAR SELECTED DATA Input CH 2 DATA MENU BAR 2. Set Menu • - Control values are set here. • After pressed [F1], it moves to the next screen shown below. • 1) Set Menu Screen • * Selected Data: The selected data cell is highlighted. • * Menu bar • - Main: Press to return to the Main menu. • - Up: Press to select Data. • - Down: Press to select Data. • - Input: Press to pop out input window to input the setting value. • - CH2: Press to select channel. • * CH2 Key : It moves to Channel 2 Setting after pressing the key. • * CH1 Key : It moves to Channel 1 Setting after pressing the key.
2) Operation • Pressing [F2] (Up) and [F3] (Down) to select the cell you want to input in. • After selecting the cell, press [F4]to input the value you want. Then, it shows the Message Box (Input Box)below. • Set Value Input: Pressing numbers on keypad, input Set Value. • - [Cancel] : After pressing it, Message Box is disappeared and it comes back to SET Menu. • - [Delete] : Pressing it, number of the Set Value is deleted from right to left one by one. • - [Enter] : After Set Value input, pressing Enter key, Message Box is disappeared and it comes backto SET Menu. You can confirm the value changed in Set Menu screen.
CURRENT VALUE CALIBRATION DATA CHANNEL NO. TITLE BAR MENU BAR SLOPE PROGRESS BAr CALIBRATION DATE 3. Calibration Menu[1] pH Calibration • - This is for pH. Calibration. • After pressing [F2](CAL) in Main Menu, you will see the screen shown below. • Calibration Screen • * Current Value measured : Pressing Start button, it displays the current value during calibration. • * Calibration Data : It indicates calibrated value of each buffer after calibration. • * Channel No. : It indicates Channel No. of fermenter which is being calibrated now. • * Slope : It shows Slope after all calibrations of three buffers are finished. • * Progress Bar : It indicates how far the calibration has progressed. • * Calibration Date : It shows the date when calibration was performed recently. • If it hasn’t been calibrated the message No Calibration is shown.
* Menu Bar • [Main] : Pressing the key, it goes back to Main screen. • - [Start/OK] : Pressing the key, it starts calibration. Once calibration is started, the key is changed to [OK]. • <After confirming that measured value of buffer is stable, press [OK] to finish calibration manually or wait until it is finished automatically. > • - [Cancel] : Press it to cancel it during buffer calibration. Once canceled, it starts from buffer 7. • - [pH] : Restart pH Calibration screen and start calibration from pH 7. • - [DO] : Pressing the key, it moves to DO Calibration Screen. • - [Temp] : Pressing the key, it moves to Temperature Calibration Screen. • - [CH 2/ CH 1] : Pressing the key, it moves to other channels.
2) Operation • * Calibration is performed in the order of Buffer 7, Buffer 4 and Buffer 10. • * pH. 7 calibration • - To start calibration, press [F2][Start] when sensor is submerged in pH.7 Buffer. • - Once the Buffer value gets stable, it automatically finishes pH.7 Buffer Calibration and starts pH. 4 Buffer • Calibration. • - After confirming that currently measured value of buffer is stable, press [F2][OK] to finish calibration manually. • Then, it starts pH. 4 Buffer Calibration. • - Press [F3][Cancel] to cancel it during buffer calibration. Once canceled, it starts from buffer 7. • * pH 4 calibration • - To start calibration, press [F2][Start] after sensor is submerged in pH. 4 Buffer. • - Once the Buffer value gets stable, it automatically finishes pH. 4 Buffer Calibration and it starts pH. • 10 Buffer Calibration. • - After confirming that currently measured value of buffer is stable, press [F2][OK] to finish calibration manually. • Then, it starts pH. 10 Buffer Calibration. • - Press [F3][Cancel] to cancel it during buffer calibration. Once canceled, it starts from buffer 7. • * pH 10 calibration • - To start calibration, press [F2][Start] after sensor is submerged in pH. 10 Buffer. • - Once the pH. 10 Buffer value gets stable, it automatically finishes pH. Calibration. • - After confirming that currently measured value of buffer is stable, press [F2][OK] to finish calibration manually. • Then pH. Calibration is finished. • - Press [F3][Cancel] to cancel it during buffer calibration. Once canceled, it starts from buffer 7.
CALIBRATION DATA TITLE BAR CURRENT VALUE CHANNEL NO. MENU BAR CALIBRATION DATE PROGRESS BAR [2] DO Calibration • - This is for DO Calibration. • After pressing [F5](DO) in Calibration Menu, you will see the screen shown below. • 1) DO Calibration Screen • * Current Value measured: Pressing Start button, it displays the current value during calibration. • * Calibration Data: Indicates calibrated value of each buffer after calibration. • * Channel No.: Indicates Channel No. of fermenter which is being calibrated now. • * Progress Bar: Indicates how far the calibration has progressed. • * Calibration Date: Shows the date when calibration was performed recently. • If it hasn’t been calibrated the message No Calibration is shown.
* Menu Bar • [Main] : Pressing the key, it goes back to Main screen. • - [Start/OK] : Pressing the key, it starts calibration. Once calibration is started, the key is changed to [OK]. • <After confirming that measured value of buffer is stable, press [OK] to finish calibration manually or wait until it is finished automatically. > • - [Cancel] : Press it to cancel it during buffer calibration. Once canceled, it starts from Zero. • - [pH] : Pressing the key, it moves to pH Calibration Screen. • - [DO] : Restart DO Calibration screen and start calibration from Zero. • - [Temp] : Pressing the key, it moves to Temperature Calibration Screen. • - [CH 2/ CH 1] : Pressing the key, it moves to other channels.
2) Operation • * Calibration is performed in the order of Zero, Span. • * Zero calibration • - To start Zero calibration, press [F2][Start] when sensor is submerged in Zero Gel or disconnected. • - After user confirms that currently measured value of buffer is stable, press [F2][OK] to finish calibration. • Then, it starts Span Calibration. • - Press [F3][Cancel] to cancel it during calibration. Once canceled, it starts from Zero calibration. • * Span calibration • - To start Span calibration, press [F2][Start] after sensor is connected. • - After user confirms that currently measured value of buffer is stable, press [F2][OK] to finish calibration. • That is the end of DO calibration. • - Press [F3][Cancel] to cancel it during calibration. Once canceled, it starts from Zero calibration.
TITLE BAR PROCESS TEMP INPUT CHANNEL NO. PROGRESS BAR CALIBRATION DATE MENU BAR [3] Temperature Calibration • - This Screen is for Temperature Calibration. • After pressing [F6](Temp) in Calibration Menu, you will see the screen shown below • 1) Temperature Calibration Screen • * Process Temp Input: Calibration Temperature can be inputted into the Message Box. • * Channel No.: It indicates Channel No. of fermenter which is being calibrated now. • * Progress Bar: It indicates how far the calibration has progressed. • * Calibration Date: It shows the date when calibration was performed recently. • If it hasn’t been calibrated the message _No Calibration__ is shown.
* Menu Bar • [Main] : Pressing the key, it goes back to Main screen. • - [Start/OK] : Pressing the key, it starts calibration. Once calibration is started, the key is changed to [OK]. • <After confirming that measured value of buffer is stable, press [OK] to finish calibration manually or wait until it is finished automatically. > • - [Cancel] : Press it to cancel it during buffer calibration. • - [pH] : Pressing the key, it moves to pH Calibration Screen. • - [DO] : Pressing the key, it moves to DO Calibration Screen. • - [Temp] : Pressing the key, it moves to Temperature Calibration Screen. • - [CH 2/ CH 1] : Pressing the key, it moves to other channels.
2) Operation • * After pressing [F6](Temp), it moves to Calibration screen and pop-up Message Box where temperature value is inputted. • * Process Temp. Input: Pressing numbers on keypad, input Set Value. • - [Cancel] : After pressing it, Message Box is disappeared and it comes back to Calibration Screen. • - [Delete] : Pressing it, number of the Set Value is deleted from right to left one by one. • - [Enter] : After Set Value input, pressing Enter key, Message Box is disappeared and it comes. back to Calibration Screen. You can confirm the value changed in Calibration Screen. • * After Process Temp. Input, Message Box is disappeared and it goes to next screen. • * Press [F2][Start] to start Temp. calibration. • * Once current temperature gets stable, Temp. calibration is finished automatically. • * Press [F2][OK] to finish calibration manually. • * Press [F3][Cancel] to cancel it during calibration. • * To input Calibration Temperature again, press [F6][Temp]. • Then, Calibration Temp Input Message Box is popped up.
Transfer 4. Data Logging Screen • - The screen is for checking Data. • - After pressing [F3](Data Log) in Main Menu, you will see the screen shown below. • - Only during operation, it shows Data. • Data Logging Menu • * [Main] : Pressing the key, it goes back to Main screen. • * [Time Interval] : Using the key, you can set Data Logging Time. • Then, you can see _Message Box_ for input of time interval. • * [Up] : It scrolls the screen to upper pages one by one. On the screen, you can check data stored in flash memory when the fermentation is stopped. • * [Down] : It scrolls the screen to lower pages one by one. On the screen, you can check data stored in flash memory when the fermentation is stopped. • * [All Clear] : It deletes data stored in flash memory. • * [Excel Transfer /Excel End] : Use the key to transmit current data to PC. But this function should be performed with the old version Data Logging software. It is can’t used when performing the SCADA software。 • * [CH 2/ CH 1] : You can change the channel by this key.
2) Clearing data saved in the flash memory • * Pressing [F5][All Clear] button brings _Message Box_ for confirmation as below. • To delete memory, press [F1][OK]. To cancel the deletion, press [F2][Cancel]. • * Once [F1][OK] pressed, Memory Clear is started with pop up Message Box below. • During deletion, pressing [F1][Cancel] makes Memory Clear terminated. Then it comes back to Data Logging Menu
<Caution> • When flash memory of BioG-A is overloaded, the message box shown below is popped up. • Overloaded Memory causes lost of data stored in. Therefore, when the memory is overloaded you have to save all data into PC to prevent it from lost of data.
5. Diagnostic Screen • - You can set current date and time on the screen. • - After pressing [F4]in Main Menu, you will see the Diagnostic Screen as shown below.
1)Check the signal • In this screen programmer can check if the signal is normal. • - [Main] Press this key to remove to Main Screen. • - [Start] Press this key and start to display the signal in the screen. • - [End] Press this key and end signal reception. • [SV] Using the key you can select [setup] signal. • - [cal] Using this key you can select [calibration] signal.
2)Time Setting • [F6][Time Set] : Pressing the key makes Time Set Message Box popped up. • - Date, Time Input: Pressing numbers on keypad, input Date and Time. • - [Cancel] : After pressing the button, you will see Message Box disappeared and it comes back to Diagnostic Screen. • - [Delete]: Pressing it, number of the Set Value is deleted from right to left one by one. • - [Enter] : After Set Value input, pressing Enter key, Message Box is disappeared and it comes back to Calibration Screen. You can confirm the value changed in Calibration Screen.
Bright setup [1700] OK + - Bright • 3)Brightness setting • [Bright] When you press this key, the bright setting screen bellow will popped up. • [OK] Press this key to finish bright setting. • [+] using this key you can increase the brightness that increases 50 each pressing. • [-]using this key you can decrease the brightness that decreases 50 each pressing.