Download

1 / 18
180 likes | 328 Vues
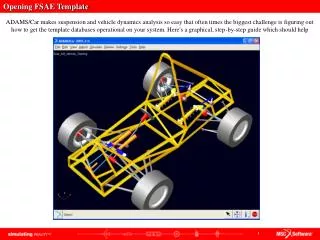
Cave Visualization of FSAE Hybrid Car. Instructional Write Up By: Tyler D’Amato. Tutorial Outline. Applying stickers to parts and assemblies in Catia Converting parts and products to be displayed using CAVE visualization technology. Outline. Stickers. Conversion.

E N D
Cave Visualization of FSAE Hybrid Car Instructional Write Up By: Tyler D’Amato
Tutorial Outline • Applying stickers to parts and assemblies in Catia • Converting parts and products to be displayed using CAVE visualization technology Outline Stickers Conversion
Applying Stickers to Catia Model • The starting point for this project was the formula car body, which is a part file. • The Addition of stickers creates a product out of whatever part you are working with. • Stickers must be added at the last step from within the final assembly. • Stickers added to a subassembly will not show up or render correctly in the full model. Outline Stickers Conversion
Photo Studio Workbench • The first step is to open your part or product in Catia. • With the part body highlighted, enter the Photo Studio Workbench under Infrastructure. • Make sure “shading with material” is enabled Outline Stickers Conversion
Apply Sticker to a Surface • You are now ready to project a sticker onto a face or surface. • Click the sticker tool and select the face where you want to place the sticker. • The adjustments in the property window allow rotation, translation, and scaling of the image. Outline Stickers Conversion
Apply Sticker to Other Surfaces Catia also supports projecting stickers onto spherical and cylindrical surfaces. Outline Stickers Conversion
Image Editing • High quality image formats such as .tiff and .png work best for high resolution renders • Images can be easily touched up and recolored using MS Paint or other image editing programs. Outline Stickers Conversion
END Sticker Tutorial Outline Stickers Conversion
Converting Catia Model for CAVE Visualization • Configure Catia IGS output settings • Apply graphic color to all parts in product. • Save Product as .IGS • Import .IGS into NuGraf using default settings • ….. Outline Stickers Conversion
Outline Stickers Conversion
Outline Stickers Conversion
Outline Stickers Conversion
Outline Stickers Conversion
Outline Stickers Conversion
Outline Stickers Conversion
Outline Stickers Conversion
Outline Stickers Conversion
Outline Stickers Conversion