Download

1 / 31

E N D
Titration By Dr H W Winter
Sampling Glassware • If you collect solutions (standard or sample solutions) from a stock solution container, the beaker must be absolutely clean (rinsed with distilled water) and dry before you transfer anything into it; alternatively it is rinsed twice with small amounts of the stock solution • Make sure you label your receptacles! You must never mix up any of these containers • Keep the solutions in a safe place at the back of your work station such that they cannot be contaminated • It is good practice to have the standard solution to the left and sample preparation to the right of the burette
Rinsing the Burette Before filling the burette: • Rinse it with water • Then rinse it with distilled water using a wash-bottle • Then rinse it twice with small quantities of the standard solution • Technique:rotate the burette in your hands while holding it horizontally in order to wet all sides, and …. … while pouring some of the liquid out the top; now drain the rest of the liquid through the bottom of the burette
Filling the Burette Close the stop cock Then fill the burette with the standard solution using a funnel Now remove the funnel Release the air below the stop cock by opening the tap fully for a very short time Read and record the bottom of the meniscus as accurately as possible (the meniscus does not have to be on the 0.00 mL mark). Tips: avoid a drop of standard hanging off the burette outlet; hold a white piece of paper behind the burette for easier reading.Clamp your burette absolutely vertical
25 mL 20°C Preparation of the Pipette Before you start…. • Never pipette by mouth • Always use a pipette filler • Select an appropriate size pipette filler • Check that the pipette has an intact tip • Rinse the pipette with distilled water first, … • …then with a small volume of the standard or sample solution you will pipette • Make sure you rinse all inside walls of the pipette right up to above the mark in this process • Discard and blow out the washings • Wipe the tip of the pipette with a tissue
Make sure you have enough sample for at least 4 titrations Put a clean 100 mL conical flask next to the sample container (rinsed with distilled water, it does not have to be dry) Re-set your pipette filler and then suck up your sample material to just above the calibration mark Fine-adjust the level such that the bottom of the meniscus is level with the mark Withdraw the pipette gently from the sample container while keeping contact between the pipette tip and the beaker wall. Make sure you do not lose any solution from the pipette through hasty vertical movement You may tilt the pipette and allow an air bubble to get sucked in; when you move the pipette to the conical flask make sure you do not lose any liquid 25 mL 20°C Pipetting – sub-sampling
After inserting the pipette to the conical flask deliver the measured amount by pressing the fast release lever of your pipette filler. Your pipette tip should be in contact with the conical flask wall It is important to leave the tip in contact with the wall for 3 more seconds after the solution has been drained from the pipette. This allows for the exact delivery of the volume Any residual liquid in the tip of the pipette must stay in the pipette. The pipette has been calibrated to have delivered the exact volume without draining the last drop in its tip Pipetting - Delivery
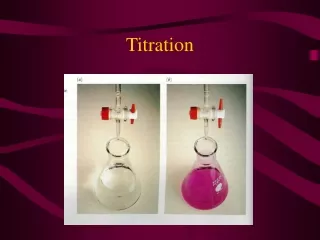
Indicator Indicator Indicators • Indicators change their colour at the end-point of the titration • Indicators are usually introducing an inaccuracy to an acid-base titration, therefore one should use as little indicator as possible. 2-5 drops are usually sufficient • Make sure you know what the expected colour change is before you start the titration. Try it out in a test-tube using some other chemicals • In order to see the colour change well it is important to have a white piece of paper under the flask
Rough Titration • The first titration is supposed to give you an approximate “titre” only. (Titre is the volume delivered by the burette) • You therefore allow the standard from the burette to flow into the conical flask while swirling the flask without any ambition to get an exact result. The endpoint is indicative of the expected titre. Record this value as the “rough” titration • Subsequent titrations are then allowing you to discharge the solution from the burette with the tap fully open to about 1 mL before the anticipated endpoint of the titration.
mL @20°C 0 1 2 3 4 5 Reading the meniscus • Make sure you are eye-level with the bottom of the meniscus; always read the bottom of the meniscus! • Have your burette dead vertical • Hold a white piece of paper behind the burette to improve the recognition of the bottom of the meniscus • Make the calibration on the burette face you • Estimate the reading’s last digit by interpolating
25 mL 20°C 10 mL 20°C Cleaning your Glassware • After each titration you should clean your conical flask immediately by emptying it first, then rinsing it twice with tap water and twice with distilled water. It is not important that the flask is dry before it is re-used • Your pipette is not cleaned between pipetting processes of the same sample • Pipettes, volumetric flasks and burettes are rinsed with tap water first and then twice with distilled water • None of the glassware needs to get dried after rinsing with distilled water
Indicator Titration • You repeat the following procedure for every titration: • Pipette a sub-sample into a clean conical flask • Add 2-4 drops of the appropriate indicator • Check for drops hanging off the burette (remove drops with tissue) • Check that the funnel was removed from the burette
Titration • You repeat the following procedure for every titration: • Pipette a sub-sample into a clean conical flask • Add 2-4 drops of the appropriate indicator • Check for drops hanging off the burette (remove drops with tissue) • Check that the funnel was removed from the burette • Put the conical flask with sample under the burette with the burette outlet just inside the flask • Read and record the starting volume (white background) • Hold the burette tap in your hand while your thumb and index finger operate the tap handle
Titration • You repeat the following procedure for every titration: • Pipette a sub-sample into a clean conical flask • Add 2-4 drops of the appropriate indicator • Check for drops hanging off the burette (remove drops with tissue) • Check that the funnel was removed from the burette • Put the conical flask with sample under the burette with the burette outlet just inside the flask • Read and record the starting volume (white background) • Hold the burette tap in your hand while your thumb and index finger operate the tap handle • Allow the standard from the burette to flow into the conical flask while swirling the flask to about 1 mL before the anticipated endpoint (based on the “rough titration”) • Rinse down the walls of the flask using a wash-bottle with distilled water • Approach the endpoint of the titration drop by drop while swirling the flask, until you can just see the indicator change • Read and record your final reading
Titration Results • It is important to process the data collected straight after each titration • As soon as you have concordant results (3 titres within 0.1 mL of each other) you can stop titrating and start calculating • It might be easier to write the final reading above the initial reading for quick manual subtraction
Tips for Successful Titrations • Close to the endpoint of the titration you might like to add only part of a drop; this is possible by allowing half of a drop to come out of the burette and with the help of your wash-bottle you can rinse it into your flask • It is also good practice to wash down the inside walls of your conical flask again once you have reached the end-point • The indicator change should be visible for 10 to 15 seconds after the addition of the last drop from the burette. If this is not the case, add another ½ drop. • Some indicator changes are fading after 30 seconds or so, rely on your earlier observations • Have a test tube with the changed indicator next to your titration flask to remind you of the expected colour change
n m c V n M n c = n V c = 2.90x10-32x10-2c = 0.145 molL-1 c V Calculation An unknown 20.0 mL sample of sodium hydroxide was titrated with 0.120 molL-1 H2SO4 • Average titre • Balanced equation 2 NaOH + H2SO4 2 H2O + Na2SO4 Ratios • Amount of known substance (No of moles) • Amount of unknown substance(No of moles) • Mass of unknown substance • Concentration of unknown substance (12.11 mL + 12.15 mL + 11.98 mL) 3 = 12.08 mL = 1.208x10⁻² L 2 : 1 n = c x Vn = 0.120 x 1.208x10-2 = 1.45x10⁻³ mol Ratio is 2 : 1 2 x 1.45x10-3 = 2.90x10⁻³ mol MNaOH= 40 gmol-1m =n x Mm = 2.90x10-3 x 40 = 0.116 g
V1 V3 V5 V7 35 15 25 45 5 15 40 30 20 25 35 10 16 26 46 36 V2 31 36 6 11 21 16 41 26 V4 V6 V8 17 37 27 47 12 32 37 27 7 42 17 22 28 48 38 18 43 8 28 13 18 23 33 38 19 29 49 39 19 14 39 34 44 24 9 29 50 20 40 30 Problem • 25.0 mL of an unknown concentration sodium hydroxide was titrated with 0.130 molL-1 sulfuric acid using Methyl red indicator • Read the burettes • Put the data into a table • Calculate the concentration of the original solution
mL @20°C 0 1 2 3 4 5 Conversation Pieces
? Conversation Pieces
? ? Conversation Pieces
Indicator Conversation Pieces
? Conversation Pieces
25 mL 20°C 10 mL 20°C Conversation Pieces
Tips • In the process of sample preparation it is advisable to prepare 2 or 3 samples simultaneously. • Filling the burette can happen while you hold it, it does not have to be clamped to a stand. • If you have to add an acid to a redox-titration aliquot it does not have to be measured by pipette, measuring cylinder accuracy is sufficient. • Make sure your burette does not leak. • Swirling the conical flask is important; particles have to meet in order to react with each other. • Tidy work place and tidy table of results mitigate mistakes