Download
1 / 36
420 likes | 857 Vues
Legacy Adaptor (KX-NS8290 ) Test Environments Setup Manual. 1. Example of test configuration -> Please refer to page. 2. NS1000 setup procedure -> Please refer to page. (1) KX-NS1000 (Ver 002.xxxx) Setup Procedure

E N D
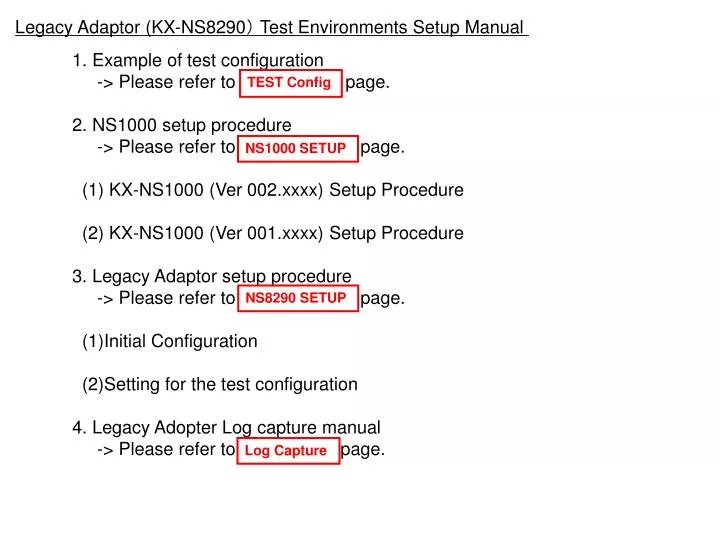
Legacy Adaptor (KX-NS8290) Test Environments Setup Manual 1. Example of test configuration -> Please refer to page. 2. NS1000 setup procedure -> Please refer to page. (1) KX-NS1000 (Ver 002.xxxx) Setup Procedure (2) KX-NS1000 (Ver 001.xxxx) Setup Procedure 3. Legacy Adaptor setup procedure -> Please refer to page. (1)Initial Configuration (2)Setting for the test configuration 4. Legacy Adopter Log capture manual -> Please refer to page. TEST Config NS1000 SETUP NS8290 SETUP Log Capture
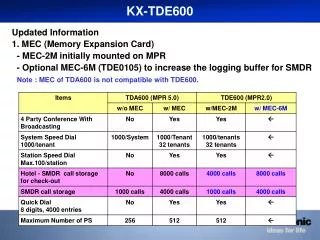
TEST Config Legacy Adaptor (KX-NS8290) PRI30 Line Status System Status SPEED PRI30 LINK/ACT AC-Adaptor VoIP LAN Initial SW
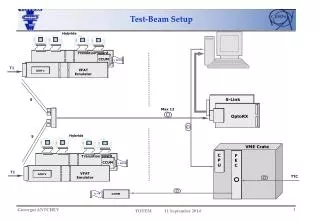
TEST Config Example of test configuration PRI Network *According to the your test environment, please set a fixed IP address for the NS8290 and NS1000. Legacy Adaptor IP=192.168.0.151 (default) AC-Adaptor Ether Fast Ether (100M) L2SW with or without PoE Ether Ether PC for Web-MC Not use PRI23 port Analog TEL(2W) KX-NS1000 IP=192.168.0.101 (default) IP-PT
TEST Config Legacy Adaptor Test Logical Channel Connection Legacy Adaptor KX-NS1000 SIP Server SIP Trunk SIP ID #401 SLT I/F SIP-Trunk I/F #01 SIP ID #402 SIP-Trunk I/F #02 PRI Network ex101 SIP ID #403 SIP-Trunk I/F #03 PR I/F ・・・ ・・・ IP-PT I/F SIP ID #423 SIP-Trunk I/F #23 or or SIP ID #430 ex103 SIP-Trunk I/F #30
NS1000 SETUP KX-NS1000 (Ver 002.xxxx) Setup Procedure (1/7) 1)Select [Virtual] 2)Select [V-SIPGW16] 3)Set Total number of cards as 2. 4)Set to the [OUS] state for each slot.
NS1000 SETUP KX-NS1000 (Ver 002.xxxx) Setup Procedure (2/7) 1)Select [Port Propertty]
NS1000 SETUP KX-NS1000 (Ver 002.xxxx) Setup Procedure (3/7) 1)Select [Trunk Adopyer]
NS1000 SETUP KX-NS1000 (Ver 002.xxxx) Setup Procedure (4/7) 1)Set the Trunk Adaptor IP address of port1 2)Push Apply button 3)Push Next button
NS1000 SETUP KX-NS1000 (Ver 002.xxxx) Setup Procedure (5/7) 1)Push Finish button
NS1000 SETUP KX-NS1000 (Ver 002.xxxx) Setup Procedure (6/7) 1) check that the setting of IP address are reflected in each port
NS1000 SETUP KX-NS1000 (Ver 002.xxxx) Setup Procedure (7/7) 1)Set to the [INS] state for each slot.
NS1000 SETUP KX-NS1000 (Ver 001.xxxx) Setup Procedure (1/6) 1)Push [Virtual] button NOTE In case of PBX Version of NS1000 is Ver 001.xxxx, must be installed in advance 16ch IP-TRUNK license key X 2 licences.
NS1000 SETUP KX-NS1000 (Ver 001.xxxx) Setup Procedure (2/6) 1)Select [V-SIPGW16] tab 2)Set Total number of cards as 2.
NS1000 SETUP KX-NS1000 (Ver 001.xxxx) Setup Procedure (3/6) 1)Set to the [OUS] state for each slot.
NS1000 SETUP KX-NS1000 (Ver 001.xxxx) Setup Procedure (4/6) 1)Select [Port Property] menu
NS1000 SETUP KX-NS1000 (Ver 001.xxxx) Setup Procedure (5/6) Please set the parameters of the port properties as follows.In case of parameters except [User Name] and [Authentication ID] can be set all ports by using COPY function. In case of [User Name] and [Authentication ID], please configure each port
NS1000 SETUP KX-NS1000 (Ver 001.xxxx) Setup Procedure (6/6) Activate the virtual card to push the [INS] button for each slot..
NS8290 SETUP Initial Configuration (1/7) Username ⇒ INSTALLER Password ⇒ 1234 http://192.168.0.151/WebMC/users/login
NS8290 SETUP Initial Configuration (2/7) 1)Push Install button
NS8290 SETUP Initial Configuration (3/7) 1)Push Next button
NS8290CE SETUP Initial Configuration (4/7) 1)Push next button
NS8290 SETUP Initial Configuration (5/7) 1)According to the your test environment, set a fixed IP address 1)Push next button
NS8290 SETUP Initial Configuration (6/7) 1)Push next button
NS8290 SETUP Initial Configuration (7/7) 1)Please set KX-NS8290CE password 2)Push next button
NS8290 SETUP Setting for the test configuration(1/9) 1)After all the initialization procedure finished, KX-NS8290CE will display this home menu. 2)Please push this icon, and enter the path configuration menu.
NS8290 SETUP Setting for the test configuration(2/9) 2)Push [OUS] button 1)Enter the SIP card property menu by select the [2.SIP Card Property]
NS8290 SETUP Setting for the test configuration(3/9) 1) Set with reference to the note below 2)Push Apply NOTE If the PBX Version of NS1000 is Ver 001.xxxx, please set the Activation Key Mode as "YES". In that case, Authentication ID setting of "SIP port Property" shown in the following pages, is required. Otherwise, the settings that are shown in this and subsequent pages is not required.
NS8290 SETUP Setting for the test configuration(4/9) 1)Enter the SIP port property menu by select the [3.SIP Port Property]
NS8290 SETUP Setting for the test configuration(5/9) 1)Set the [Authntication Password] of port1 as 1234. 2)Push the [Copy] button
NS8290 SETUP Setting for the test configuration(6/9) 1) Click here 2)Select the port number, from port2 until port30 3) Push [Copy] button
NS8290 SETUP Setting for the test configuration(7/9) 1)Enter the SIP card property menu by select the [2.SIP Card Property]
NS8290 SETUP Setting for the test configuration(8/9) 1)Push [INS] button
NS8290 SETUP Setting for the test configuration(9/9) 1)After all the settings has been completed, please save the system data 2) When you close the Web maintenance console, please press the [LOGOUT] button
Log Capture Legacy Adaptor Error Log Capture 2) Push [Minor] Button 1) Utility -> 3.Log -> 1.Error Log 3) Push [Save] Button to store data to PC
Log Capture Legacy AdaptorSyslogCapture 1) Utility -> 3.Log -> 2. Syslog 2) Push [Save] Button to store data to PC
Log Capture Legacy Adaptor ISDN/QSIG Protocol Trace Capture 3) Push [Start] Button 2) Select [Accumulation Trace] 4) Push [Capture] Button to store data to PC 1) Utility -> 4.Monitor/Trace -> 1.ISDN/QSIG Protocol Trace