Embedded System Design Process with Example
Are you curious about embedded system design and its process? Look no further! In this article, we will take you on a journey through the intricacies of embedded system design, providing you with a clear understanding of the process, along with a practical example to illustrate the concepts.<br>Embedded systems are everywhere - from smartphones and medical devices to cars and household appliances. Understanding the design process behind these systems is essential for engineers, designers, and enthusiasts alike. Our goal is to demystify this process and provide you with actionable insights.<br>

Embedded System Design Process with Example
E N D
Presentation Transcript
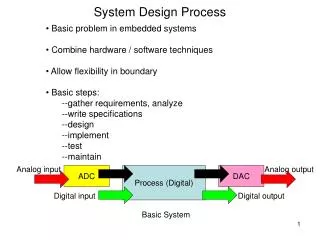
Embedded System Design Process with Example Are you curious about embedded system design and its process? Look no further! In this article, we will take you on a journey through the intricacies of embedded system design, providing you with a clear understanding of the process, along with a practical example to illustrate the concepts. Embedded systems are everywhere - from smartphones and medical devices to cars and household appliances. Understanding the design process behind these systems is essential for engineers, designers, and enthusiasts alike. Our goal is to demystify this process and provide you with actionable insights. Throughout the article, we will cover the key steps involved in embedded system design, including requirements gathering, system architecture, hardware design, software development, and testing. We will also highlight the common challenges faced during each stage and offer tips to overcome them effectively. By the end of this article, you will have a comprehensive understanding of the embedded system design process, empowering you to create efficient, reliable, and optimized systems. So, let's dive in and explore the fascinating world of embedded system design! What is the Embedded System Design Process? Embedded system design is the process of creating a dedicated computing system within a larger mechanical or electrical system. These systems perform specific functions and are designed to be reliable, efficient, and optimized for their intended purpose. The design process involves multiple stages, each with its own set of considerations and challenges. The first step in the embedded system design process is understanding the requirements and specifications. This involves gathering information about the functionality, performance, and constraints of the system. Requirements may include factors such as power consumption, processing speed, memory size, and input/output capabilities. By clearly defining the requirements, designers can ensure that the final system meets the desired objectives.
Selecting the appropriate hardware and software components is the next critical step. Hardware components include microcontrollers, sensors, actuators, and other electronic devices. The choice of hardware depends on factors such as cost, power consumption, processing capability, and compatibility with the software. Similarly, software components include operating systems, device drivers, and application software. Selecting the right components is crucial for achieving optimal performance and functionality. Designing the system architecture is the next stage in the embedded system design process. This involves determining the overall structure of the system and how its components will interact. The architecture defines how data flows within the system, how different modules communicate, and how the system handles inputs and outputs. A well-designed architecture is essential for ensuring the system's reliability, scalability, and maintainability. Software development is a major part of the embedded system design process. This involves writing code that controls the hardware and implements the desired functionality. The code must be efficient, reliable, and optimized for the specific hardware platform. Software development for embedded systems often involves working in low-level languages such as C or assembly language. It also requires a deep understanding of the hardware and its capabilities. Testing and debugging the embedded system is a crucial step to ensure its functionality and reliability. This involves running various test cases to verify that the system meets the specified requirements. Testing may include functional testing, performance testing, and stress testing. Debugging is the process of identifying and fixing errors or issues in the system. Both testing and debugging are iterative processes, and multiple rounds may be required to achieve the desired results. Integration and deployment of the embedded system is the final step in the design process. This involves integrating the hardware and software components into a complete system and deploying it in the target environment. Integration may include connecting sensors, actuators, and other peripherals, as well as configuring the software to work correctly. Deployment involves installing the system and ensuring that it functions as intended.
Case Study: Designing an Embedded System for Home Automation To illustrate the embedded system design process, let's consider a case study of designing an embedded system for home automation. Imagine a system that controls the lighting, temperature, and security of a smart home. The first step is to gather the requirements and specifications for the system. This may include factors such as controlling multiple rooms, adjusting lighting based on occupancy, monitoring temperature and humidity, and integrating with a smartphone app for remote control. Understanding these requirements is crucial for designing an effective system. Next, we need to select the appropriate hardware and software components. For this case study, we may choose a microcontroller with sufficient processing power and input/output capabilities. We would also need sensors for detecting occupancy, temperature, and humidity, as well as actuators for controlling the lighting and security systems. On the software side, we may choose an embedded operating system and develop a custom application for controlling the home automation system. Once the components are selected, we can design the system architecture. This may involve dividing the system into modules for each functionality, such as lighting control, temperature control, and security. We would also define how these modules communicate with each other and how they interact with the user through a smartphone app or a control panel. With the architecture in place, we can start developing the software for the embedded system. This involves writing code to control the sensors, actuators, and other components. We would also implement the logic for controlling the lighting, temperature, and security based on the user's preferences and the sensor inputs. The software development process may involve multiple iterations to fine-tune the functionality and optimize the performance.
Testing and debugging are crucial to ensure that the home automation system works as intended. We would run various test cases to verify that the lighting, temperature, and security systems respond correctly to user inputs and sensor inputs. We would also check for any bugs or issues in the code and fix them as necessary. Testing and debugging may involve using simulation tools, debugging tools, and real-world testing scenarios. Once the system is fully tested and debugged, we can integrate the hardware and software components into a complete system. This involves connecting the sensors, actuators, and other peripherals to the microcontroller and configuring them to work together. We would also install the necessary software on the microcontroller and set up the communication interfaces with the user interface, whether it's a smartphone app or a control panel. Finally, we would deploy the home automation system in the target environment, such as a smart home. This involves installing the system and ensuring that it functions correctly in the real-world scenario. We would also provide user documentation and support to help users understand and use the system effectively. Conclusion Designing embedded systems is a complex and fascinating process. It involves understanding the requirements, selecting the right components, designing the system architecture, developing the software, testing and debugging, and finally integrating and deploying the system. Each stage has its own set of challenges, but with careful planning and attention to detail, it is possible to create efficient, reliable, and optimized embedded systems. In this article, we have explored the key steps involved in the embedded system design process and provided a case study to illustrate these concepts. By following these steps and considering the challenges and tips we have discussed, you can embark on your own embedded system design journey with confidence. So, whether you are an engineer, a designer, or an enthusiast, we hope this article has demystified the world of embedded system design and
empowered you to create innovative and effective systems. Happy designing!