Word Processing Using Microsoft Word
Word Processing Using Microsoft Word. Creating a Document. Top down – create overall outline, then fill in the details. Bottom up – throw ideas, sentences, phrases down, then build up from there. Modern word processors let you do any combination of these.

Word Processing Using Microsoft Word
E N D
Presentation Transcript
Creating a Document • Top down – create overall outline, then fill in the details. • Bottom up – throw ideas, sentences, phrases down, then build up from there. • Modern word processors let you do any combination of these. • Other useful features: wizards and templates, automatic index and table of contents generation. • The finished product is a professional-looking document with less effort.
Microsoft Word: General Info • Toolbars • The insertion point • Select-then-do • Cut, Copy, and Paste • Undo and Redo • Lines, paragraphs, pages, and sections • Views
Find and Replace • Spelling and grammar checking • Insert • Web page features • Templates and Wizards
Toolbars • Commonly used commands are collected into groups of buttons called toolbars. • The most commonly used Word toolbars are: • Standard toolbar: new file, open file, save file, print, cut, copy, paste, etc. • Formatting toolbar: bold, italic, underline, etc. • Drawing toolbar: text box, arrow, etc. • To see or hide these or other toolbars, do View => Toolbars.
The insertion point • The insertion point is the location in the document where the next character typed will appear or the next Paste or Insert operation will deposit text or a picture, for example. • It is indicated by a blinking vertical bar.
Note: It is not necessarily the same location as where the cursor is pointing, nor is it necessarily visible in the part of the document shown in the Word window. • In general, after typing some characters or performing a Paste or Insert operation, the insertion point is located just past the inserted text (or picture, e.g.).
To move the insertion point • Click: moves it to where the cursor is • Arrow keys: move it left, right, up, or down • Ctrl+Home: moves it to the beginning of the document • Ctrl+End: moves it to the end of the document • Edit => Go To… moves it to the beginning of the desired page, paragraph, section, etc.
Note that scrolling the Word window does not move the insertion point but only changes the part of the document that is displayed. • You must also point the cursor to the desired location (once it’s visible) and click.
Select-Then-Do • In Windows or any Windows application, you first specify what object you want to perform an action on, and then specify the action. • Specifying the object explicitly is called selection.
However, in Word, some actions only apply to a particular type of sub-unit of the document, like paragraphs, • In this case, if no portion of the document is selected, the action is applied to the particular sub-unit where the insertion point happens to be.
In Word, selected text is displayed on the screen as a reverse, which means, for example, that if it would ordinarily appear as black on white, it is instead displayed as white on black. • Here is an example:
Another way to select a whole document is to use the Edit => Select All command or type Ctrl+A.
Cut, copy, and paste • To move a portion of the document from one location to another, you use a Cut operation followed by a Paste operation. • To duplicate a portion of the document, first use a Copy operation, then a Paste operation. • To understand these better, it is useful to know about the Clipboard.
Clipboard • Each time you Cut or Copy a selected portion of the document, it is placed in the Clipboard (and replaces whatever was previously in the Clipboard). • To Cut, use Edit => Cut or Ctrl+X or click its icon on the standard toolbar. • To Copy, use Edit => or Ctrl+C or click its icon on the standard toolbar.
Cut removes the selected portion from the document (but retains a copy of it in the Clipboard). • Copy leaves it there.
Paste inserts the contents of the Clipboard into the document at the insertion point. • To Paste, use Edit => Paste or Ctrl+V or click its button on the standard toolbar.
Undo and Redo • What if you perform some erroneous keystrokes or mouse operations and the document ends up drastically modified in ways you didn’t intend? • Use the Undo feature by clicking the down arrow next to the Undo button on the standard toolbar and selecting the steps to undo. • There is a corresponding Redo feature to re-perform undone steps.
Dividing up a document • Your document can/will be divided into • Lines • Paragraphs • Pages • Sections • Some of this is done by Word automatically and you have ways of controlling some of these as well.
Hard vs. soft returns • Hard returns • Occur whenever you type Enter (or Return) • Represent the end of a paragraph • Displayed as ¶ when the Show/Hide button is depressed • Soft returns • Created automatically according to what fits on each line • Locations vary with font size, margin size, etc.
What if you want a new line to begin at a certain location in the text, but don’t want this to be the start of a new paragraph? • Then type Shift+Enter. This will create what could be termed a “hard line break”.
Hard vs. soft page breaks • Hard page breaks • Created by selecting Page in the Insert => Break…dialog box • Force a new page to begin where inserted • Soft page breaks • Created automatically according to what fits on a page • Locations vary with font size, margin size, etc.
Section breaks • Only inserted manually, so always “hard” • Used to divide document up for different kinds of: • Page numbering • Column formatting • Margin settings • Created by selecting one of four section break types in the Insert => Break… dialog box
Views of the Document • Main ways to view a Word document: • Normal view • Print Layout view • Either of these allows you to edit the document, but some things are best done in one or the other. • You can select the view using the View menu or by clicking the appropriate buttons.
Examples of differences between Normal and Print Layout view: • To delete hard page breaks you need to be in Normal view. • To see and/or delete section breaks you need to be in Print Layout view. • To see multiple column format you need to be in Print Layout view.
Find and Replace • Use Edit => Find…or Edit => Replace… or Edit => Go To… to: • Find a particular word or other string of characters in a document; or • Replace some or all occurrences of a string of characters in that document with another specified string; or • Move the insertion point to the desired location in the document (and display the text at that location). • All of these bring up the same Find and Replace dialog box, which has 3 tabs, one for each function.
Spell and Grammar Checking • Each can be turned on/off individually (under Tools => Options…, then select the Spelling and Grammar tab) • Spell checker puts wavy red line under unrecognized (presumably misspelled) words • Grammar checker puts wavy green line under groups of words it thinks represent an error in grammar. • Best to have them both turned on, even if you don’t agree with everything flagged.
If spell checker flags a word as a spelling error but you know it’s correct, either: • Ignore it • Add the flagged word to the custom dictionary • Also note the Tools => AutoCorrect feature, which allows abbreviations or common misspellings to be automatically expanded or corrected, based on a customizable list of entries.
Insert • Using the Insert menu you can place (embed) a wide variety of things into a document, such as: • The current date and time (with automatic updating if desired) • Pictures or Clip Art or WordArt • Tables • Symbols (e.g., mathematical symbols) • Many, many other types of object
If you click on an embedded object in a Word document, you can then perform operations specific to that type of object. • For example, if you select a picture, the Picture toolbar appears, containing buttons which allow you to crop it, add a border to it, or adjust its color, brightness, and contrast.
Pictures • You can control how a picture is placed amid the surrounding text in the Format => Picture… dialog box. (To get Picture…to appear on the Format menu, you must first select the picture.) • For example, the picture may appear on top of or behind text, or text may be wrapped around it in various ways.
Drawing objects • Similar options are available for drawing objects. • For example, text boxes can be very useful (as in this presentation), and there is a corresponding Format => Text Box… dialog box.
When you insert clip art, you can treat the image as a drawing object and use buttons on the Drawing toolbar to edit it. For example, you can change the fill or line colors, rearrange parts, or combine images.
OLE • Object Linking and Embedding. • Use Edit => Paste Special to link an object created outside the Word program (e.g., a picture or an Excel chart or spreadsheet) into a Word document. • More on this later in the course.
Word and WWW • You can insert a hyperlink (clickable link to a web page) by using the button on the standard toolbar or Insert => Hyperlink… • This brings up a dialog box allowing you to specify the corresponding URL (web address) and the corresponding text, which will look something like this: Click here to see something interesting.
The most natural use of this feature is when using Word to create a web page. • If you do a File => Save As Web Page, the program automatically creates a text file having all the appropriate HTML tags in it so that how the file appears in a web browser is (nearly) the same as how it appears in Word. • The resulting file has the extension .htm.
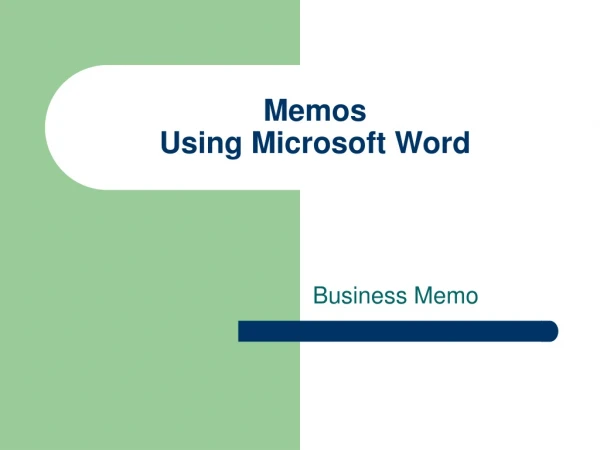
Templates and Wizards • A template is a ‘skeleton’ document that contains all the basic, standardized characteristics of a text type which allows you to create instances of that text type. • Word has many built-in templates, and the user may create other customized templates as well, such as personalized letterhead. • A wizard is a variant in which you are asked a series of questions and the program then creates the document based on your answers.
To use a template, use File => New…and a dialog box showing all the available templates (and wizards) will appear. • Among them, for example, is the following built-in template for creating a company memo:
The file extension for a regular Word document is .doc • The file extension for a template, whether built-in or user-created is .dot • For example, the default template in effect when Word is started is Normal.dot • Template files are stored in a special Templates folder