CEMETERY WORKSHOP
CEMETERY WORKSHOP. TXGenWeb State Conference June 28, 2003 Austin, Texas. Presented by. Mary Duke TXBELL Volunteer Joe D. Deaver TXBELL Coordinator/Volunteer. Transcribing and Volunteers (Mary Duke) Determine the Need Asking for Help Planning your Attack

CEMETERY WORKSHOP
E N D
Presentation Transcript
CEMETERY WORKSHOP TXGenWeb State Conference June 28, 2003 Austin, Texas
Presented by Mary Duke TXBELL Volunteer Joe D. Deaver TXBELL Coordinator/Volunteer
Transcribing and Volunteers (Mary Duke) Determine the Need Asking for Help Planning your Attack Markers: How to read Transcribing Helpful Websites Photographs and Websites (Joe D. Deaver) Photography: What do I need? Marker Photos: Quality vs. Quantity Photo Editing Cemetery WebPages: Tools Cemetery WebPages: Methods Cemetery Workshop
Transcribing and Volunteers I. Determine the Need • A. Get a list of all cemeteries in your county and find out what has been done • 1. Contact Historical Societies, Planning and Zoning Commission, Libraries, and Genealogical Societies.
Transcribing and Volunteers I. Determine the Need • B. Contact the cemetery Sexton • 1. Ask about Internment Books/ or other inventories already completed • 2. Ask about maps • 3. Get permission if cemetery is located on private property. (Texas law says cemeteries should be open to the public on the first Sunday in April and first Sunday in October.)
Transcribing and Volunteers I. Determine the Need TEXAS SENATE RESOLUTION NO. 591 1997 Legislative Session 75-R (paraphrased) WHEREAS, Thousands of these historic Texas cemeteries, particularly those in rural areas, are located on private property whose owners have no relationship to those interred there; and WHEREAS, These historic cemeteries are often in an imperiled condition; and WHEREAS, Interested citizens and descendants of those buried in these historic cemeteries have the right by Texas law to visit these sites and maintain them, but are often prevented from visiting due to inaccessibility and/or inconvenience, as well as a general lack of public awareness concerning the issue of cemetery visitation RESOLVED, That the Senate of the State of Texas, 75th Legislature hereby designate the first Sunday in April and the first Sunday in October as Texas Cemetery Visitation Days, known hereafter as Texas Cemeteries: A Bridge to the Past; and, be it further RESOLVED, That a copy of this Resolution be prepared as an expression of support for this most important cause, in the hope of fostering greater awareness of the rich cultural and historical legacy of Texas, especially as it exists in its thousands of historic cemeteries.
Transcribing and Volunteers II. Asking for Help • A. Ask for Volunteers • 1. call local colleges - may be doing research or mapping classes • 2. contact local Historical and genealogical societies • 3. post a message on your web site and e-mail discussion list B. Have on Hand • 1. Water, pencils, bug spray, suntan lotion, small trowel or shovel, whisk broom, railroad chalk, trimmers, first aid kit, snake bite kit, cell phone, and directions to the restroom
Transcribing and Volunteers II. Asking for Help • C. Volunteers need to bring • 1. Clipboard • 2. Hats • 3. Personal Items (i.e., medication) • 4. Digital camera, if available
Transcribing and Volunteers III. Planning your Attack • A. Obtain maps from the cemetery Sexton (if available) • B. Break areas into smaller section • 1. if no map use natural boundaries - trees, roads etc. • 2. Label all areas for identification
Transcribing and Volunteers III. Planning your Attack • C. Survey Sheets • 1. Use Excel • a. Labels: First Name, Middle, Last Name, Birth date, Death date, Notes Block # (if available) this is from cemetery maps • b. Leave a line at the top for the name of the cemetery and the section # • D. Clip a map and several survey sheets together - give to volunteers
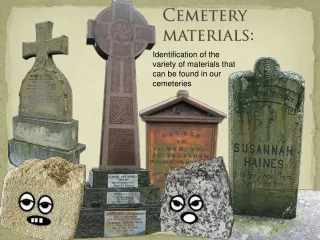
Transcribing and Volunteers IV. Markers: How to read • A. Paper survey • 1. Don't try to write down everything on the marker (reserve the notes field for daughter of, wife of, military service. Avoid all the poems epitaphs) • 2. Walk all around the marker - don't assume there is only one name on the marker
Transcribing and Volunteers IV. Markers: How to read • 3. Record all graves not marked and/or unreadable markers • 4. Record Husband and Wife makers as separate entries. • a. do not assume that it is husband and wife unless stated. (may be brother & sister or father & son)
Transcribing and Volunteers IV. Markers: How to read • B. Pictures • 1. Watch for shadows in markers • 2. Use railroad chalk to enhance inscription
Transcribing and Volunteers V. Transcribing • A. Record in an Excel Spreadsheet - Save • 1. Alphabetize or Not - your choice • 2. Left Align all columns • 3. Format Cells for TEXT (you will be able to type anything in cell) • B. Open this sheet in Word - Save as "Text with Layout.ans"
Transcribing and Volunteers V. Transcribing • C. Open the ANS file in Word Pad - check information • 1. add disclaimer and any other information you want • 2. add submitters name, cemetery name, address, and date of inventory • 3. save as TXT file • 4. send TXT file to your web site manager for publication. • 5. copy to the cemetery Sexton • 6. copy to local library, historical society - optional
Transcribing and Volunteers VI. Helpful Websites • www.interment.net/column/records/record/index.htm • www.thc.state.tx.us/cemeteries/cemred.html • www.rootsweb.com/~txbell/cemcentral.htm
Photographs and WebsitesI. Photography: What do I need? • Camera • Preferably digital with at least 1.3 mexapixal resolution • Large media card (64MB and larger) and spare(s) • Notepad or PDA/handheld • Railroad chalk for rubbing inscriptions • Sun and insect protection, first aid kit • Appropriate attire for weather and landscape • Optionally: laptop computer, mirror, cemetery inventory and map, GPS device, butcher paper with colored chalk, spray bottle of water, tape recorder
Photographs and WebsitesII. Marker Photos: Quality vs. Quantity • Plan out your strategy in advance: • What is the size of the cemetery? • Are all graves accessible? • Do I want a sampling of photos or is my goal to document most or all of this cemetery? • Are the photos for a website, book, or CD? • Am I limited by media card size? • Do I have other volunteers? • Will I be making multiple visits? All of these factors should be considered when determining resolution setting for your camera and how many headstones you will be photographing.
Photographs and WebsitesII. Marker Photos: Quality vs. Quantity Helpful Hints: • If there is a chance the inscription may not be legible in your photograph due to erosion or light conditions, take a second photo zoomed in on just the wording • Use a notepad to write down facts or inscriptions • If you have a laptop computer with appropriate interface, it’s handy to have around to empty your camera or media card, in addition to viewing the full-size photos on site • As with inventories, you can use railroad chalk (fine textured) for rubbing inscriptions. Rubbing the inscriptions with colored chalk over butcher paper usually works well and provides a memento. Sometimes, simply using a spray bottle of water on the face or a mirror reflecting sunlight will make wording show up better. • Tape recorder for making quick audio notes on the graves
Photographs and WebsitesIII. Photo Editing • Software Tools • IrfanView photo editor/viewer – my favorite for quantity and quality photo results (and it’s freeware!) www.irfanview.com • Adobe PhotoShop (sometimes lite version comes with scanner or digital camera) • Microsoft Photo Editor (usually comes with Office) • Ulead PhotoImpact • MicroSoft Picture It
Photographs and WebsitesIII. Photo Editing • Size/Resolution/Format • Use jpg/jpeg format for maximum compression to save disk or web space (faster loading on website) • If you desire maximum resolution, tiff or gif format • Keep dimensions large enough to be legible, but don’t oversize if placing on website. • Crop photo as much as possible. It’s nice to have a little background, but you do not need the surrounding half acre of other graves. You want the specific grave to be the only subject of your photo. Location photos can be taken to highlight the general cemetery, if desired. • If you took a “zoomed” photo of a grave inscription, you can use your editing software to merge it next to your wider angle photo
Photographs and WebsitesIII. Photo Editing • Color and Quality • Use your editing software to enhance contrast, sharpness, and brightness. Sometimes, if may be necessary to change color components slightly for legibility, but it’s best to keep original colors if possible • Experiment with converting to black & white. It’s amazing how much this affect certain shots and it gives it a nostalgic appearance as well. • Save photos with organization in mind • Use individual folder/directories for each cemetery. With large cemeteries, subfolders for sections might help • Keep in mind when saving files that spaces and unusual characters may cause problems on some web servers
Photographs and WebsitesIV. Cemetery WebPages: Tools • Webpage Tools • Microsoft FrontPage (good organization features and previews, but known to be heavy on code overhead) • Adobe GoLive (more recent package, high reviews, sometimes complex for beginners) • Macromedia Dreamweaver (a favorite among many webmasters, expensive and not for beginners) • Homesite (formerly Allure now Adobe, for those that prefer code rather than visual editing, high reviews, relatively inexpensive) • Arles Image Web Page Creator (great for photo pages with index features and thumbnail previews) www.digitaldutch.com • Other packages include: Hot Dog, Cool HTML, NoteTab Pro, CuteHTML, Namo Web Editor
Photographs and Websites V. Cemetery WebPages: Methods • Simple and quick – list of labeled hyperlinks which each open an image (Easy, but sometimes crude on indexing and navigation. Not for large collections!) • For better navigation and save bandwidth, use thumbnail feature which will provide a smaller preview of each photo (most web editors will have a thumbnail capability) • Alphabetize image name list by surname • Have quality navigation to move about between photos without constantly hitting the back button to go back to index
Photographs and Websites V. Cemetery WebPages: Methods • It at all possible, include transcription of names and dates. Optionally, inscriptions or other data can be included but likely time-consuming. Remember, text can be useful for search engine inclusion • Give credit to the submitter! Your data and photo submitters are deserving of recognition and it encourages them to continue contributing to your website’s online resources • Have links back to your your website’s home page, the cemetery section, and the cemetery’s main page • Use “what’s new?” page to keep researchers informed of cemetery data/photo updates