COMM 3050 GoToWebinar Tutorial
COMM 3050 GoToWebinar Tutorial. GoToMeeting / GoToWebinar. Webinar and collaboration tool Create a trial account at https:// www1.gotomeeting.com/s/isr/2dc/g2w/try Only one account is needed per team GoToWebinar is the product that will be used for ICE presentations. GoToWebinar Roles.

COMM 3050 GoToWebinar Tutorial
E N D
Presentation Transcript
GoToMeeting / GoToWebinar • Webinar and collaboration tool • Create a trial account athttps://www1.gotomeeting.com/s/isr/2dc/g2w/try • Only one account is needed per team • GoToWebinar is the product that will be used for ICE presentations
GoToWebinar Roles • Organizer • Account holder • Creates the webinar • Receives webinar invitations • Starts the webinar • Can present / share screen • Can record webinar • Has audio controls • Controls Q&A • Controls polls • Panelist • Should be made the Presenter • Has audio controls
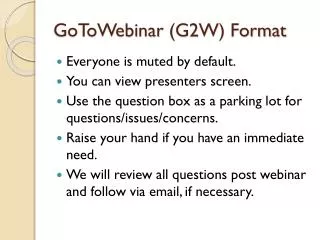
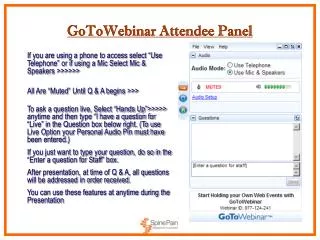
GoToWebinar Roles • Presenter • User who is actively presenting • Attendee • Listen-only mode • Can ask questions via Questions panel • Can answer polls
Create a Webinar • Login at http://www.gotomeeting.com • Expand My Webinars from the menu on the left • Click Schedule a Webinar
Title & Description • Webinar Name must include “McIntire Student Webinar:” and a few words to describe the project • Description – includes a few sentences to describe the presentation
Date & Time • Enter the Date and Time of your webinar
Audio • Accept the default options for audio
Panelists • Panelists are people that will share their screen(s) • Click Edit to add Panelist • Enter your team name in the Name field • Enter the email address of one team member • Click Save and Continue
Branding and Theme • Theme settings determine look of the webinar invitation and registration page • The Waiting Room is what attendees will see when they arrive online and until a presenter shares his/her screen
Theme • Add a logo • Maximum 400 x 200 pixels • 100kb maximum • Choose a Theme • Add an image • Maximum 200 x 200 pixels • 100kb maximum
Theme • Select Preview Theme at the bottom of the page
Waiting Room • Add names for each person in team • Insert images for each (optional)
Waiting Room • Preview the Waiting Room
Registration • Select Clear All to remove all questions except First Name, Last Name, and Email Address
Registration • As an option, questions specific to your project can be added to the registration page
Registration • Click Preview to view the registration page
Webinar Creation • Click to complete basic setup • Panelist invitation sent to Panelist(s) • Attendee invitation sent to Organizer
Invitations • The invitation must be sent to Attendees • Forward the message that is sent to the Organizer • Attendee must follow link in message to pre-register for webinar
Creating Polls • Create polls by logging into the GoToWebinar website • Select Polls from the Change Session Settingslist
Creating Polls • Determine the Question Type • Enter the Question • Enter Answer options • Click Create
Setting Email Notifications • Notifications are sent to registered attendees based on the intervals you choose • Edit notifications by logging into the GoToWebinar website • Navigate to My Webinars • Select Email Notifications from the Change Session Settings menu
Setting Email Notifications • Confirmation Email – Message that is sent to attendees after registration • Reminder Email • Select 3 Hours before • Select 1 Day before • Follow-Up Email • De-select this option
Obtaining the Webinar ID • Click the View link to the right of the Settings menu
Prior To Final Webinar Delivery Email Suzy Pengat suzypeng123@gmail.com with the following information: • Block Number • Group / Team Number • Name of Webinar • Name and Email of group contact if necessary during webinar • Webinar ID
Starting the Webinar • When delivering the Webinar, all group members should be in the same room • There should be two computers online • The Organizer will be logged into GoToWebinar on one computer • Ideally the Organizer’s laptop should be hard-wired using the Ethernet connection in the room • The Panelist will be logged into the other • The Organizer must use a Windows-based computer • The Organizer should remain muted
Organizer - Start the Webinar • Start the webinar by logging in and clicking the Start button • Panelists join the session using links in the email messages previously sent
Organizer - Webinar Start • Attendees On Hold • Attendees see the Waiting Room information • Organizer and Panelists can talk or use Chat
Organizer Control Panel • Dashboard • Audience View • Attendee List • Audio • Polls • Questions • Chat
Organizer Settings • Click the Options Menu • De-select the Attendees Can Raise Hands option
Organizer Settings • Click the View menu • Select Recording • De-select Auto-Hide the Control Panel
Attendee List • Shows Staff (Organizers and Panelists) and Attendee details • Right-click on any Attendee to send a message or change status
Audience View • A live snapshot of what the Attendees currently see • When another person is presenting, the Audience View will switch to the GoToWebinar Viewer
Dashboard • Displays statistics such as attendance, attentiveness, and number of questions for current webinar
Audio • Select to change Audio Mode • Click Edit to turn off “On-Hold Beeps”
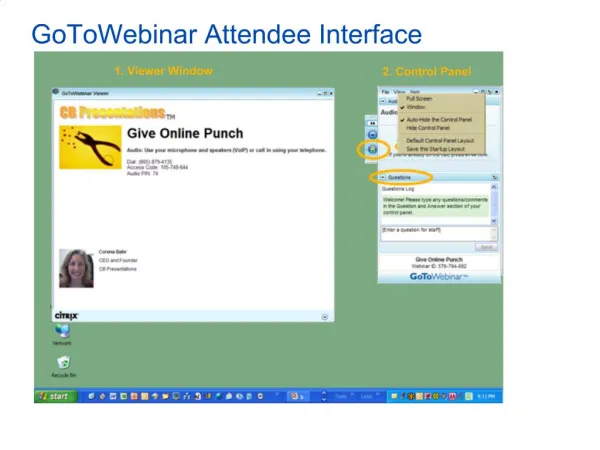
Attendee View • Audio Mode • Questions Panel
Attendee View • Viewer Panel • Click Arrow to expand • Full-screen button • Attendees see Waiting Room until presentation begins
Organizer - Make Panelist the Presenter • Click the Change Presenter button • Select the Panelist
Presenter • Have slideshow ready and running • Exit all other running applications such as web browsers and anything that would cause notifications or sounds • This is the only computer that should be unmuted in your room!
Presenter – Show Options • The Presenter may select from the options in the Show My menu • The default is to show the entire screen • Choose the Screen- CLEAN option
Organizer - Recording • Click the Start Recording button to begin recording • Recording is not automatic • Select from the View menu • Recording is saved locally • Recording is not available for Organizers using Mac OS X.
Organizer - Recording • Access the Recording Defaults by clicking Settings in the Recording panel or in File | Preferences
Organizer - Start Broadcast • For Attendees to hear the webinar presentation, the Organizer must first start the meeting • Presenter / Panelist should ensure that screen is shared • Click the Start Broadcast button which starts the audio portion of the Webinar
Ask a Question - Attendee • Attendees may ask questions during the webinar by typing in the Question panel • Questions are sent to the Organizer