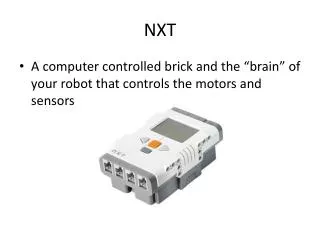
Virtual NXT
Virtual NXT. Getting started guide. Summary. This presentation is intended to help you get started with the Virtual NXT and Robot Virtual Worlds Software. It is broken into 4 parts: Prerequisites Installation Running the Software Programming with the Virtual NXT Additional Resources.

Virtual NXT
E N D
Presentation Transcript
Virtual NXT • Getting started guide
Summary This presentation is intended to help you get started with the Virtual NXT and Robot Virtual Worlds Software. It is broken into 4 parts: Prerequisites Installation Running the Software Programming with the Virtual NXT Additional Resources
Prerequisites • PC Compatible OS: Windows XP, VISTA, Windows 7, or Windows 8 • Processor: Intel Core 2 Duo processor family or better, AMD Athlon X2 processor family or better • Memory: 2 GB RAM • Graphics: NVIDIA® GeForce® 8800GTS or better, ATI Radeon™ HD 3850 or better • DirectX: DirectX® 9.0c and DirectX® 10 • Hard Drive: 700 MB free hard drive space • Sound: Standard audio device • Permissions: Administrative Privileges to Install Software
Installation • Double-click on the installation file to begin the installation. • The installation file includes 4 primary components: • The Virtual NXT Software • The Virtual NXT USB Driver • The LEGO NXT Driver • 3 Robot Virtual Worlds • Curriculum Companion • Operation Reset • Ruins of Atlantis • When prompted, choose “Yes” to begin the installation.
Installation Follow along with the Installation Wizard, clicking “Next” and “Yes” when prompted.
Installation You will be prompted with a License Agreement. Read the terms of the agreement and choose the “I accept…” selection to continue the installation.
Installation The installer wizard will launch a second installer for the Virtual NXT Software specifically for your Operating System (64bit or 32bit). This is expected; continue to press the “Next” and “Yes” buttons when prompted.
Installation You may need to give permission for a driver for the Virtual NXT to be installed. Choose “Install” or “Yes” to continue the installation.
Installation If the latest version of the LEGO NXT driver is not already detected on your system, it will also be installed. Be sure to choose “Next” or “Yes” if prompted. Once the installation of the software and drivers are complete, you may need to press “Finish” to close them.
Installation Tips If your computer notifies you that it should reboot before starting the software, we recommend that you do so. If the installation did not complete for any reason, double-clicking the installation file and going through the process should resolve most issues. If prompted when running the installer a second time, choose the “Repair” option given.
Running the Software The installation creates shortcuts to “Launch Virtual NXT” on the Desktop and in your Start Menu. Double click the shortcut to launch the Virtual NXT software. The first time the software is run, you will be prompted to enter your License Information or begin a free 14-day trial. Enter your License Information if available. Licenses for the Virtual NXT will be available at: http://robomatter.com/
Running the Software • The Virtual NXT software resembles a real NXT, with additional menu options. • The Emulator menu allows you to rename your NXT and choose certain settings. • The Target World menu allows you to choose from the Robot Virtual Worlds currently installed on your computer. In other words, this selects which virtual environment (and types of virtual robots) your programs will run in. • The Advanced menu contains specialized options. • The Help menu will contains options to take you to help resources as well as the menu to activate (or deactivate) your software if you haven’t already.
Running the Software The screen and buttons (orange, gray, right arrow, left arrow) on the Virtual NXT are fully functional and can be used as part of your programs. Note: You may notice that the driver for the LEGO MINDSTORMS NXT finishes installing the first time the software is run. This is normal.
Running the Software • The menu option you will interact with most often will likely be the Target World. • Select on of the options under Target World to launch the virtual environment. • When the Virtual NXT detects that you’ve downloaded a program, it will automatically open the selected world if it is not already open. • The Virtual NXT will allow one Target World to be open at a time. Selecting a second world will close the first. This is important as each world is resource intensive. • Additional worlds can be downloaded from http://robotvirtualworlds.com/
Running the Software • In this instance, the Curriculum Companion was chosen from the Target World menu. • It and the other worlds have their own user interface you will need to navigate. • If you choose to log in using a CS2N or Local account, the game will keep track of your programming progress and award badges. • Free CS2N accounts can be created here: http://cs2n.org/signup • You can choose different robots from the ROBOTS menu, and different challenges from the other sections.
Programming Intro Programming Languages that can be used to program the NXT can be used with the Virtual NXT and Robot Virtual Worlds. Three of our recommendations are: NXT-G (can be downloaded for free from LEGO): http://www.lego.com/en-us/mindstorms/downloads/nxt/nxt-software/ EV3 (can be downloaded for free from LEGO): http://www.lego.com/en-us/mindstorms/downloads/software/ddsoftwaredownload/ LabVIEW for LEGO Mindstorms (free 30-day trial available from NI)http://www.ni.com/academic/mindstorms/
Programming Intro We recommend a 3-step process no matter which programming language you choose to use with the Virtual NXT and Robot Virtual World software: Launch the Virtual NXT Software Choose your Target World Launch your Programming Language (NXT-G, EV3, etc.)
Programming Intro • In each Robot Virtual World, the specifications for the Virtual Robots are given. You will be able to see: • The dimensions of the robot • Which motors are connected to which wheel/arm • Which sensors are connected and to which port • In general, the programming languages “default” ports are used for the driving motors and sensors on the virtual robots.
Programming Intro Execution Controls Camera Controls • All Robot Virtual Worlds have execution controls (buttons on the left) and camera controls (buttons on the lower right). • Use the execution controls to run or pause the current program, restart the robot, or return to the menu system. • Use the camera controls to control switch between different camera modes and views of the robot and challenge. • Also shown here are the Measurement buttons (top right), used to find the distances and angles in the world.
Programming – NXT-G • Programming in NXT-G for the Virtual NXT is very much the same as for a real NXT. • In the lower-right corner of the interface, there is a series of control buttons. • The button with the NXT silhouette will allow you to see the Virtual NXT, named “Virtual NXT” by default. • The Download (downward arrow) button will download programs to the Virtual NXT. • The Download and Run (right arrow) button will download a program to the Virtual NXT AND start running it in the virtual world.
Programming – NXT-G • When working on a challenge, we recommend that you press the Download and Run (right arrow) button in NXT-G to send the program to the virtual robot. • Press the reset button (circular arrow) on the left side of the virtual world to rest the robot to its original position. • You can make as many changes to your program and download it as many times to the robot as you need (and much faster than to a real robot!).
Programming – EV3 • Programming in EV3 for the Virtual NXT is very much the same as for a real NXT. • In the lower-right corner of the interface, there is a series of control buttons. • The button with the LEGO Brick silhouette will allow you to see the Virtual NXT, named “Virtual NXT” by default. • The Download (downward arrow) button will download programs to the Virtual NXT. • The Download and Run (right arrow) button will download a program to the Virtual NXT AND start running it in the virtual world.
Programming – EV3 • When working on a challenge, we recommend that you press the Download and Run (right arrow) button to send the program to the virtual robot. • Press the reset button (circular arrow) on the left side of the virtual world to rest the robot to its original position. • You can make as many changes to your program and download it as many times to the robot as you need (and much faster than to a real robot!).
Programming – LabVIEW • LabVIEW presents a wider variety of programming flexibility than the EV3 and NXT-G programming solutions. • “Robot Projects” as well as single programs can be used with the Virtual NXT and Robot Virtual Worlds, but currently LabVIEW MUST be set to have the Virtual NXT set as the target with only VI’s from the NXT Robotics set supported.
Programming – LabVIEW • Programming in LabVIEW for the Virtual NXT is very much the same as for a real NXT. • In the upper-left corner of the interface, there is a series of control buttons. • The Download (downward arrow) button will download programs to the NXT. • The Download and Run (right arrow) button will download a program to the NXT AND start running it in the virtual world. • An area in the lower-left section of the interface chooses the “Target” for the program.
Programming – LabVIEW • Programming for the NXT in LabVIEW is primarily done in the “Block Diagram” Window (not the Front Panel Window). • The Block Diagram can be selected from the Window menu in LabVIEW. • You must target the Virtual NXT in LabVIEW before downloading and running your programs. • In the lower-left corner of the Block Diagram window, right-click on the area that says “Main Application”, and choose the Virtual NXT (“Virtual NXT [USB]” by default) • The color should change to orange.
Programming – LabVIEW • When working on a challenge, we recommend that you press the Download and Run (right arrow) button in LabVIEW to send the program to the virtual robot. • Press the reset button (circular arrow) on the left side of the virtual world to rest the robot to its original position. • Note that the lower-left corner of the LabVIEW Block Diagram is orange, with the Virtual NXT specified.
Additional Resources • http://robotvirtualworlds.com/ - Home of the Robot Virtual Worlds. You will find additional virtual world level packs, support, tutorials, and other resources. • http://cs2n.org/ - Students can create a free account at the Computer Science Student Network to keep track of their achievements, download virtual world level packs, find free programming tutorials and courses, and other computer science related activities. • http://www.education.rec.ri.cmu.edu/content/lego/index.htm- The Carnegie Mellon Robotics Academy site is full of valuable information and resources for robotics students and teachers. • http://robomatter.com/Shop-By-Classroom/Programming/NXT-G- Licenses for the Virtual NXT Software as well as NXT Curricular products are available through robomatter.com