Download
1 / 11
120 likes | 353 Vues
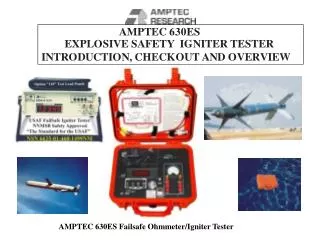
AMPTEC 630ES Failsafe Ohmmeter/Igniter Tester. PASSWORD PROTECTED WEB DOCS. AMPTEC 630ES EXPLOSIVE SAFETY IGNITER TESTER INTRODUCTION AND OVERVIEW.

E N D
AMPTEC 630ES EXPLOSIVE SAFETY IGNITER TESTER INTRODUCTION AND OVERVIEW
Introduction AMPTEC 630ESThe AMPTEC 630ES Explosive Safety Igniter Tester was derived from the model AMPTEC 620A-4 Igniter Tester (The USAF Squib Meter"). The AMPTEC 630ES Explosive Safety Igniter Tester's features were originally developed for the United States Depart. of Energy at Los Alamos National Laboratories. It is used to check high explosives and related EEDs (electro-explosive devices) circa 1999. Its has numerous safe operation features and Safety Board Approvals (contact AMPTEC RESARCH Sales Dept.) that have reviewed the unit’s failsafe circuitry and deemed it as the “HE meter” (high explosive meter) for use by Los Alamos National Laboratories, NASA and US Air Force Range Safety .
User Note: When key is removed from the AMPTEC 630ES, the unit's circuitry is not connected to any test lead connection that may be going off to some "squib" under test. If the user puts the key in their pocket, they know that nothing the 630ES does can electrically effect the "squib" wires that they may be going to connect to. Upon return to the 630ES, only when the keyis inserted and the keyswitch is in "measure mode" is the failsafe ohmmeter Igniter Tester connected to the test leads (if plugged into the "Connections" port.
AMPTEC 630ES Explosive Safety Igniter Tester –Startup Check Out Procedure Getting started – If the AMPTEC 630ES is new to you, the lid of the 630ES contains a laminated instruction card that diagrams all of the AMPTEC 630ES switches, connections, milliammeter use and more . . (see near the last slide of this presentation for the 630ES User Reference Instruction Card diagram. The first item to examine is to check the calibration sticker'sdue date for the AMPTEC 630ES Igniter Tester. If the due date is still valid and not expired, it is ready to begin the safety check procedure. If the calibration due date is expired then contact your calibration laboratory or AMPTEC RESEARCH. A tamper resistant calibration sticker is usually located around the perimeter screw(s) area to the AMPTEC 630ES Igniter Tester DMM top plate. The sticker will most likely be covering one of unit's the calibration access screws.
Step 2: Procedure for turning "ON" the AMPTEC 630ES Igniter Tester :Using the unit's main operating power switch located in the lower left portion of the front panel, flip the toggle bat of the power switch (grey silicone rubber boot protected) into the “UP” or “ON” position .
After the AMPTEC 630ES is powered up you should see the red LED display come on. A low battery level is indicated with a negative or minus sign in the front of the unit's L.E.D display. Adequate battery level – the minus sign may initially come on for a couple of seconds but should go out and not be continuously lit. In order to charge the 630ES, the meter must be turned off and the battery charger (AC powered) plugged into the unit’s “CONNECTIONS” port. Do not operate the 630ES with a “Low Battery” indication as the readings can be inaccurate.
The 2.0 ohm range on the AMPTEC 630ES Igniter Tester should be checked out first. After pressing the 2 ohm range (momentary) switch, the range indicator LED should come on.This indicates the 2 ohm range is selected .
2.0 Ohm Range - Checkout / Verify Procedure 5 mA There is positive (+) and negative (-) polarity associated with the AMPTEC 630ES Test Leads. AMPTEC 630ES Test Lead polarity doesn’t effect the resistance measurement, but it (polarity) does effect the use of the milliammeter. The banana jack lead with the red indicator is Voltage and Current HIGH, while the banana jack with the black indicator is Voltage and Current Low. When using the built-in analog DC milliammeter (red jack on the meter +, and black jack on the common black jack) proper test lead polarity connection must be maintained to facilitate proper operation of the milliammeter. In addition the 630ES key must be in the keyswitch and the switch in “measure” mode in order to measure anything with the 630ES Test Leads. The milliammeter should indicate the units test current level is less than 5 mA, which is viewed as just right of the the 12 O'clock or mid scale needle position. The key must be in and switched to the measure position in order to make any measurement. In the "SAFE" mode the connection port leads are shorted (No output for Safety purposes)
2.0 Ohm Range Check 1. Next check the 2 ohm range by plugging in the red banana jack lead into the 0.100 (1/10th) Ohm reference resistor. Note: this resistor is only approx. 0.100 ohms . The 630ES reading will be approx. 0.10 ohms (i.e .0995 ohms or 0.1011 ohms. The purpose of having a reference resistor is only to verify the 630ES is measuring in the proper magnitude or level of resistance. The unit's reference resistors are not be considered as a calibration standard, but only as a simple measurement verification or checkout tool. If the 0.100 ohm check looks OK, try plugging the red banana jack lead into the 1.0 ohm reference resistor. Again the 630ES should display a reading of approx. 1.0 ohm (i.e .9985 ohms or 1.0012 ohms etc.)