Finished Goods Purchase Order Entry
Finished Goods Purchase Order Entry. RLM System. Finished Goods Purchase Orders. FGPOs are the orders Jordache places to the factories that produce the garments FGPOs to all Factories except JRA Yucatan are entered by Jordache NY. JRA Yucatan POs are entered by Colfax

Finished Goods Purchase Order Entry
E N D
Presentation Transcript
Finished Goods Purchase Order Entry RLM System
Finished Goods Purchase Orders • FGPOs are the orders Jordache places to the factories that produce the garments • FGPOs to all Factories except JRA Yucatan are entered by Jordache NY. JRA Yucatan POs are entered by Colfax • NOTE: Some of the following slides will have different screen colors (browns and blues), but the screens you will see will all have the blue colors. (Skip to Main Menu)
Glossary of Training Terms • The following terms will be used throughout this training program: • Field: A box on the screen into which you enter information • Value: The information (data) being entered in the field. Example: Division number, FGPO number • Icon: An image you may click to perform a function such as select, submit or exit • (Single-)Click: Also “Select.” Hitting the left mouse button once. This will activate an icon or select a row in a list of values • Double-click: Hitting the left mouse button twice o the same part of the screen. Used only to select and return a value from a list.
Using the RLM System • These are the primary RLM icons you will use: • Search: Located next to entry fields. Clicking this icon brings up a pop-up window with a list of all possible values for the field (for example, the next to the Division field will show a list of all divisions) (Shift-F9 keys or F21 key) • Select: Located on the Search pop-up windows. You may click on a line and click Select to return its value to the main screen • OK (Submit): Located in the bottom right corner of each screen. Processes the information on screen and brings you to the next screen • Return (Back): Located at the top of each screen. Click this icon to go back one screen (F2 key) • Exit: Located at the top of each screen. Click this icon to return to the menu or close a pop-up (F3 key)
Sign On Enter your User ID and Password here Note: User ID and Password are assigned by MIS. The password field IS case-sensitive.
Welcome Click the check (or hit the Enter key) to proceed
Enter the application number for the menu or click the correct button in the menu at left Enter the application number for the PO menu or click the correct button in the menu at left Select Application Enter the Company number If you don’t enter a Company or enter the wrong number, you will receive this error: Click OK
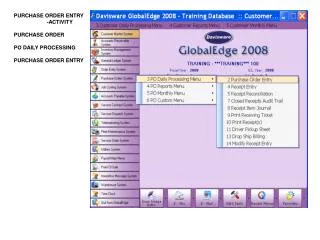
FGPO Menu Click “Entry functions”
FGPO Entry Menu Click “Enter/Maintain Finished Goods Purchase Orders”
Select Division To Select a Division click this icon: Enter the Division Number here Double-Click the correct division, enter the number or click the line and click
Create New FGPO For a new PO enter the Factory number in the “Maker/Contractor” field Enter the “Plant/Warehouse” number here FOR GAP ONLY: Enter the Gap’s account number Click OK
Select Factory To Select a Factory click the icon Double-click a Factory to select it, or single-click and hit the button
Search Factory (Contractor/Vendor) To search, start typing the factory name and hit enter to search the list You may also enter or click to search by Contractor Type… Or by Country
Select Plant To Select a Plant click this icon: Double-click a Plant to select it, or single-click and hit the button
Enter FGPO Header: User PO # Enter the User PO number (found in the PO Book). For GAP use the Customer PO# from EDI The PO Type is automatically filled in (and determines the type of Cost Sheet used) Select the type of PO: 1st Quality (default selected), 2nd Quality, 1st Quality Leftovers (Odds)
Enter FGPO Header: PO Type (Div. 46) Note: For Ditto FGPOs produced at JRA Yucatan you must change the PO Type to a JRA Yucatan-specific one so the correct cost sheet will be used. Click into this field and hit F21 (Shift-F9) to bring up a list of Div. 46 PO types Double-click a JRA Yucatan PO Type to select it, or single-click and hit the button
Enter FGPO Header: PO Type (Domestic) Note: For Non-Intercompany POs (Domestic) you must use the “DO” PO Type Click into this field and hit F21 (Shift-F9) to bring up a list of PO types Double-click the DO PO Type to select it, or single-click and hit the button
Enter FGPO Header: Country, Ship. Mode The “Country of Origin” is automatically filled in (based on the Factory location) The “Maker #” is automatically filled in (based on the Factory selected) To change the Ship. Mode type in or click the
Edit Vendor Number (Inter-Company only) The Vendor # must be changed: Type in or press the F21 key (shift-F9) to select. For Non-Intercompany POs leave the Vendor # as is. Double-click a Vendor to select it, or single-click and hit the button
Vendor Numbers • 800052 (MG Macao): For Owned Factories: JAR Morocco, AJICO, JAR Kenya, JRA Yucatan and all Non-Owned Factories • 800053 (MG Macao for Ditto): For JRA Yucatan when Division is 46 • 900022 (AIHL): For MKLEN (Madagascar) • 900023 (AIHL for Ditto): For MKLEN when Division is 46 – rarely used • 800073 (MG Overseas Ltd.): No longer used, may be on old FGPOs. • Note: For Domestic POs the Vendor # is the same as the Maker #
Enter FGPO Header: Tag, Total, ETD Enter the Tagging information if necessary. To view the available options, click the icon Enter the ETD here (MMDDYY) Enter the Total Ordered (required)
Enter FGPO Header: Instructions Enter Packing Instructions in the “Pk. Instr.” field If necessary, enter Special Instructions in the “Sp. Instr.” fields (max. of 3).
PO Additional Information If necessary, click here to enter “PO Additional Information”
PO Additional Information (cont.) Enter “PO Additional Information” in these fields Click “Update” when finished
Enter FGPO Header: Finish Click the check or hit Enter to continue
Enter FGPO Details: Season, Style Enter the season and year in these two fields. Example: F 05 for Fall 2005. Select with the Select the Style using one of the icons
Select Style Notice that there are separate styles for Prepacks and for 00A (Open Stock) Double-click a Style to select it, or single-click and hit the button
Enter FGPO Details: Ins/PP The Style, FabWash and Color are put into the fields Select the Ins/PP using the icon
Select Ins/PP If you chose a Prepack style, select the Prepack code. There may be more than one. Note the number of units If you chose an Open Stock style, select the *N code.
Enter FGPO Details: Quantity Enter the quantity ordered for this style If you chose a Prepack style, the quantity Ordered must be a multiple of the number of units in the Prepack.
Enter FGPO Details: Prepack Style Click the check mark (or hit Enter) to continue
Enter FGPO Details: Open Stock Style If you entered an 00A style, enter the breakdown by size in these fields. Note: The total of the breakdowns must equal the number Ordered for this style – see slide 26
Review FGPO Details Click here to “Add a New Line” – add a style to the FGPO If finished, click the Balance icon (or hit F9)
Balance When finished, click here to Balance the PO You may also click this button or hit the F9 key to Balance
Out of Balance If the total entered by style does not equal the total on the PO header (see slide 19), you will see this screen Click “Continue” to return to the PO details an edit the numbers. See slides xx-xx
Balance (cont.) Click “Continue” to finish balancing the FGPO
What Happens Next • The Purchase Order creates a Customer Order in the Vendor Company (and in Related Factories) • Related Factories cost their orders and submit the cost sheets to NY for approval • Non-Related Factories’ cost sheets are submitted to NY by Related Vendors (MG, JIL, etc.) • Domestic POs must be costed and approved by NY
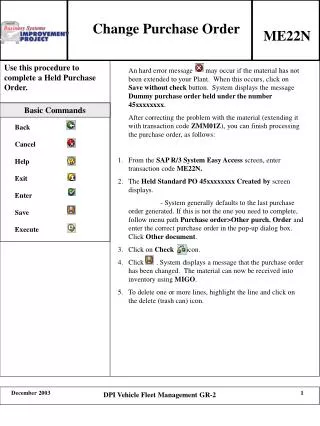
EditFGPO To edit an FGPO, enter the “Division #” and the “User PO #” here. “(System) Purchase order #” is not needed Click the check or hit OK to continue
Change Plant Click here to change the Plant (Warehouse) Double-click a Plant to select it, or single-click and hit the button
Edit FGPO Header Click here to Change Maker/Manufacturer Note: To change the Maker once the cost has already been Approved you must first Reject the cost, enter a new FGPO, then cancel the original FGPO.
Select New Factory Current Factory is here To Select a new Factory click this icon: See instructions for selecting a new Factory (Vendor/Contractor)
Accept New Factory The new Factory appears here Click “Change” (F13) to accept the new Factory
Edit Existing Style Line Right-click on a line to show Options… And left-click “Change Line” Or type in the LN# (line #) of the style and hit Enter… 0001
Edit Existing Style Line Select “Standard Maintenance” to change the line (can only be done until cuts are entered by Factory). Return to Prepacks, or to Open Stock To split the PO line to provide a new ETD date, select the third option. Continue with next slide Click Continue 0001
Split PO Line for New ETD Date Enter the NEW ETD Date Enter the quantites by size that will be shipping on the NEW ETD. Sum of sizes must equal the total field. The balance will remain on the original line and ETD Enter the total quantity that will be shipping on the NEW ETD Click OK to create the new line Note: Prepack styles will have only the total field
Balance after Edit When finished editing you must Balance the PO You may also click this button on any of the FGPO screens or hit the F9 key to Balance
Balance after Edit: Mark as Changed Check here to print the FGPO Make sure “Changes were made” is checked You may change the Outq here Click “Continue” to finish balancing the FGPO
Balance after Edit: Reason Code If “Changes were made” you must enter a Reason. Use the icon to select from a list… …Or enter a description of the change here Click “Update” to finish
FGPO not Balanced If you have viewed or edited an FGPO without balancing it, you will see this warning when you next sign on to the system The system will bring you directly to the FGPO that needs balancing when you click the check or hit Enter
Cancel an FGPO To Delete an FGPO click the “Cancel PO” button here or on the detail screens