TAB-To-L3(Tape)
At the L1Cal2b sidewalk test stand we have a setup to transmit the data coming from detector to tape using the new system. We installed the setup sometime in February and since then we are writing data both to tape and to our local disk.

TAB-To-L3(Tape)
E N D
Presentation Transcript
At the L1Cal2b sidewalk test stand we have a setup to transmit the data coming from detector to tape using the new system. We installed the setup sometime in February and since then we are writing data both to tape and to our local disk. In the beginning our aim was to have a readout system which can send the data to tape at Feynman computing center and also we should be able to dump the data to our local disk. This arrangement was done keeping in mind to debug the system immediately. TAB-To-L3(Tape) Md Naimuddin Delhi University
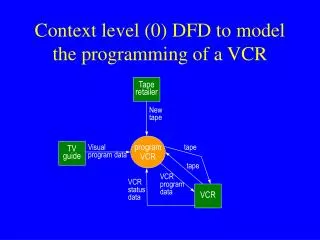
To readout the signals from TAB we have the following infrastructure: 1. TAB(s) board from where data is to be readout. 2. VTM 3. VRB 4. VRBC 5. BIT3 6. SBC 7. An online node. 8. A windows box Readout System setup
Here is a sketch of how our sbc is isolated from building ground and also show the networking at sidewalk
The readout crate can be operated in two modes: When getting data from TAB or can run for simulated data on VRB. 1. Configure the VRB using BIT3 spreadsheet on windows box. One can choose here whether to run in simulated or TAB data mode. 2. Once the BIT3 is setup and VRB is configured, make sure that SBC is up by pinging from d0ol55. 3. Configure the TAB using Mike's handy code for TAB configuration. 4. Once TAB is configured, login into the sbc as root from d0ol55 node and issue these commands: dump_to_file <filename> for writing the data on local disk. Reset_all.sh for writing the data on Tape. 5. Open the taker window and download the trigger configuration file which you want to run from /online/data/coor/configurations/commissioning/l1cal/l1cal2b/ 6. Once the download is successfully completed then start the run. We can run even in parallel with the global run with the appropriate trigger configuration. Operating the test setup
We have quite a few trigger file available to run the test setup in different conditions. We have a zero bias trigger file which can be configured and run in parallel with global run. We also have a trigger file which trigger only on fixed bunch crossing. (Need cal crates to run this trigger) There is another trigger file which is for taking a pulser run with a particular pattern. And we have a trigger file which can trigger for real collisions in the calorimeter i.e. For collecting the real physics data from collisions. Using these trigger files we can run continuosly without disrupting the DAQ system. Till now we have not caused any major problem to the DAQ system. When we run in parallel to the global run then we require to issue a couple of SCLinits to clear L2 crate X24 which goes busy if any run in parallel to globa run starts. Trigger Files and DAQ
We started our integration test by generating simulated data on VRB and then dumping the data on our local disk using sbc. The First run after integration was Run#205516. We did not cause any problem to DAQ and ran smoothly. The First Run with random TAB data was Run#205603 The First fixed pattern data from TAB was Run#205846. This data first times gave us the clear picture of timing and other problems. To get rid of those problems we changed the TAB firmware and took another Run#205903 which corrected few of the problems but not all. After a fix, we sent out a channelmap data in which each channels were given a distinct value so that we can probe the problematic channels. The Run number was 206184. Once we established a reliable connection between TAB to L3 then we integrated ADF also in our readout exercise. The first run including ADF was run#206187 Summary of the Runs and Problem diagnosis
In the past we also observed the byte swapping issues in the readout data so we modified the sbc configuration to take this into account and then took the Run#206400 • After correcting for byte swapping problem we again took run including the ADF , Run#206558 • Till now we were writing data only to our local disk so at this point we integrated our system to readout and write the data to tape. The first run on Tape was Run# 206688 • Once we started writing on Tape we exercised the whole chain from ADF->TAB->Tape in Run#206958 • To correct for our pedestals we fixed all the channels to pedestals values and took the Run#207012 and 207016 • The First BLS signal was readout by our system in Run#207237 • At this point we had many problems fixed except that we were not timed in and we had few extra words in our data. • To get timed in we took the run with a trigger which triggers on fixed bunch crossing only. Run#208804 • Once we were timed in then we started taking runs for comparing precison Vs L1Ca2b Vs L1Cal2a. We first used the pulser to fire in our TT and the Run#208913 Now to compare each TT we took hand pulser Run#208984
In order to compare the real energies in TT we took the run during the physics collisions,Run#209310, 209311 and 209312. We also found that we could run stably with our new physics trigger. The Phsics Run#209312 were having some problem of bit shifts in EM and lack of calibration, etc. We changed the VTM and as all other parts were working fine and took another run#209531. This run had no bit shift problem but we found a new sort of noise problem. After performing various other tests we suspected VMESCL as culprit so changed the VMEscl firmware. We also took a fixed pattern run#209440 to verify our ADF->TAB transmission accuracy and robustness. We took run#209497 with no beam in tevatron to perform our noise studies. With modified VMEscl firmware, we took physics run#209675. This run had none of above mentioned problems and the plots can be seen in next slide.
Using our readout setup we took several runs and now we are taking the real physics run to compare the L1Cal2b system with precision and L1Cal2a. Few recent plots: Recent results
We have a stable setup for reading the data out from ADF->TAB to Tape or to dump on our local disk. We are running the system for quite a long time without any major problem. We can run reliably for longer durations. Conclusions