ISOMETRIC IN AUTOCAD
ISOMETRIC IN AUTOCAD. Outcomes of today’s lecture. Able to explain in producing Isometric drawing in AutoCAD. Setting up isometric grid/snap. The grid/snap style should be changed to isometric snap Right click on grid button on status bar, choose ‘Settings…’

ISOMETRIC IN AUTOCAD
E N D
Presentation Transcript
Outcomes of today’s lecture Able to explain in producing Isometric drawing in AutoCAD
Setting up isometric grid/snap • The grid/snap style should be changed to isometric snap • Right click on grid button on status bar, choose ‘Settings…’ • Drafting setting window displaying Snap and Grid tab is displayed
Setting up isometric grid/snap Rectangular Isometric
Changing isoplane • Changing the isoplane – left, top, right • Cycle by pressing CTRL+E or F5 or • Command: isoplane {enter} Right Top Left
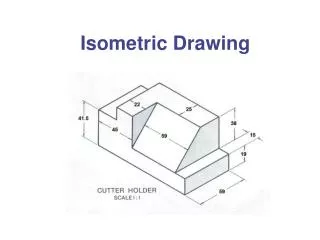
Drawing lines, circles and arc • Isometric lines and non-isometric lines can be drawn using line or polyline command • Isometric circle can be drawn using ellipse command • Draw ellipse > isocircle • Isometric quarter circle and semi circle can be drawn using ellipse arc command • Draw ellipse arc > isocircle
Creating round corner Before After Draw ellipse arc Draw another ellipse arc Trim Trim Trim Draw straight line from midpoint of top arc to midpoint of bottom arc
Dimensioning • Use aligned dimension for linear dimensioning • Use quick leader for isocircle Aligned dimension Quick leader
To make dimension aligned with isometric axes, follow few steps as: - Type DIMEDIT - Type O for Oblique - Select the dimension to be aligned, then Enter - Specify the obliquing angle For example, using the object above, for clockwise alignment such as 90, type 30 for the angle, whereas for 100, type -30 for the angle since anti-clockwise alignment.
Dimensioning for Isocircle Select Quick leader icon Select the circle, then extend the leader line to appropriate direction, click, then make short extension in horizontal direction, click,then type corresponding value (example: R20) for the dimension.
Other useful tips • Use COPY command with polar relative coordinate system or OSNAP. • Do not use OFFSET command. • Set up LAYER before drawing. • Use construction line as a guide (recommended to use different colour)
Conclusions What has been covered today: • Producing isometric drawing using AutoCAD
What is next? • You will complete the Tutorial on creating Isometrics. • After completing the Tutorial and turning in your print. You will revisit Packet 2 and 3. You will complete 6 total Isometrics for the two packets (your choice on which 6). Each is worth 10 points. Dimensions MUST be included.