Sketching Isometric
160 likes | 385 Vues
Sketching Isometric. 3D Sketches. Big Picture. An Isometric is a 3 Dimensional Sketch. Isometric means equal measure, each dimension (height, width, and depth). A Troubled Image.

Sketching Isometric
E N D
Presentation Transcript
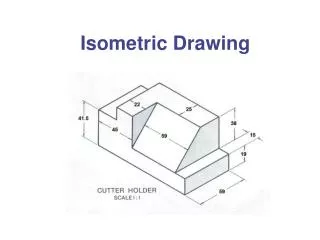
Sketching Isometric 3D Sketches
Big Picture An Isometric is a 3 Dimensional Sketch. Isometric means equal measure, each dimension (height, width, and depth).
A Troubled Image With a partner (at your table) try and draw the Isometric Shape using the Orthographic Projection to the left.
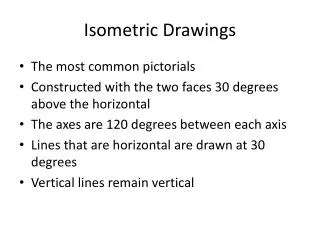
Equal Measure In an Isometric drawing, the lines all converge together to form 120 Degree angles.
Box Method To draw an Isometric we will use the “Box Method” While drawing, use a ruler and make 1 single neat line.
Lines You will use 2 different lines when sketching. 1. Construction Lines – light lines to initially draw the object
Lines You will use 2 different lines when sketching. 2. Drawing Lines – Dark lines to “highlight” the finished drawing.
Ortho to Iso In order to draw an Iso follow these steps. 1. Draw the beginning construction lines 30 degrees from the horizontal line, and the vertical line.
Ortho to Iso 2. Sketch the “Box Method” using construction lines.
Ortho to Iso 3. Start adding details using construction lines. Try starting with the side.
Ortho to Iso 4. Locate cutouts and endpoints in the orthographic and add in those details.
Ortho to Iso 5. Erase construction lines and darken in Final lines to complete.
To the Drafting Table Complete both of the isometric sketches. They are labeled, “Isometric” and “Advanced Isometric” on the website.