Download
1 / 30
300 likes | 320 Vues
Learn how to manually record with an iRiver D240x detector for real-time activity monitoring using headphones with heterodyne channel. Follow detailed steps for setting up and recording with the device efficiently.

E N D
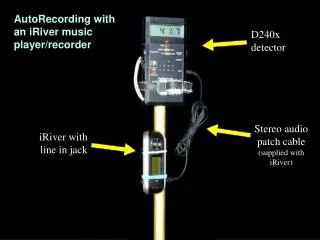
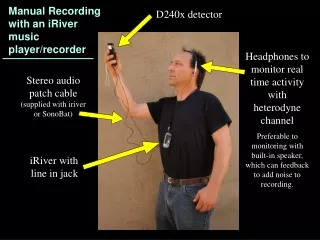
Manual Recording with an iRiver music player/recorder D240x detector Headphones to monitor real time activity with heterodyne channel Preferable to monitoring with built-in speaker, which can feedback to add noise to recording. Stereo audio patch cable (supplied with iriver or SonoBat) iRiver with line in jack
Hold this button down until the iRiver turns on. • Recording settings to use: • Mono • 44 kHz • 160 kbs • Ext line-in connection • 1 sec autosync
If the iRiver does not power up into record mode, hold this button down until the mode window appears. Jog the joystick right or left to select LINE IN, then push to select.
Changing settings Hold the joystick button down until display changes to the General Settings window.
Then jog the joystick to right until the Control settings show...
Jog down down to LINE-IN RECORDING MODE setting and select by pushing down joystick.
Click the joystick to switch from stereo to mono. Jog down to sample rate and jog right to 44.1 kHz. Jog down to bit rate and jog setting to 160 kbps.
Jog down to LINE-IN RECORDING VOLUME setting, and push joystick to select.
Jog down to LINE-IN AUTO SYNC setting, and push joystick to select.
Jog left or right to select Line-in, and push joystick to select.
Push this button to return to settings menu. Use the jog button to move over to the Display settings and click to select.
If set to seconds, click the jog button to toggle to minutes.
Push the jog button to the right to scroll the minutes to the maximum setting of 30.
Setting up the D240x to Manually Record HET/TIME EXP button does not matter when using headphones. Leave on “NORMAL” setting. (This unit has the switch disabled to avoid inadvertently changing this setting.) Adjust volume setting to sufficiently hear baseline static on heterodyne (left) channel. Use HIGH gain for most situations to maximize range reception of bats; use low gain in situations when the detector might be very close to the bats. Connect to headphones. Connect stereo patch cable to LINE IN jack on iriver. Not headphone jack!!!
START/STOP button to trigger/end recording downloads. Set trigger setting to MAN. Use 1.7 sec recordings for most recording sessions. This will provide sufficient calls and sequence data for most bat species, while optimizing the number of passes recorded. These settings do not matter when manually recording.
This glowing red LED indicates the detector is recording. (If not glowing, then it is downloading– click the START/STOP button to return to record mode. Adjust the heterodyne to a frequency appropriate for the bats you wish to record, or use 40 kHz as a general default that works for most species; adjust the frequency dial up and down from about 20 kHz to 50 kHz to search for others.
Push the record button to begin recording. (You will not see any actual recording activity until you trigger a download from the D240x.) Once in record mode, toggle the lock button to lock to prevent any inadvertent button clicks. The backlight will end after 30 minutes, just retoggle the lock slider on and off to reinitiate 30 more minutes of backlighting.
The detector records continuously into a circular buffer, i.e., it discards older data as it writes new data. When you trigger a download with the START/STOP button, you capture the previous 1.7 seconds of recording from just before you pushed the button. Endeavor to capture the strongest section of the bat pass. Listen as the detector clicks strengthen, pass a maximum level, then as you hear it begin to diminish, push the START/STOP button to begin the download. START/STOP button pushed listening 1.7 seconds Recording section that will download.
Once you push the START/STOP button, turn your attention to the iriver and watch the seconds count up. Just before the display reaches 16 seconds, push the START/STOP button to end the download. This prevents the button click sound from entering the recording, and prevents redundant recording as the D240x will keep looping the same download until you stop it. (16 seconds because the iriver has a 1 second response lag.) Just before 16 s, STOP!!! You may also select 3.4 sec downloads from the D240x. If using this option, stop the download just before 33 seconds.
Push and hold the COM button to generate voice note files. For example, after recording a known bat, you might speak, “The previous file was a ruffle-bonneted bat emerging from a termite roost.” In general, it works better to make voice notes after a successful recording. When processing your files, these voice notes will be in numeric order following the file to which they refer, and then you can back up and enter the notes. See the iriver file management presentation for extracting and transferring files from the iriver recorder.