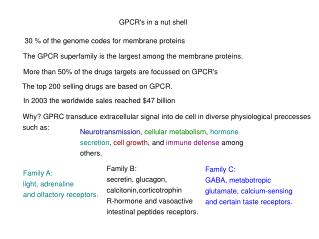
Creative Photo Editing Techniques by Leeann Smith
Discover various creative photo editing techniques showcased in Leeann Smith's portfolio. From enhancing colors and contrast to intricate lasso selections, learn how to elevate your photography skills. This presentation includes diverse projects, such as merging layers, applying thresholds, and adjusting hues for artistic effects. Whether you're enhancing wildlife imagery, portraits, or landscapes, these methods aim to create visually stunning results. Perfect for aspiring photographers and graphic designers looking to refine their editing prowess.


Creative Photo Editing Techniques by Leeann Smith
E N D
Presentation Transcript
Portfolio in a Nut Shell By: Leeann Smith
Animoto • http://animoto.com/play/6KkRFFuUSFBzPgw7EUw1jg
Color The Birds Black • Copy Bird • Threshold • Paste Bird on each layer, for different amounts of threshold applied • Use paint bucket • Merge Visible • Copy full photo • Paste on different layers • Change hues
Associates Degree Face • Lasso Brother • Invert • Make Background Black and White • Raise the contrast of the background • Crop to minimize busyness.
Brown in a Mason • Lasso the Snake • Bring up the contrast • Raise the Saturation to make it stick out • Brighten up the jar to make it background
Red Robin in the Morning • Not much editing needed • Brighten trees • Bring up bird contrast slightly
Mysterious Smoke in a Snowfall • Not much editing needed • Brought up overall contrast • More contrast was applied to the smoke to bring it out • *Flash was applied when photo taken
Deer. • Desaturate • Bring up Contrast • Bring brightness up slightly.
Dew Clearly • Lasso flower, and raise contrast to focus on flower even more • Darken background • Not much editing needed
It’s the Memory, not the Picture • Slightly effect the curves • Slightly effect the Saturation and Lightness
Lost Ginger • Lasso Cat • Inverse • Blur Background further • Bring up saturation in cat slightly • Lasso eyes • Brighten eyes slightly to further bring them out
Mama or Ghost • Darken edges • Effect Curves • Brighten light from lamp to give mystical effect • Crop slightly • Lighten photo to see figure better
ME Wordle • Created using Wordle. • Words used to describe me • Change colors to blues, greens, and purples • Screen shot using Print Screen key • Paste into Photoshop • Crop
Bring up the contrast in the jacket using lasso tool to select it • Change the curves to make that glossy finish in the right hand corner of the jacket • Bring up the lightness in the jacket to show the focal point Nike Supporter
They Named Him Ernest • Was a grid drawing, done last semester in Mr. Quinns Class. • Scanned it in • Further desaturated • Threshold photo in layers to bring out different features • Merge Visible, with darken blend on one layer creating spots on forehead • Paint on different layer and blend • Copy first face and paste 3 more. • Change hues to be different and create a pop-art effect.
Painting the Dark • Took picture in the car while it was moving • Slowed down shutter speed to create the lines of lights • Desaturate • Bring up contrast to make it more dramatic • Lighten to make it more subtle
Morning Brings Simple Beauty • Lasso seed pod, bring up contrast • Inverse and blur background further • Change curves to give off that cold feeling and also give off a silvery tint
Sam and Sunset • Girl and background done in two stages • Bring up contrast in girl • Change curve levels • Bring up Saturation in order to bring up the sun on her hair look • Change the levels of the background • And then lighten in order to take the focus off it • Then change overall contrast for final finish
SQUIRREL! • Raise overall contrast • Raise Saturation • Crop to lower amount of trees • Change curves slightly to give natural but more rustic feel
TaTa • Lasso T.A. bring up his contrast • Lighten background to make him stick out • Change curves to give that dusty look • Darken
Snow is a Big Deal in Shelby • Taken with flash on to make snow show up. • Brighten • Change curve levels to give that flare to the lights • Blur trees in the back slightly
The Dream of the Device • Raise Contrast slightly • Change curves and levels to give off a shiny finish throughout • Lighten
Navy skies with a Burst of Hope • Darken in all areas • Raise saturation • Darken • Raise Contrast
Florida • Desaturate • Threshold • Raise lighten • Raise contrast • Paint background slightly • Blend in Luminosity
Peaceful Flying Fish • Create background • Add grid • Place background of lake behind layer of grid • Create layers of fish moving • Go to Image Ready and select separate layers and make it move
Spring has Come • Raise saturation • Lower Lightness • Change the curves slightly • Lower contrast slightly • Raise Brightness
Lincoln Town Car • Raise the Lightness and Saturation • Desaturate • Raise Contrast • Slightly adjust curves • Select car and raise contrast
It Was All A Dream… • Raise Contrast • Raise Brightness • Raise Lightness • Change Curves • Bring up Saturation
Something to change… • Start with original • Apply a layer of cracked mirror • Decreased opacity • Changed curves on mirror layer