Download
1 / 30
300 likes | 449 Vues
Course Materials Management System And The New Student Portal. Overview of CMMS and Student Portal.

E N D
Course Materials Management System And The New Student Portal
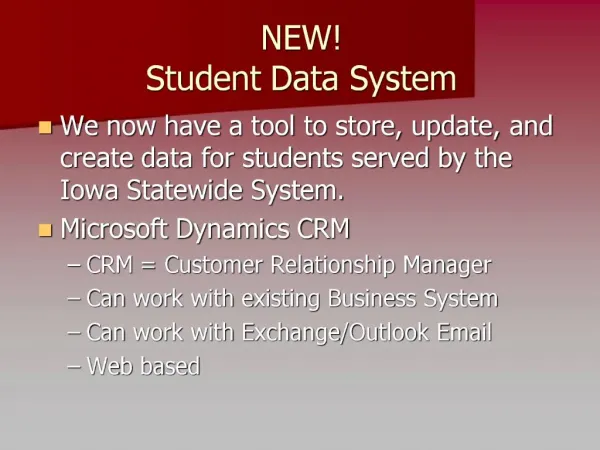
Overview of CMMS and Student Portal • The CMMS and the Student Portal are related but distinct applications working in concert to provide faculty, staff and students with access to the School’s online curricular materials. Typically, online curricular materials are posted using CMMS administrative tools, and accessed by students using the Student Portal. • The Course Materials Management System (CMMS) replaces the School’s Curriculum Website, and provides a much more robust mechanism for posting and viewing course materials. CMMS is tightly coupled to the Web Event online calendar that has been deployed with the new Student Portal. A brief overview of CMMS as it appears within the Student Portal follows…
Typical Student Views of CMMS fromWithin Student Portal Non-event related materials such as courseware and syllabi are available on new course webpages in CMMS. Event related materials such as slides and lecture notes are linked directly to the portal calendar, as well as by course…
Summary of CMMS and Student Portal • CMMS allows curricular materials to be associated with events. Materials can be uploaded and updated at any time, by any authorized individual. The CMMS can be pre-populated with curricular materials from previous years, pending submission of current materials. • Posted materials are accessible through the Student Portal, through various search and browse tools in CMMS, as well as via direct links from event in the student calendar. • The Course Materials Management System (CMMS) replaces all earlier methods for posting and managing School of Medicine online curricular materials, and will be used by SoMIT and Deans Office staff for these purposes. • FACULTY ARE NOT REQUIRED TO USE THESE TOOLS THEMSELVES, AND MAY CONTINUE TO FORWARD CURRICULAR MATERIALS TO THE SAME STAFF FOR POSTING, AS IN PREVIOUS YEARS. • Faculty who wish to directly interact with the online curriculum are welcome to do so, and can use the following tutorial to learn about the main features of the CMMS…
Tutorial Course Materials Management System
Using CMMS • Using your KID and e-mail password you will log onto the CMMS by entering the following URL in your web browser: http://www.med.nyu.edu/coursematerials • Your ability to upload or edit information on subsequent screens is determined by your responsibilities for any given event.
CMMS startpage The URL will take your browser to the CMMS startpage. Press the continue button to go to the login page.
Log-in Screen Next, type your kerboros id and password in the fields and click the “Login” button. Once successfully logged in you will have a chance to organize course materials or upload curricular material.
Navigating in CMMS • Two key functions provide faculty and staff control of most curricular materials: • Administer Modules/ Lecture Relationships: Gives the staff and course director the ability to create/edit events and assign an instructor using his or her KID • Upload Materials. Gives staff, course directors and lecturers the ability to upload curricular materials and request A/V services. • The next few slides demonstrate the “Administer Modules/ Lecture Relationships” function.
Administering Modules and Lectures The “Administer Modules/ Lecture Relationships” function enables faculty and staff to create/edit events and assign an instructor using his or her KID. Choose Module: Use the “Module Name” drop-down list to select a module. As a course/module director you will only have access to your modules; i.e. Director for Physician Patient and Society will only view PPS Modules. Click the “Continue” button.
Administering Modules and Lectures Choose Lecture: Select a name from the “Lecture Name” drop-down menu. The list is derived from the schedule. Next, enter the “Event Code” if one already exists, or else create a new one. An event code is an abbreviation of the event title, of no more than 8 lower case characters. Examples include [Antifungal Pharmacology: afnglrx, Host Defense Exam I Review: hdex1rev, and Obstructive Airway Disease Seminar: oadsem]
Administering Modules and Lectures Add Lecturer: Enter Lecturer Name by clicking on "1st lecturer" and/or "2nd lecturer". This opens a second browser window. In the new window enter full or partial name and click the “Do Search” button. Choose the correct faculty name from the list. This assigns the faculty Kerberos ID to the event. Click: "Add New Lecture" to submit.
Administering Modules and Lectures Once a lecture has been successfully added you will be given the choice of adding another lecture or uploading materials for a lecture. The following slides demonstrate the curriculum materials upload function.
Upload Materials Select Academic Year: If you choose “Upload Materials” at login or from the Administer Modules menu, you will first be asked to select an Academic Year from the “First year” or Second year” radio buttons. Click “Continue”.
Upload Materials Select Course Module: Choose the module you want from the “Module” drop-down menu and click “Continue”.
Upload Materials Select Lecture: Choose your lecture from the “Lecture” drop-down menu and click “Continue”.
Upload Materials Select Material type: Decide what type of material you are posting (lecture notes, slides, Q&A, etc.) and select it from the “Material Type” drop-down menu. This allows the system to assign unique labels for multiple materials posted to a single event. In this example we are using an Anatomy Module as an example however, your module most likely will be different.
Upload Materials Browse for Material: Once you have selected a material type, click the “Browse” button to search your computer for the materials to be uploaded. This will open the familiar file system navigator window on your computer. Use it to navigate to and select the lecture material you wish to add.
Upload Materials A/V Code: Finally, enter any A/V service requests in the “A/V Code” field (Alternatively, this can be done in the Webevent calendar). To get a list of A/V codes press the “Help” link to open a list in a new browser window. Click the Continue button.
Upload Materials You will receive a message indicating that the materials were successfully uploaded. The following slides demonstrate the remaining functions of the CMMS.
Browsing Curricular Materials Browse Materials by Module: You and your students can browse the materials that have been uploaded. Click on the “Browse Materials” button on the banner in the top portion of the webpage.
Browsing Curricular Materials This screen indicates the module names and the number of materials that have been uploaded to each. You can view the materials by clicking on the highlighted module name. In this example we will select the Anatomy & Embryology Fall 2005 link.
Browsing Curricular Materials Having selected the module link you are presented with a list of events associated with the module. Under each event is the course materials. Clicking this materials link will download the media to your desktop.
Comprehensive Search Comprehensive Search Page: Click on the “Comprehensive Search” button if you want to search for events and materials across a module in a more definitive way.
Comprehensive Search Follow the steps as they are presented. First, select the “Academic Year” checkbox.
Comprehensive Search Choose a module to search from the “Module” drop-down menu.
Comprehensive Search Choose the search values from those presented and then click “Continue” to see a list of search results.
Comprehensive Search The search results are returned and displayed in a new list. Again, in this example we have used the Anatomy & Embryology Fall 2005.
Logoff • Logoff: Click the “Logoff” button to leave the secure “CMMS” system when you are finished.