Creating New Forms
210 likes | 355 Vues
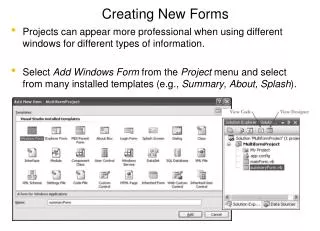
Creating New Forms. Projects can appear more professional when using different windows for different types of information. Select Add Windows Form from the Project menu and select from many installed templates (e.g., Summary, About, Splash ). Switching Between Forms.

Creating New Forms
E N D
Presentation Transcript
Creating New Forms • Projects can appear more professional when using different windows for different types of information. • Select Add Windows Form from the Project menu and select from many installed templates (e.g., Summary, About, Splash).
Switching Between Forms • Each form is a separate file and a separate class. • Easiest way to switch is to use the tabs at the top of the Document window. The drop-down list shows all forms in the project. • . Selecting from drop-down list Selection from Tabs
Adding Existing Form Files to a New Project • Forms may be used in more than one project - an existing form may be used in a new project. • Each form and information for the form is saved as three files: • Code procedures • Visual interface (form design) • Property settings for the controls • To add an existing form to a project, use the Add Existing Item command on the Project menu, • Select only one filename: FormName.vb; all three files are automatically copied into the project folder,
Removing Forms from a Project • Select the file name in the Solution Explorer of the file to be removed. • Either click the Delete key or right-click on the filename to and choose Delete from the context menu. • Additional option is to choose Exclude from Project to remove the form from the project but not delete the files. This option is generally not available in VB Express.
The About Box Provides the name and version of the program and information about the programmer or company. Usually found in Help menu • Visual Studio’s About Box template can be used to create a new About box. • Choose Add Windows Form from the Project menu and select About Box.
Providing Assembly Information in the About Box • Information in the About Box can be retrieved from the Assembly Information Dialog Box. • To display the Assembly Information Dialog, open the Project Designer from the Project/ProjectNameProperties menu item and then click the Assembly Information button. • The About Box automatically includes code that uses the provided information from the Assembly Information Dialog.
The Splash Screen • Professional applications use splash screens to tell the user that the program is loading or starting. • Select Project/Add New Item to display the Add New Item dialog box and choose Splash Screen to add the new form. • Modify the template to fit your needs. A splash form created using the Splash Screen template
Making the Splash Screen Display First • Display the Project Designer from the Project menu and set the Splash screen drop-down list to the created splash screen. • Do not change the setting for Startup object or Shutdown mode. • When the project is run, the splash screen should display while the startup form is loading, and then disappear when the startup form activates.
Holding the Splash Screen Display • If applications are very small, the splash screen disappears before it can be read. • Code can be written to hold the splash screen longer by calling the System.Threading.Thread.Sleep() method in the Load event procedure for the startup form of the project. System.Threading.Thread.Sleep(5000) • 1,000 units = 1 second of sleep
Modal versus Modeless Forms • A form is modalwhen the user must respond to the form in some way, usually by clicking a button such as OK or Cancel before going back to another form in the project. • No other program code can execute until the user responds to and hides or closes the modal form. • A form is modeless when the user can navigate from the modeless form to other forms in the application and back again, if the user chooses. • With a modeless form, the user may switch to another form in the project without responding to the modeless form.
Showing a Form • New forms are displayed in response to a user clicking a button or a menu item. • The ShowDialog()method of a form displays the form modally. Use ShowDialog()when you want the user to notice, respond to, and close the form before proceeding with the application. • The Show()method of a form displays the form modelessly. Use Show()when you want the user to navigate among the different forms without having to close the modeless form first. SummaryForm.ShowDialog() SummaryForm.Show()
Hiding or Closing a Form • The Close()method of a form behaves differently for a modeless form compared to a modal form. • Modeless —Close()destroys the form instance and removes it from memory. • Modal — the form is only hidden. • The Hide() method sets the form’s Visible property to False and keeps the form instance in memory. • Forms that display help are better hidden than closed. SummaryForm.Close() SummaryForm.Hide()
Responding to Form Events • Two primary events that code might be needed for are: • FormName.Load — form loaded into memory • FormName.Activated— occurs when control is passed to form • The first time a form is shown in an application, the form generates both the Load and Activated events. • If a form is displayed multiple times, initializing steps can be placed into the Activated event procedure; same for setting the focus in a particular place on a new form
Writing Event Procedures From the Code Editor • In the Editor, drop down the Class Name list and choose the entry that shows the events for the selected form. • In the Method Name list, select the event for which to write a procedure—events already having a written procedure appear in bold.
Writing Event Procedures From the Properties Window in the Designer • Select an event using the Properties window. • Click the form to show properties and click Events button. • Double-click the event to create an empty event procedure.
Variables & Constants in Multiform Projects • To make a module-level variable available to other forms in the project, use either the Public or Friend keywords for declaration. • Friend— allows other forms in the project to access the variable (recommended) • Public— allows all other programs to access variables (not recommended) • Private keyword declaration allows access only in the class (form) in which it is declared. • Only use Public, Private and Friend keywords for module-level variables. Use Dim for local declarations.
Accessing Friend and Public Variables • Friend and Public variables are available outside of the class where they were declared. • To access these variables outside of their class, they must be referenced using their qualified name. • A qualified name has its form name added to the name of the variable. • Example: In Form1: Friend GrandTotal As Decimal In Form2: Form1.GrandTotal += 100.00
Static Variables • Every time a procedure or block of code is run, all the local and block-level variables are created ; when the procedure or block stops running, those variables are destroyed. • Sometimes the value in a variable needs to be retained for multiple calls to a procedure (such as running count). • Declare those variables Static and they will retain their value for the life of the project. • Only declare local and block-level variables as Static, not module-level variables. Static PersonCount As Integer
Guidelines for Declaring Variables & Constants • Place all local declarations at the top of a procedure using Dim. • Use named constants for any value that doesn’t change during the program execution. • Keep the scope of variables and constants narrow. • Make local variables Static, if needed, for multiple executions within a procedure. • Use Private module-level variables if referencing a variable in multiple procedures of a single form. • If using the value of a variable in more than one form, declare it using Friend.
Running a VB Program Outside the IDE • The .exe file can be moved to another computer, placed on the system desktop, or used as a shortcut just like any other application. • If copying the .exe file to another system make sure it has the correct version of the Microsoft.NET Framework. • Downloadable for free from the Microsoft Web site • You can change the icon, if desired by going to the Application tab and browsing for another .ico file. The application will have to be re-compiled.