Creating Forms in Word
Creating Forms in Word. Create a Form. Step 1: Set up Word for creating forms Click the Microsoft Office Button , and then click Word Options . Click Popular . Select the Show Developer tab in the Ribbon check box, and then click OK . See Sample Video . Create a Form.

Creating Forms in Word
E N D
Presentation Transcript
Create a Form • Step 1: Set up Word for creating forms • Click the Microsoft Office Button, and then click Word Options. • Click Popular. • Select the Show Developer tab in the Ribbon check box, and then click OK. See Sample Video
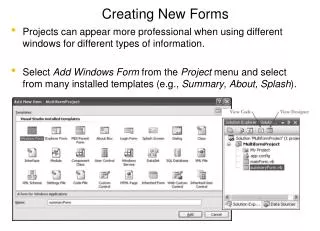
Create a Form • Step 2: Open a template or a document on which to base the form • Click the Microsoft Office Button , and then click New. • Under Templates, click My templates. • Double-click Normal, and then click Template or Document under Create New. • Click the Microsoft Office Button , and then click Save As. • In the Save As dialog box, give the new template or document a file name, and then click Save.
Create a form • Step 3: Add content controls to the form • Design the form by sketching a layout first, or use an existing form as a guide. In your form, you can add content controls, tables, and other graphics elements. • On the Developer tab, in the Controls group, click Design Mode, and then click where you want to insert a control. See Sample Video
Do any of the following:Insert a text control where users can enter text • On the Developer tab, in the Controls group, click the Rich Text control or the Text control . • Insert a text fill-in field • Important Spell Check will not flag any errors that are typed in the text form field. If you want to run Spell Check, use the Rich Text control or the Text control.
On the Developer tab, in the Controls group, click Legacy Tools. • Click Text Form Field. • In the Controls group, click Design Mode, and then do any of the following: • To add a line under the field, select the field, and then click Underline in the Font group on the Home tab. • To limit the amount of information a person can type in the field, set a maximum width by selecting the field, clicking Properties in the Controls group, and entering a value under Maximum length. • To make the field look as long as its maximum length, add instructional text by clicking Properties in the Controls group, and typing text, such as Type your first name here, under Default text.
Insert a drop-down list that restricts available choices to those you specify • On the Developer tab, in the Controls group, click the Drop-Down List control . • Select the content control, and then on the Developer tab, in the Controls group, click Properties. • To create a list of choices, under Drop-Down List Properties, click Add. • Type a choice in the Display Name box, such as Yes, No, or Maybe. • Repeat this step until all of the choices are in the drop-down list.
Insert a date selection box • On the Developer tab, in the Controls group, click the Date Picker control. • On the Developer tab, in the Controls group, click the Properties control. • Select the date format you wish to use. • Click OK.
Insert a check box • On the Developer tab, in the Controls group, click Legacy Tools. • Click Check Box Form Field. • Type a space, and then type a label for the check box. • To remove the shading from the check box, click Legacy Tools, and then click Shading. • Note You won't be able to select or clear the check box until you protect the form.
Prepare a form to be filled out • Open the form that you want to lock so that it can be filled out. • On the Developer tab, in the Protect group, click Protect Document, and then click Restrict Formatting and Editing. • In the Protect Document task pane, under Editing restrictions, select the Allow only this type of editing in the document check box. • In the list of editing restrictions, select Filling in forms. • Under Start enforcement, click Yes, Start Enforcing Protection. See Sample Video