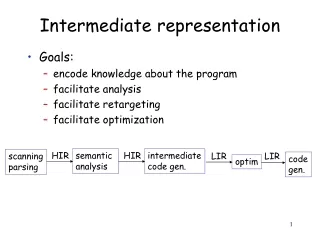
Intermediate PowerPoint
You should have already completed the PowerPoint basics section. Proceed through to learn the skills for Silver. As before, navigate by using the buttons to the left. Intermediate PowerPoint. Next Slide. Previous Slide. Home Slide. End Show. Intermediate PowerPoint Table of contents. 1.

Intermediate PowerPoint
E N D
Presentation Transcript
You should have already completed the PowerPoint basics section. Proceed through to learn the skills for Silver. As before, navigate by using the buttons to the left. Intermediate PowerPoint Next Slide Previous Slide Home Slide End Show
Intermediate PowerPointTable ofcontents 1 Collect Pictures from the Internet Hyperlink your slides Animate using Custom Settings 2 3
Pictures from the InternetPowerPoint Intermediate • Each “page” in a presentation is called a slide- knowing this, you can display anything on here that is on the Internet. • Copying from the Internet uses a graphic size of 72dpi. All screens show at this “dpi”. • Printing is done at 300 dpi. This is why pictures from the Internet look “blocky”. They do not have enough information in them. Pictures from the Internet Page 1 of 3
Open your Internet Browser Find a picture you want Hold down the “ctrl” key and click and hold the mouse button over the picture. A menu appears. Choose “Download Image to Disk” Somewhere on the computer is your new picture Pictures from the InternetHow do I copy? Pictures from the Internet Page 2 of 3
Go to the Insert Menu Select- Picture From File Navigate to the Picture, and click “Insert” The Picture will appear in the center of the Slide Resize and Reposition as appropriate. Pictures from the Internet Inserting the Picture Pictures on the Internet Page 3 of 3
Pictures from the InternetSummary • You can copy almost all pictures from the web. • Use ctrl-mouse, or right click (with a two button mouse) to gain access to the menu. • Views provide different ways to view and work on your presentation. Get to Know PowerPoint Page 9 of 9
A hyperlink is when one document is kinked to another Normally these documents are web based The method of using them is “Click and Go”, though sometimes you must double click. Items you can link in through PowerPoint hyperlinks are: Other slides Other PowerPoint presentations Web sites Any document on your computer Hyperlink your slidesThe News Hyperlink your Slides Page 1 of
Go to the Slide Show Menu Select “Action Settings”, and from the submenu “Custom” The cursor becomes a “cross-hair”. Click and Drag to make a shape (this is the button) Select a destination for when the button is clicked Time to name it. Hyperlink your slides Start with the Action Buttons-Custom Hyperlink your Slides Page 1 of
Type text Hyperlink your slides Naming your button • Go to the “Text Tool” in the Drawing Toolbar • Click in your button to create a text box • Then Type. • Later Select your text box, AND the button you made. • Go to the drawing Toolbar and choose” Group” Get to Know PowerPoint Page 8 of 9
Hyperlink to URL • Type in your URL address. • Highlight the text • Go to Slide Show > Action Settings • Check the Hyperlink to button • Change Next Slide to URL • Type in your URL address
Animate Using Custom Settings • Adding animation to your slide show allows you to emphasise main points, allows discussion as your presentation pauses, and makes things more interesting. • Good Practices: • Use the same animation for every item. • Make sure animation is suitable i.e. the typewriter animation is very long and slow. • Too many could make the presentation long, too few could make the presentation uninteresting.
Adding an Animation • Select Title then Click on Add Effect
Select desired Effect • There are 3 options to do with animations Entrance, Empahsis, and Exit. • Use Exit only if you want your text or picture to be removed. • Select your Effect • Click OK
Adding Timings • Click on Effect Options • Select whether you want you item to appear On Mouse-click or with/after previous • Click OK
Viewing and Changing Order • To view click the Play button • If the timing is not what you wanted or in the order that you wanted use the arrows to move the item up or down. • Once you have it how you want it click OK.
Topic Assessment • Now that you have worked through the presentation you should know how to: • Take a picture from the Internet • Place it in your presentation • Create custom buttons and hyperlink to slides • Hyperlink to URL • Animate your presentation • Go to your workbook and start your presentation!