Download

1 / 72
730 likes | 886 Vues
Learn about the intricate structures of a horse's hoof and how to maintain its health and functionality. Explore hoof anatomy, growth, strength, and moisture to ensure optimal care. Discover tips for proper trimming, shoeing, and preventing common issues like dry hooves.

E N D
Introduction • The old adage no hoof no horse is very true. • As a horse owner, you should pay close attention to the care and maintenance of your horse’s hooves.
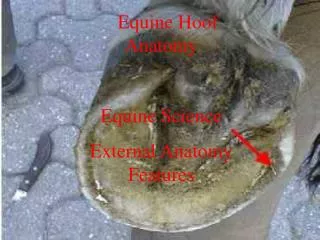
Introduction • The external structures of the equine foot can be divided into five major areas: the hoof wall, sole, white line, coronary band, and frog. • Each of these structures play an important role in maintaining a healthy foot. • Beneath many of these areas are sensitive structures that provide the blood supply, nerve sensation, and growth of the hoof. • In this lesson we will cover general ideas on what is normal and how to keep these structures healthy and functioning properly. • A short description on proper trimming and shoeing will be given.
The Hoof Wall • The hoof wall is the hard outside covering of the foot that bears most of the horse’s weight. • It is attached to the underlying sensitive structures and coffin bone by interlocking with the sensitive laminae or "leaves." • The sensitive laminae are located between the coffin bone and the hoof wall. It has small vertical grooves where the horny hoof wall can interlock. This system allows the hoof wall to still grow downward, yet still be attached to the underlying structures like the sensitive laminae and the coffin bone.
The Hoof Wall • This is a picture of the horny hoof wall from a horse. The white arrow identifies a vertical groove of horny lamina that interlocks with the sensitive lamina.
The Hoof Wall • When the sensitive laminae become inflamed, laminitis/founder results. • The area where the sensitive laminae and the horny laminae from the hoof wall meet at the bottom of the foot is called the white line.
Hoof Growth • The hoof wall grows downward at a rate of 1/4 to 3/8ths of an inch per month. • Things such as nutrition, breed, age (increased growth in younger animals), and season of the year all influence the rate of growth. • The hoof wall has the ability to stretch and flex as different forces are placed on the foot. • It also acts as a cushion, along with other structures, to the weight bearing forces placed on the limb. • The hoof wall should be hard, yet experience some expansion, particularly in the heels, as the horse bears weight.
Hoof Strength • Studies have been done to evaluate the strength and moisture content of different colored hooves. • The studies showed that the color of hoof on the same horse had no bearing on its strength or moisture content. • Studies did show that differences did occur among horses, and that some animals with lighter feet tended to have more problems. • This is genetic in origin and does not relate to the actual color of the foot. The same genetics that cause a horse to have weak hooves may also cause those hooves to be light in color.
Hoof Moisture • The moisture content of the hoof wall comes from internal sources (80%) and from the environment (20%). • This means that keeping a horse properly hydrated, adequately exercised (helps to move fluid into the cells of the feet), and on a balanced diet are the most essential parts of maintaining healthy feet.
Hoof Moisture • The other 20% of hoof moisture comes from the ground the horse is standing on. • Horses lose hoof moisture through the surface of the hoof wall or out the bottom of the foot. • In environments that are dry and sandy, more moisture is lost. • The surface of the hoof wall has a natural thin layer of hoof "varnish" that comes from the periople (a structure just above the coronary band) and is carried down as the hoof wall grows out. • Because of environmental conditions, this "varnish" wears off in almost all horses to some degree. With the loss of "varnish" comes an increased moisture loss through evaporation.
Dry Hooves • The foot in this picture shows signs of neglect and excessive drying. These problems often result in cracks forming in the hoof wall. Special shoeing and care are often required to treat many of these cracks.
Dry Hooves • The following suggestions for treating and preventing dry feet in a horse focus on environmental moisture loss, restoration, and retention. • To help prevent excessive water loss from a normal foot, many farriers recommend some type of sealant be applied to the surface of the hoof wall. This helps to reduce evaporation losses from the hoof wall surface. Most recommendations state that these sealants should be applied about once a week.
Dry Hooves • Another very common recommendation, used with or without the sealants, is to occasionally have a horse stand in a puddle of water. A water trough that is purposely overflowed can provide such an environment. The water will be absorbed into the foot, replacing necessary moisture. If a sealant has been applied, most of the moisture will be absorbed through the bottom of the foot. • It is always a good idea to clean a horse’s feet on a regular basis, picking out any dirt and debris. Cleaning all parts of the foot, then rinsing with water from a hose will also increase the amount of moisture the foot can absorb.
Dry Hooves • A third method, which is often controversial, involves applying a moisturizing cream or oil. • The downside to these products is that many of them should be applied daily and may require that a boot be placed over the foot to get the proper absorption. • General ingredients that can help keep the foot moist are pine tar, lanolin, fish oils, and olive oil. Select products in which these are the active ingredients. • Pine tar products seem to be the most effective and generally cost the least. • Other ingredients like ketones, toluene, acetate, and alcohols are commonly used, but are not as effective and probably should be avoided.
Dry Hooves • Outside of the topical products that are so common, keeping the horse’s stall somewhat moist can also help. • Excessive moisture is detrimental, so there is a fine balance between too much moisture where thrush can be a problem and a very dry environment where dry feet are a problem.
Essential Nutrients, Vitamins, and Minerals • The hoof is mostly made up of protein and moisture. • Some reports indicate that certain parts of the foot can contain as much as 50% moisture. • The following are also found in the hoof: carbon, sulfur, calcium, sodium, potassium, phosphorus, zinc, magnesium, iron, and copper. • Studies indicate that vitamin A is essential for normal hoof growth. • Providing a horse with a complete and balanced ration is essential to maintaining sufficient levels of the above substances in the horse’s body.
The Sole and White Line • The sole is found on the very bottom of the foot. • It is firm and ranges in thickness from about 1/4 to about 3/8ths of an inch. The sole actually grows and then is sloughed off or worn away with time. • This makes the very outer most surface of the sole flaky and dry. The main purpose of this outermost surface is to protect the underlying sensitive sole that is found between the coffin bone and the sole. • It is not designed to bear weight and should not receive consistent pressure from the ground or a shoe. Injuries to this area result in bruising, abscesses, and lameness. • The area where the sensitive laminae and the horny laminae from the hoof wall meet at the bottom of the foot is called the white line. • It is usually about 1/8th of an inch thick and may be yellow in color.
The Sole • The black arrow indicates an area of dry, flaky sole in this foot that is in desperate need of a thorough cleaning and trimming.
Clean Sole & White Line • This is the same foot from the previous slide after being cleaned and trimmed. • Notice the smooth, glossy surface to the sole and the white line (black arrow).
The Coronary Band • The coronary band is located just above the hoof and is the junction between the hoof and skin. • The sensitive portion of the coronary band provides most of the growth and nutrients for the hoof wall. • Damage or injury to the sensitive coronary band will cause defects in the hoof to appear below the injured area. • Evidence of nutritional and other problems can also be seen as horizontal lines or as changes to the hoof growth
Care & Nutritional Problems • This is a neglected foot where excessive growth has caused the hoof wall to dish and the heels to be underslung. • Notice the abnormal horizontal line (white arrows) in the hoof wall indicating nutritional disturbances or other problems.
The Frog • The frog is the v-shaped structure found on the under side of the foot. • It helps with weight bearing and absorbing compressive forces placed on the foot. • A healthy, normal frog is usually the consistency of a rubber eraser. • An unhealthy frog becomes dry, hard, or shrinks. It is not uncommon for the entire frog to completely sluff off two or more times during the year. • This most often occurs in feet that are not trimmed or cleaned on a regular basis.
When to Trim • Many horse owners wonder when and how often they should have their horse’s feet trimmed or shod. • The answer to this question is not the same for every horse. • How often the horse needs foot work depends on the hoof wall rate of growth, the season of the year, the wear on the foot, and how much corrective trimming/shoeing is needed to maintain proper balance. • The average horse needs to be trimmed about every 6 weeks. The following list identifies ways to determine if a horse needs trimming or re-shoeing:
When to Trim • The shoe is loose or the nails are loose. • The foot is out of balance. • There is excessive hoof growth that can over hang the shoe. • Excessive wear is found on the shoe. If more than half the thickness of the shoe is worn away, the shoe needs to be replaced.
Hoof Care • Each hoof should be cleaned on a regular basis with a hoof pick and sometimes a hoof knife. • The foot should be kept clean of caked on mud, rocks, and foreign debris. • Normally, very little of the sole or frog should be removed with the hoof knife. Exceptions would be the removal of any area of dry, flaky sole or frog. Generally, the sole should be removed until a smooth, glossy surface is found. • After cleaning, it is a good idea to wash the foot with water. This helps the foot gain back necessary moisture.
Hoof Balance • Just as your shoes will wear unevenly over time, the same is true for a horse’s feet. • Keeping the foot in balance is one of the most important considerations when it comes to trimming and shoeing the foot. • Notice that an equal amount of hoof wall can be found on either side of the middle of the foot and pastern region.
Hoof Balance • The side view shows a balanced foot where the slope of the pastern and hoof wall are about 50 degrees. • The angle of the hoof wall also matches the pastern angle. • Angles that are steeper or more sloping will cause abnormal hoof growth and balance problems.
Picking Up a Front Leg • Quietly approach the horse from its head. Place the inside hand on the shoulder region.
Picking Up a Front Leg • With the outside hand, move from the top of the limb down to the fetlock/pastern region.
Picking Up a Front Leg • Push the weight of the horse off the limb with the hand on the shoulder, and at the same time, pick up the foot.
Picking Up a Front Leg • Once the foot is picked up, it can be placed between the knees. Crouching and turning your toes in will help hold the limb
Picking Up a Hind Leg • Start slowly from the mid-back region. Maintain at least 3 points of contact (hand, arm, shoulder, and side if possible). With 3 points of contact, any sudden movement from the horse will push the person picking up the foot out of the way. Move the outside hand smoothly from the rump area and down the back side of the leg.
Picking Up a Hind Leg • The outside hand can be used to rub and calm the horse while progressing to the mid-cannon region. The inside hand should be brought to the point of the horse’s hip and can be used to push away from the horse if necessary.
Picking Up a Hind Leg • With the outside hand on the cannon region of the leg, the limb can be pulled towards the person lifting the leg. The person can then step forward and place the horse’s foot in their lap.
Picking Up a Hind Leg • The inside arm can then be brought down to help control the limb.
Picking Up a Hind Leg • The foot can be cradled in your lap by turning your toes in and resting the horse’s leg on your inside thigh and outside knee.
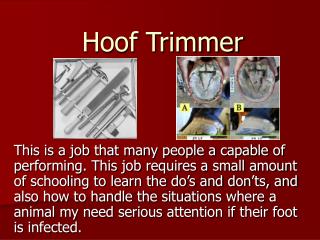
Common Horse Shoeing Tools Nippers Clincher A Shoeing Hammer Hoof Knife Hoof Pick Hoof Rasp
Adding a Shoe • After the foot is properly trimmed, a shoe can be placed. • In most cases, the shoe should be made to fit the foot, not the foot made to fit the shoe. • Using hoof nippers to remove hoof wall and then rasping the hoof into balance are usually the final steps before placing the shoe. • Adjustments should be made to the shoe to help it match the foot. The nails should exit the hoof wall approximately 1 inch above the shoe; Variations to this depth can occur in weak hooves or in special cases. • If corrective or specialized shoeing is required, variations to the above recommendations are often necessary.
Removing a Shoe • The first step is to remove the clinches using a pair of nippers or clinch cutter and hammer.
Removing a Shoe • The foot can be held comfortably if you crouch slightly and turn your toes in. This will force your knees together and allow the foot of the horse to be held securely.
Removing a Shoe • Start at the heel region of the shoe and pull down toward the toe and toward the center of the foot.
Removing a Shoe • This same action can be performed on the quarter and toe regions of the shoe.
Removing a Shoe • Once one branch of the shoe is loosened, the opposite branch can be worked on.
Removing a Shoe • Once both branches are loosened, the shoe can be removed. After the shoe has been taken off, make sure that all the nails are completely removed. The foot can now be trimmed and/or examined.
Lameness • There are many different reasons why a horse becomes lame. Because of this, even the professionals struggle at times with a diagnosis. • However, there are a few basic tips, that if understood, can help even the most casual horse owner become fairly adept at detecting a lameness problem.
Tip #1 • Studies show that most lameness problems are associated with the foot, therefore, the foot should be the first area of focus. • Realize that 60-65% of the horse’s body weight is carried on the front legs, resulting in more problems occurring in the front legs and feet.
Tip #2 • Conformation (how the horse is put together) plays a major role in lameness problems. Initially, the following observations should be made: • Is the horse base-narrow, base-wide, toed-in, toed-out, or a combination of the above? • Does the horse have calf, bucked, knock, or bench knees? • Are the horse’s pastern angles upright or sloping? • Is the horse sickle or cow hocked?