AdeptWindows Pick-and-Place Program Creation Guide
220 likes | 247 Vues
Learn how to create pick-and-place programs in AdeptWindows PC editor, store and modify location points, and write V+ programs for Adept Robots. Step-by-step instructions and examples provided.

AdeptWindows Pick-and-Place Program Creation Guide
E N D
Presentation Transcript
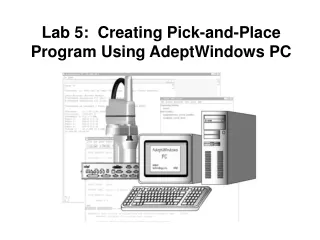
Lab 5: Creating Pick-and-Place Program Using AdeptWindows PC
Lab 5: Creating Pick-and-Place Program Using ADEPT Windows Objectives: 1. Create a pick and place program in AdeptWindows PC editor. 2. Store the program in a disk file. 3. Load into system memory the program and location file. • Execute a program in single step mode • Execute a program in continuous mode.
Creating a program in V+ for the ADEPT Robots • 1. Create the location points using HERE. • 2. Modify and edit location points using the POINT command • 3. Store (save) the points in a file using STOREL • Note: when resaving using a new file name • 4. Create a V+ Program. • For the COBRA use ADEPT WINDOWS • For the ADEPT-ONE use the SEE editor • For the ADEPT-ONE or COBRA use the OFF-LINE Editor. • 5. Store (save) the V+ program using STOREP • 6. Step through a program to test all moves using XSTEP • Run the program using EXECUTE(name) • 8. Modify the program using one of the editors then resave • Note: when resaving using a new file name
Step 1. Create the location points using HERE. The most straightforward method of creating a location variable is to place the robot or motion device at a location and enter the monitor command: HERE loc_name To just see the location without creating a location variable type: WHERE
Step 1. Create the location points using HERE. • Use the MONITOR commands, location points can be created for a program to be created after a location file is created of all the points to used by a program. • Create the location points using HERE. • HERE #SAFE • Here Point1 • Here Point2 • Store (save) the points in a file using STOREL • StoreL ABCLAB4
Step 1. Create the location points using HERE. • HERE loc_variable • Define the value of a transformation or precision-point variable to be equal to the current robot location. If no task is specified, the HERE monitor command returns information for the robot selected by the V+ monitor • Examples • Define the transformation “place” to be equal to the current robot location. • HERE point1 • HOME is saved as a precision point (joints) defined by the # sign • Start the program with a location of your choice in the envelope • HERE @SAFE
2. Modify and edit location points using the POINT command. Editing a location POINT loc_variable = loc_value POINT @task:program loc_variable = loc_value Sets the value of the location variable equal to the value on the right, providing the variable and value are the same type of location representation. That is, they must both be transformations or precision points. If no “loc_value” is specified and the variable was previously defined, its value is unchanged and the user is given the opportunity to make changes to its components as described below. If the value is not specified and the variable is not defined, the variable is set equal to the value of the null transformation (0, 0, 0, 0, 0, 0). The value of the variable is displayed and its components may be modified by typing new values after the query “Change?”. Component values must be separated by commas and values that are not being changed may be omitted. Changes are asked for repeatedly until no change is made.
3. Store (save) the points in a file using STOREL STOREL (Store the location Ffile) STOREL file_spec = program_name, ..., program_name STOREL /levels file_spec = program_name, ..., program_name Store location variables in a disk file. STOREL can be used while a program is executing. There must be sufficient room on the disk to hold the new disk file. Otherwise, the store operation will fail. Note: when resaving using a new file name
4. Create a V+ Program. For the COBRA use ADEPT WINDOWS For the ADEPT-ONE use the SEE editor For the ADEPT-ONE or COBRA use the OFF-LINE Editor.
4. Create a V+ Program. For the COBRA use ADEPT WINDOWS The first screen seen when powering up in ADEPT Windows is the Ether-Net communications screen. Open AdeptWindows PC and verify that the correct controller IP address is displayed. Controller #1 IP is 172.16.170.174 Controller #2 IP is 172.16.170.175 Controller #3 IP is 172.16.170.189 Click OK when the correct IP is in the box.
4. Create a V+ Program. For the COBRA use ADEPT WINDOWS When the monitor window opens and is finished loading type “ena pow” this is the monitor command to enable high power (220 volts single phase) to the robot. Press the high power button on the control panel (the one that’s now flashing) you only have 10 seconds until the system resets and you have to type the command again. After power has been enabled, a period will appear on the monitor window. The next command will be “cal” this will calibrate the robot. Type “y” and hit enter when asked if you are sure.
4. Create a V+ Program. For the COBRA use ADEPT WINDOWS AdeptWindows PC Main window for writing the V+ Program
4. Create a V+ Program. For the COBRA use ADEPT WINDOWS The Adept Windows File Menu
4. Create a V+ Program. For the COBRA use ADEPT WINDOWS • 1. With the AdeptWindows PC widows opened you can now enter program instructions. • You can now enter program instructions such as shown below. • Move the cursor off the program line and enter the lines: • PROMPT "May I have your name please? ", $text • TYPE $text
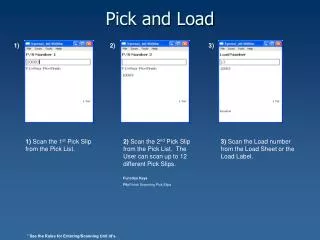
abovesafe nearpick aboveplace DEPART,40 #Safe APPRO,40 DEPART,40 APPRO,40 Place Pick 4. Create a V+ Program. For the COBRA use ADEPT WINDOWS Lab Procedure - Part 1: The locations for the following were developed in lab 3. The location file will contain your locations and coordinates.
4. Create a V+ Program. For the COBRA use ADEPT WINDOWS Enter the following program instructions. (There are no line numbers on the left as shown below) Type ZERO to clear the monitor memory
4. Create a V+ Program. For the COBRA use ADEPT WINDOWS Modify the program by adding speed changes Always approach the part pick up point or the place point slowly with care Then Move fast away from the parts to save time.
5. Store (save) the V+ program using STOREP • 1. In lab 3 you created a locations file and in this lab you created a program file. This file was saved as • nameLAB4 Location file using the .STOREL • 2. You can now save the program file as • nameLAB5 Program file saved using the .STOREP • 3. To check to see if both files have been saved, open the directory .FDIR • Load your file from the hard drive or a drive into the monitor. .LOAD Filename • You must type the correct path to store a program in AdeptWindows PC. • See next slide
5. Store (save) the V+ program using STOREP Path slide here
6. Step through a program to test all moves using XSTEP XSTEP program Execute a single step of a program. XSTEP can be used to single-step any of the system program tasks, independent of the execution status of other system tasks. When using the program debugger, you can press CTRL+X to generate an XSTEP command for the task being debugged. Examples Initiate execution of program “pack” for three cycles as task #0 (or the current debug task). The parameters “p2” and “17” are passed to the program. The first (executable) step of “pack” is displayed in anticipation of its execution with a subsequent XSTEP command (without parameters). XSTEP pack(p2,17),3 Prepare the program “assembly” for execution as program task #0 (or the current debug task) starting at step number 23. If “XSTEP” is then typed, step 23 would be executed. XSTEP assembly,,23 Execute the next step of the program executing as program task #2. XSTEP 2
Lab 5: Creating Pick-and-Place Program Using AdeptWindows PC The End