How class works
Measurement of Stream Discharge by Wading Water Resources Investigations Report 00-4036 By K. M. Nolan and R. R. Shields. How class works.

How class works
E N D
Presentation Transcript
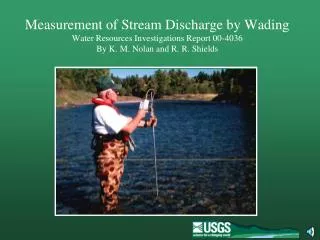
Measurement of Stream Discharge by WadingWater Resources Investigations Report 00-4036 By K. M. Nolan and R. R. Shields
How class works • Instructions for viewing and navigating through this training class can be found in the “Intro.html” file, which is on the CD-ROM containing this presentation.
Class Credit • Listed as Training Class SW1271 with the National Training Center of U.S. Geological Survey • Supervisor may ask to see a copy of the completed test
Links to reference materials USGS memos http://wwwrcamnl.wr.usgs.gov/sws/fieldmethods Linked Text
Agenda • Horizontal angle correction • Computing subsection width and depth • Recording velocity • Recording discharge • Finalizing measurement • Mean Gage Height • Accuracy • The control • Point of zero flow • Plotting on rating • Test • References • Acknowledgements • How this class works • The velocity-area concept • Making the measurement • Measuring width • Measuring depth • Wading rod use • Measuring velocity • Site selection • Safety • Measurement notes • Blackfoot River as an example • Starting the measurement • The front sheet • Inside the note sheet • Job Hazard Analysis
Cross section area THE VELOCITY-AREA METHOD Discharge = (Area of water in cross section) x (Water velocity) x Water Velocity
Channel cross section is divided into numerous sub sections Discharge of each sub-section = Area x Average Water Velocity
Area of each sub-section determined by directly measuring width and depth Width Depth Area = Width x Depth
Water velocity in each sub-sectionis estimated using a current meterto measure water velocity atselected locations
Stream discharge is sum of discharges inall sub-sections 1 2 3 Total Discharge = ((Area1 x Velocity 1) + (Area2 x Velocity2) + ….. (Arean x Velocityn)) n
Making the Measurement • Verticals should be spaced so no subsection has more than 10% of the total discharge • Ideal measurement has no more than 5% of total discharge in any subsection • Should have between 20 and 30 subsections • Spacing between verticals should be closer in those parts of cross section with greater depths and velocities.
Measuring Cross-Section AreaWidth (cont.) • Taglines usually have marks • One mark every 2 ft • Some taglines have: • Two marks every 10 ft • Three marks every 100 ft. • Distances between marks are estimated or measured
Measuring Cross-Section AreaDepth • Wading rod is marked every 0.1 foot
Wading Rod Use Top Setting Mechanism
Wading Rod Use (cont.) Rod set so meter placed at 0.6 (2.6 ft) 10 8 6 4 2 0 2 3 Setting Rod 4 Depth Scale 5 6 0.2 depth 7 2.08 ft. 0.6 Depth 0.8 Depth 8 2.6 ft. Total Depth 1.04 ft. 0.52 ft.
Wading Rod Use (cont.) • Must estimate depth when velocity causes “pile-up” on rod. • Visually extend water surface to rod.
Wading Rod Use • Stand beside and downstream of rod
Velocity Determination • USGS generally uses Price current meters • AA for large depths • Pygmy for shallow depths Standard AA Meter See OSW memos 85.07 and85.14 Pygmy Meter
Spin Tests • A spin test should be performed on all meters: • Before each field trip • When performance is suspect. • Before and after repairs • A log of all spin tests must be maintained • See OSW memo 89.07 for policy on spin tests
Meter Performance • Meter performance should also be checked before and after each measurement • Spin meter and note if meter spins freely and comes to gradual stop
Meter Care • Meter care and maintenance is discussed in OSW memorandum 99.06
Headset and Stopwatch • Velocity is determined by placing meter in stream and counting number of revolutions in a measured amount of time Stop Watch and Headset
Digitizer, Aquacalc and DMX 1 Digitizer • Newer units are now available that compute velocity and/or discharge DMX Aquacalc 1Use of trade, product, or firm names is for descriptive purposes only and does not imply endorsement by the U.S. Government
Marking Meter • Meter revolutions can sometimes be counted manually by marking one meter cup.
Rating Table • Velocity can then determined using a current-meter rating table Partial listing of standard rating #2
Rating Table Equations • Equations for standard Rating Tables: • For AA meter • V = 2.2048 R + 0.0178 • For pygmy meter • V = 0.9604 R + 0.0312 • R = Revolutions per second • See: • OSW Memo 99.05 • Standard rating table #2 for AA meter • Standard rating table #2 for Pygmy meter
Velocity from Digitizer, Aquacalc, and DMX • Current meter digitizers Aquacalcs and DMX units have equations for rating table built in. • These devices provide direct computation of velocity
Measure velocity for at least 40 seconds • Velocity should be measured for at least 40 seconds • Evens out short-term velocity fluctuations
Average Velocity • The goal is to represent the average velocity in the vertical • Measured at 0.6 the depth when depths are shallow • Measured at 0.2 and 0.8 the depth when depths are large. These two velocities are averaged to represent average velocity in the vertical Typical velocity profile
Velocity Measurement Methods Guide to velocity-measurement methods
Non Standard Conditions • Use of 0.6 and 0.2/0.8 methods assume velocity profile is logarithmic. • Velocity should decrease closer to bottom due to friction • If velocity at 0.8 depth is greater than velocity at 0.2 depth or if velocity at 0.2 depth is twice the velocity at 0.8 depth then the velocity profile is considered abnormal andthethree-point method must be used (see next slide).
Three-Point Method • Three-point method computed by averaging velocity measured at 0.2 and 0.8 the depth and averaging that result with velocity measured at 0.6 the depth.
Site Selection • Reach should be straight and uniform for a long enough distance to provide uniform flow through the measuring section • Streambed should be stable and free of large rocks, weeds, and protruding obstructions. Upstream view of excellent measuring section, Little Blackfoot River
Site Selection (cont.) • Straight and uniform for a distance long enough to support uniform flow Measurement Section Control Flow Riffle W 5W 2W
“Safety First, Every Job, Every Time” (Department of Interior Policy) Safety - First Throw Bag Standard PFD Inflatable PFD
Safety – On Line http://wwwhif.er.usgs.gov/uo/safety.html
Safety – Memo 99.32 Water Resources Division Memorandum 99.32
Safety – miscellaneous memos Click on page image to view memo
Safety – Responsibilities • WRD Memo 99.32 - “Both supervisors and employees will be held accountable if safety policies are not followed.” Winter measurement Snake River near Moran, WY
Safety - PFDs • See WRD Memo 99.32 • Personal Flotation Devices (PFDs) must be worn unless the job hazard analysis states otherwise. Suspender-type PFD Standard PFD
Safety- Hypothermia • Protection against hypothermia is required when conditions warrant. • WRD Safety Home Page contains information on protection against hypothermia • Use of cold water protective Personal Flotation Devices increases protection against hypothermia Float Coat
Safety - Rescue • Look downstream and think rescue Downstream view of measurement section, Clark Fork, near Gold Cr., MT
Safety - Rescue • Throw bags contain a line that can be thrown to colleagues who need help. • See Mississippi report on use of multi-person field trips
Wading Safely • When wading, proceed carefully • Use wading rod to probe bottom ahead of you
Wading Safely (cont.) • Wade carefully and think about hazards downstream • How would you execute a self-rescue at this site? • Have a plan before you begin
Safety – Conditions Around You Snake River near Moran, WY • Be aware of potentially dangerous conditions upstream and downstream • Ice • Debris • Dam Releases • Boats
Safety – Measuring Width • Use laser distance meter, rather than a tag line, to measure channel width and distances when boat traffic is possible Laser distance meter
Safety - Traction • Use of felt soles or metal cleats on the bottom of your waders can significantly improve traction. • Be careful, felt bottoms can become slick if algae is present.