hESC Cell Culture
hESC Cell Culture. Lab Week 1 Overview. Tuesday (1.5h) Lab safety and finding your way around the lab Learn how to use pipettes, incubators, biosafety cabinets, microscopes Prepare media and tissue culture dishes and thaw feeder cells Thursday (1.5h) Pre-warm media

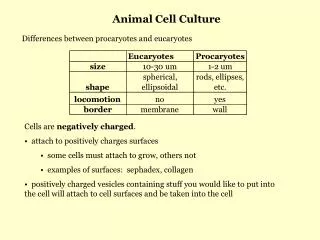
hESC Cell Culture
E N D
Presentation Transcript
Lab Week 1 Overview • Tuesday (1.5h) • Lab safety and finding your way around the lab • Learn how to use pipettes, incubators, biosafety cabinets, microscopes • Prepare media and tissue culture dishes and thaw feeder cells • Thursday (1.5h) • Pre-warm media • Check feeder cell plates thawed on Tuesday • Thaw and plate stem cells 2
Thawing hESCs: 2 10 1 6 5 7 11 3 4 10 8 9 1 Be sure to have a 6 well with “hESC-MEFs” available. 2 Add 3+9 ml hESC medium to two 15 ml tubes and pre-warm to 37C. 3 Hold frozen hESC vial in 37C water bath (do not immerse) until a small piece of ice remains, then quickly ethanol-spray and wipe off vial and move to hood. 4 Transfer a small amount of warm medium from the 9 ml falcon tube to the hESC tube using a 1 ml serological plastic pipette and resuspend hES cell clumps by slowly pipetting up and down (once only!). 5 Transfer to the 9 ml falcon tube. 6 Spin. 7 Aspirate supernatant above the MEFs, then wash this well with 2 ml of DMEM/F12 and 8 add 1 ml of hESC medium from the 3 ml tube. 9 Remove the medium above the spun hESCs. 10 Carefully resuspend pelleted cell clumps using a 2 ml serological plastic pipette and the remaining 2 ml of fresh hESC medium (pipette just enough to resuspend and evenly mix the cell clumps in the medium)9 Plate onto the MEF well. 10 Transfer to the incubator (rock the plate back/forth and left/right, avoiding circular motions, to ensure even plating) 3
hESCs: Healthy Culture Look for: tight borders Look for: tightly packed stem cells ~40xPh ~4xPh Colony MEFs (phase-contrast) hESC (nucleus) nucleoli 4 (dark-field)
hESCs: Healthy Culture hESC inter-cellular spaces … may be essentially invisible (typical for center of large colonies) … may appear “phase-bright”(typical for smaller colonies and colony periphery) these are still good stem cells! (despite the difference in size, shape, and appearance) dying/dead cells and cellular debris (some of this stuff will be floating in the media as well!) 5
hESCs: Colony Growth ~1 day after plating ~3 days after plating time to split again! 6