Download
1 / 35
360 likes | 561 Vues
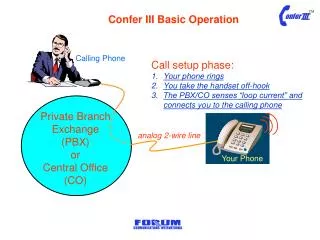
Confer III Basic Operation. Calling Phone. Call setup phase: Your phone rings You take the handset off-hook The PBX/CO senses “loop current” and connects you to the calling phone. Private Branch Exchange (PBX) or Central Office (CO). analog 2-wire line. Your Phone. CONFER III.

E N D
Confer III Basic Operation Calling Phone • Call setup phase: • Your phone rings • You take the handset off-hook • The PBX/CO senses “loop current” and connects you to the calling phone Private Branch Exchange (PBX) or Central Office (CO) analog 2-wire line Your Phone
CONFER III Confer III Basic Operation • Call setup phase: • The line plugged into the Confer III rings • The Confer III takes the line off-hook • The PBX/CO senses “loop current” and connects the Confer III line to the calling phone Calling Phone Private Branch Exchange (PBX) or Central Office (CO) analog 2-wire line
CONFER III Call setup Greeting Message: “Welcome to the Confer III Bridge!” • Depending on the options and settings, the calling phone will first hear: • a standard greeting (Option VP Present) • a custom user-recorded greeting (Option UG Present and the greeting is not erased, otherwise, the std greeting will be played) • no greeting (Greeting Override On or VP and UG Options not present) Calling Phone Private Branch Exchange (PBX) or Central Office (CO) analog 2-wire line
CONFER III Greeting Options “Welcome to the Confer III Bridge!” • Standard Greeting • “Welcome to the Confer III Bridge” • must have VP Option • VP Option also activates other voice prompts • mute status • lockout status • headcount (if HC Option present) • greeting override • greeting can be overriden with Greeting Ovrd Calling Phone Private Branch Exchange (PBX) or Central Office (CO)
CONFER III Greeting Options “Welcome to the XYZ Corporation’s Weekly Executive Staff Meeting!” • Custom User Recorded Greeting • tailor greeting to conference’s context • “Welcome to the XYZ Corporation’s Weekly Staff Meeting” • must have VP Option, RA Option, and UG Options • record up to 30 second greeting for each conference via dial-in CM Port • greeting can be overriden with Greeting Ovrd Calling Phone Private Branch Exchange (PBX) or Central Office (CO)
CONFER III Call setup Auth Code entry: “Please enter your authorization code” • After the greeting, (depending on options and settings), the calling phone will hear: • a standard auth code message followed by a prompt beep (Auth Code/VP Options Present) • “please enter your authorization code” • a custom user-recorded greeting (followed by a prompt beep) which includes a reference to auth code entry (Option UG and Auth Code Options Present) • a single prompt beep (Auth Code Present with VP/UG Options not present) • no prompt message or prompt tone (Auth Code Option not Present or Auth Code Override ON) Calling Phone Private Branch Exchange (PBX) or Central Office (CO) analog 2-wire line
CONFER III Call setup Conference Join: “Join Tone” (bing-bong chime tone) • After the authorization code entry (if applicable) the calling phone will hear: • a “Join tone” (a “bing-bong” two-tone chime with a low to high pitch) • the conference will hear a Join tone if join tone is enabled through dipswitch S5 position 2 ON Calling Phone Private Branch Exchange (PBX) or Central Office (CO) analog 2-wire line
Conference User Commands Private Branch Exchange (PBX) or Central Office (CO) CONFER III analog 2-wire lines Mute/Unmute (6#) • any member can mute/unmute his/her mic audio by pressing 6# (ON/OFF toggle) • if VP Option not present, mute ON indicated by two-tone low to high pitch beep while mute OFF indicated by two-tone high to low pitch beep played to the user • “MUTED”/”UNMUTED” voice prompt played to user (if VP Option present)
Conference User Commands Private Branch Exchange (PBX) or Central Office (CO) CONFER III analog 2-wire lines Lockout (5#) • any member can lock the conference by pressing 5# • a “locked” conference will ignore subsequent calls • if VP Option not present, locked indicated by three-tone low to mid to high pitch beep played to conf • “CONFERENCE LOCKED” voice prompt played to conf (if VP Option present)
Conference User Commands Private Branch Exchange (PBX) or Central Office (CO) CONFER III analog 2-wire lines Unlock (8#) • any member can unlock the conference by pressing 8# • an “unlocked” conference will answer subsequent calls • if VP Option not present, unlocked indicated by three-tone high to mid to low pitch beep played to the conf • “CONFERENCE UNLOCKED” voice prompt played to conf (if VP Option present)
Conference User Commands Private Branch Exchange (PBX) or Central Office (CO) CONFER III analog 2-wire lines Self-Boost (2#) • any member can boost his/her mic audio by pressing 2# • self-boost is a one-time, one step boost (subsequent 2# presses are ignored) • allows weak lines to get a volume boost
Conference User Commands Private Branch Exchange (PBX) or Central Office (CO) CONFER III analog 2-wire lines Headcount (*42) • HC and VP Options must be present • any member can request headcount of active participants in the conference by pressing *42 • Voice Prompt indicating number of conference members played to conference: “ONE”, “TWO”, “THREE”, etc.,.
Conference Moderator Commands Private Branch Exchange (PBX) or Central Office (CO) CONFER III analog 2-wire lines Conference Moderator • Dialout and VP Options must be present to support moderator commands • any member can request moderator privileges by pressing *67 • if moderator privilege has been granted, the user will hear a “doorbell” chime
Conference Moderator Commands Private Branch Exchange (PBX) or Central Office (CO) CONFER III analog 2-wire lines Virtual Gavel (4#) • Allows moderator to mute all members’ audio except his/her own to bring the conference to order • toggles between gavel ON gavel OFF(normal operation)
Conference Moderator Dialout Commands Private Branch Exchange (PBX) or Central Office (CO) CONFER III analog 2-wire lines Dialout (*36) • Allows moderator to drop himself/herself from the conference and dial out through the next available line in the conference group • after pressing *36, moderator hears dial tone from PBX then enters phone number of party being called.
Conference Moderator Dialout Commands Private Branch Exchange (PBX) or Central Office (CO) CONFER III analog 2-wire lines Drop Line (*33) • Allows moderator to drop the current “dialout” line and return to the conference
Conference Moderator Dialout Commands Private Branch Exchange (PBX) or Central Office (CO) CONFER III analog 2-wire lines Add Line (*32) • Allows moderator to add the current “dialout” line to the conference • moderator is also added back into the conference
CONFER III Conference Moderator Dialout Commands Dialout Example: • conference member presses *67 to gain moderator privilege then presses *36 to get an outside line • moderator gets dialtone and dials the number of the party • called party answers • moderator presses *32 to add called party and himself into the conference • if the called line was busy, the moderator could have pressed *33 to drop the busy line and return to the conference Private Branch Exchange (PBX) or Central Office (CO) analog 2-wire lines Outside line
CM Port CONFER III Confer III Configuration Changes From time to time, you will need to make changes to the conference assignments, authorization codes, greetings, etc,., Change methods fall into three categories CM Port (Local Battery Feed) CM Port (Remote Administrator Mode) Conf Select Buttons on each Card
CM Port CONFER III Confer III Configuration Changes CM Port (Local Battery Feed) • A standard telephone is plugged into the CM Port RJ-11 of the first card • the Confer III is configured at the factory for “battery feed” • the following changes can be made through Battery Feed mode: • authorization code (per conference #)(must have AC Option) • authorization code override (per conference #) • greeting override (per conference #) (must have VP/UG Option) In addition, each card’s conference can be monitored by plugging the CM Phone cable into the CM Port RJ-11 jack of each card to be monitored and pressing *1 for the lower 4-port group or *2 for the upper 4-port group.
CM Port CONFER III Confer III Configuration Changes CM Port (Local Battery Feed) Changing Authorization Codes for a conference: • take the Phone Off-hook, listen for a beep, then press 7, the two-digit conference number (01 for conf#1, 02 for conf#2, etc.,.), then the new 4-digit auth code. • if you have the VP option, the digits will be played back through voice prompts, otherwise you will get a confirmation tone.
CM Port CONFER III Confer III Configuration Changes CM Port (Local Battery Feed) Changing Authorization Code Override for a conference: • take the Phone Off-hook, listen for a beep, then press 2, the two-digit conference number (01 for conf#1, 02 for conf#2, etc.,.), then 1 for on or 0 for off. • if you have the VP option, the override state (on or off) will be played through a voice prompt, otherwise you will get a confirmation tone.
CM Port CONFER III Confer III Configuration Changes CM Port (Local Battery Feed) Changing Greeting Override for a conference: • take the Phone Off-hook, listen for a beep, then press 9, the two-digit conference number (01 for conf#1, 02 for conf#2, etc.,.), then 1 for on or 0 for off. • you must have the VP option for this function, the override state (on or off) will be played through a voice prompt
CM Port CONFER III Confer III Configuration Changes CM Port (Local Battery Feed) Local Battery-Feed Phone Commands: • 2. Set Auth Code Ovrd for a conference# • 7. Set Auth Code for a conference# • 9. Greeting Ovrd for a conference# Local Battery-Feed Phone Command Format: • 2. **Set Auth Code Ovrd..<2><conf#><on/off> • 7. **Set Auth Code...........<7><conf#><auth code> • 9. *Greeting Ovrd.............<9><conf#><on/off> Notes: <conf#> = 01, 02, 03, 04..18 <on/off> = 1(on) 0(off) <auth code> = 2580 (any 4-digits) * - must have Voice Package Option ** - must have Auth Code Option
CM Port CONFER III Confer III Configuration Changes CM Port (Remote Administrator Mode) With Remote Administrator Mode (RA), you can completely control your Confer III remotely over the phone • set/playback auth codes per conference • set auth code override per conference • set/playback conference assignments per card • record/play user greetings (UG req’d) • set auth code for CM Port • set greeting ovrd for a conference PBX In addition, each conference can be remotely monitored by dialing in to the bridge, entering the CM Port auth code and waiting approx 5 seconds to enter monitor mode. Pressing *01 for conf #1, *02 for conf#2, *03 for conf# 3, etc., selects the conference to monitor.
CM Port CONFER III Confer III Configuration Changes CM Port (Remote Administrator Mode) How to dial-in and enter Remote Administrator Mode: • first, select a line with a unique phone number and connect it to the CM Port (topmost RJ-11) of Card 1 (leftmost in cage) • from a remote telephone, dial the number of the CM Port (port must be strapped for dial-in) • at the beep, enter the 4-digit CM Port auth code (default 0123) followed by #. • you will then hear “administrator mode” PBX • you can only enter administrator mode if the bridge is free. • if the bridge is not free, you will get a reorder tone • if there is no activity for 2 min, the line will be disconnected • after leaving administrator mode (hanging up) the system will reboot
CM Port CONFER III Confer III Configuration Changes CM Port (Remote Administrator Mode) Remote Administrator Commands: • Play auth code for a conference# • Set Auth Code Ovrd for a conference# • Play conference# assignment for a card# • Set conference# assignment for a card/grp# • Record Custom User Greeting for a conference# • Playback User Greeting for a conference# • Set Auth Code for a conference# • Set Auth Code for the CM Port • Greeting Ovrd for a conference# • 0. Erase User Greeting for a conference# PBX
CM Port CONFER III Confer III Configuration Changes CM Port (Remote Administrator Mode) Remote Administrator Command Format: • **Play Auth Cd....................<1><conf#> • **Set Auth Cd OVRD..........<2><conf#><on/off> • Play conf assignment..........<3><card#> • Set conf assignment............<4><card#><grp#><conf#> • Record User Greeting.........<5><conf#> • *Play User Greeting............<6><conf#> • **Set Auth Cd......................<7><conf#><auth code> • Set CM Auth Cd..................<8><auth code> • Greeting Ovrd.....................<9><conf#><on/off> • 0. *Erase User Greeting..........<0><conf#> PBX Notes: <conf#> = 01, 02, 03, 04..18 <on/off> = 1(on) 0(off) <card#> = 1,2,3,4...9 <grp#> = 1(lower) 2(upper) <auth code> = 2580 (any 4-digits) * - must have UG Option ** - must have Auth Code Option
Confer III Configuration Changes Conf Select Buttons on each Card Conference Select buttons are used to increment each digit to the desired conference number while in Conference Setup mode Reset • shown to the left is a 32-port bridge configured as three conferences of 8, 12, and 12 ports each • must first get into “conference setup” mode by pressing and holding in Pushbutton 1 (of Card 1) while momentarily pressing the Reset button (see Confer III Users Manual) • the number on each display indicates the conference number that the 4-port group is assigned to • add up the quantity of displays with the same number and multiply by 4 to get the ports for that conference number • when configuration setup is complete, press reset again Display 2 Display 1 Pushbutton for Display 2 Pushbutton for Display 1
PSTN • Call setup phase: • Your phone rings • You take the handset off-hook • The PBX connects you to the calling phone Calling Phone analog 2-wire line Your Phone Private Branch Exchange (PBX) • Call termination phase: • The calling phone hangs up • The PBX receives signalling from the network that the calling phone has hung up and provides a disconnect signal (in this case, dial tone) • You hear dial tone • You place the handset on-hook
CONFER III PSTN • Call termination phase: • The calling phone hangs up • The PBX receives signalling from the network that the calling phone has hung up and provides a disconnect signalto the Confer III Bridge Calling Phone Private Branch Exchange (PBX) or Central Office (CO) analog 2-wire line Disconnect Supervision Signal
CONFER III PSTN • Disconnect Supervision signal types: • Loop Current break • Dial Tone (350Hz + 440Hz) • Reorder tone (fast busy) (480Hz + 620Hz) • DTMF ‘D’ • DTMF ‘A’ • no signal • other (unique non-std tone frequencies) • 2-minute silence detection disconnect Calling Phone Private Branch Exchange (PBX) or Central Office (CO) analog 2-wire line Disconnect Supervision Signal
CONFER III PSTN • Disconnect Supervision Signals • The disconnect supervision signal type must be specified in the Confer III through dip switch S5 positions 4-7 (see Confer III Users Manual) • The disconnect supervision signal detection is the only means by which the Confer III can automatically disconnect a distant hung-up line. • There are two manual methods of disconnecting: user pressing 9# (self release) or *## (conference disconnect) Calling Phone Private Branch Exchange (PBX) or Central Office (CO) analog 2-wire line Disconnect Supervision Signal
Confer III Special Configurations • The Confer III 2-wire line interfaces can be modified to become 4-wire interfaces. • The Audio Output jack (2.5mm) provides a line-level conference sum output which can be used as a source for a Public Address System or conference recording. • The Audio Input jack (as well as a selected 4-wire port) can be used to broadcast audio (transmit only) to parties calling in to 2-wire ports. Applications include: • Earnings report conference calls • church services • radio/television station remote reporter coordination
Confer III Special Applications • The Confer III can be customized to blast dial a preset list of phone numbers on specific ports upon receiving a special key sequence from the CM Port • can dial phone numbers or just go offhook without dialing • Future development includes the ability to completely control your Confer III over the Web with “ConferWeb”. • If you have a special application, feel free to call one of our sales representatives at (972) 680-0700.