Step one:
Vacuum forming is an industrial process which is used to shape plastic products. It is most commonly seen in blister packaging and some bottle productions.

Step one:
E N D
Presentation Transcript
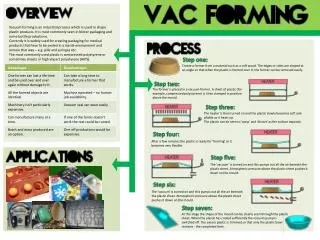
Vacuum forming is an industrial process which is used to shape plastic products. It is most commonly seen in blister packaging and some bottle productions. Currently it is widely used for creating packaging for medical products that have to be sealed in a sterile environment and remain that way – e.g. pills and syringes etc. The most commonly used plastic is compressed polystyrene or sometimes sheets or high impact polystyrene (HIPS). Step one: Create a former from a material such as a soft wood. The edges or sides are shaped at an angle so that when the plastic is formed over it, the former can be removed easily. Step two: The former is placed in a vacuum former. A sheet of plastic (for example, compressed polystyrene) is then clamped in position above the mould. Step three: The heater is then turned on and the plastic slowly becomes soft and pliable as it heats up. The plastic can be seen to 'warp' and 'distort' as the surface expands. Step four: After a few minutes the plastic is ready for ‘forming’ as it becomes very flexible. Step five: The 'vacuum' is turned on and this pumps out all the air beneath the plastic sheet. Atmospheric pressure above the plastic sheet pushes it down on the mould. Step six: The 'vacuum' is turned on and this pumps out all the air beneath the plastic sheet. Atmospheric pressure above the plastic sheet pushes it down on the mould. Step seven: At this stage the shape of the mould can be clearly seen through the plastic sheet. When the plastic has cooled sufficiently the vacuum pump is switched off. The excess plastic is trimmed so that only the plastic bowl remains - the completed item.
Put the process cards in the correct order to show how you would create a vac formed product. You could discuss this with the person sat next to you. Use the plan we will have created in lesson and your finished “Vac Forming” presentation sheets to attempt to answer the 20 mark question section. Due: 6th November (after half term)
Why would the heat be applied before the vacuum? • Answer: • What does pliable mean? (2 marks) • Answer: • Why does polystyrene become malleable at this temperature? • Answer: The plastic needs to be pliable before the vacuum is applied so it will shape around the former. Pliable means easy to bend or shape, in this case, with the addition of heat. Polystyrene is a thermoplastic – thermoplastics become pliable at certain temperatures – as they cool they set firm, plastic memory allows them to bounce back.
To understand how to approach “Industrial Practice” questions. • To deepen understanding of how to use vac forming to create new products and how existing products are formed. • You should be able to answer the exam style question: • “Use notes and diagrams to show how the fruit packaging would be vacuum formed.” (9 marks) • You can evaluate where formers have produced lower quality moulds and can adapt them to improve the quality. • You will be creating the former and mould for your bottle using this technique so it’s important you know where the problems and limitations are with the equipment. If you know these you can successfully plan how to get around these.
The relief mould has no cuts or tears and the mould has come away easily from the plastic. • You have adapted the former to create a better mould. • You can set up and operate the vacuum forming machine safely and accurately without further guidance.
You have explained the process step by step in an easy to read way (imagine you are explaining this to Year 7 students). • You have given an overview about how it is currently used and what specific materials are used with it (e.g. PET plastic). • You have weighed up the advantages and disadvantages of manufacturing with this method. • You have the three subtitles; overview, applications and process. • You have included some images of it’s current applications. • Your presentation board is neat and looks interesting.
(1 – 3 marks) – explain first three steps with basic picture. (4 – 6 marks) – explain adding heat and how vacuum works. (7 – 9 marks) – explain the particular type of cheese used in manufacture. In your pairs create a short plan showing how you will attempt to answer the question: “Use notes and diagrams to show how the fruit packaging would be vacuum formed.” (9 marks) You should plan how you will achieve each mark and think about which sections should be written and which should be diagrams. Reminder: Use the plan we will have created in lesson and your finished “Vac Forming” presentation sheets to attempt to answer the 20 mark question section. Due: 6th November (after half term)